innBrooklyn

Beet Gnocchi. Enough Said.


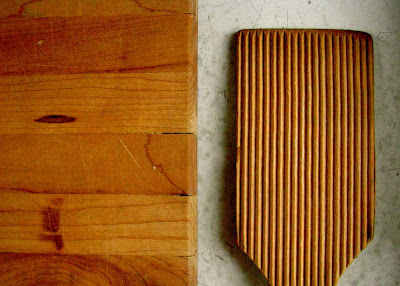
This is only the second time I have ever made gnocchi. Or eaten gnocchi. A few years ago, I was watching Mario Batali make it on the Fine Living Network, and I had a revelation. He made it look so easy! Like I should just be able to do it tonight, while conversing with friends over a glass of wine. I also discovered during that Molto Mario episode, that I personally owned a gnocchi paddle. My Mom had given me a bunch of kitchen tools, probably from an auction or rummage, and among them was this paddle. When I had limited wooden utensils, I tried using it to stir and couldn't fathom why it would have grooves. It seemed like the worst idea ever for a kitchen implement. It spent a long, lonely decade in the bottom of a drawer before, fortuitously, Mario showed me it's intended use, and thanks to his enthusiasm, I went right from the couch to the kitchen and made my batch. After all, if I had this neglected piece of kitchen software, I may as well put it immediately to good use.


InnBrooklyn's Veg of the Month Club selection this month is beets, and I felt a particular inclination to outdo myself, since it was my beet pasta experiment that first attracted them to CakeWalk as readers and now to me personally as "froggers" (friends+bloggers). I actually was acquainted with them first through a connection at flickr, and ever since I feel like I'm chatting with old friends when we write (or now Skype) on a fairly regular basis. I feel renewed in my creativity since joining forces with them for LIFEyear, our 365 photography project, and am really happy that I was able to forge such a meaningful connection with people so far away, that I would never have met if it weren't for the Internet!

I also personally wanted to try making gnocchi again; my first attempt with plain russet potato was alright, but far from perfect. Since I really had no way of knowing, I made the dumplings, and then let them sit covered at room temperature for several hours until I boiled them. I've learned since, that if you don't intend to boil them right away, you should freeze them in a single layer on a sheet pan, and then pull them directly from the freezer and introduce them to the boiling water when needed. I'd say I'm still a ways off from perfect gnocchi, but at least I'm having fun and gleaning a bit of extra nutrition along the way.


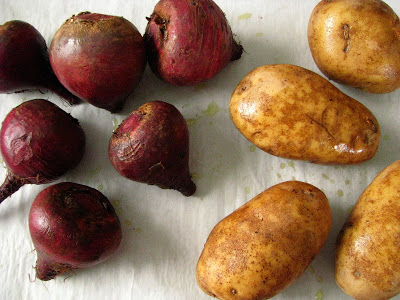
I used Mario Batali's recipe for gnocchi, but used 1 part beet to 2 parts russet potato. I also opted for roasting the beets and potatoes, to preserve the color in the beets - boiling tends to wash them out.

To roast the beets and potatoes, preheat oven to 375, lightly coat them (unpeeled) with olive oil, and let them stay in there until a piercing knife yields very little resistance. The beets will likely take longer, so start them 20 minutes before adding the potatoes. When they are done, cool them just enough so that you don't burn yourself when handling them, and then scrape off the skins. You'll want to rice them (or finely shred them) when they are still warm, but more on that below.

Beet Gnocchi (adapted from Mario Batali) with Brown Butter and Crispy Lemon Thyme

makes 4 main courses or 8 side portions, but I suspect this will vary with your state of hunger.
  • 1 lb. beets, roasted
  • 2 lbs. russet potato, roasted
  • 2 cups, AP flour (plus additional for rolling)
  • 1 egg
  • pinch of salt
When potatoes are roasted and peeled, use a ricer to finely grate them onto a clean sheet pan. (I have no ricer, but one is now on my list! I rub them through a fine stainless sieve which works well.) If you have a ricer, it may be strong enough to rice the beets, but since I don't, I cut them into large chunks and processed them finely in my food pro. Then, I added them on top of the potatoes, and let them cool slightly.

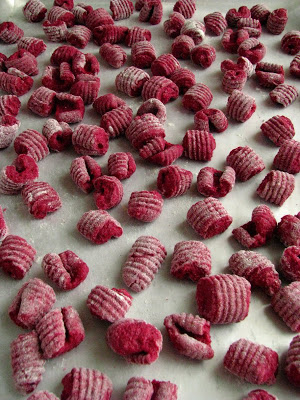
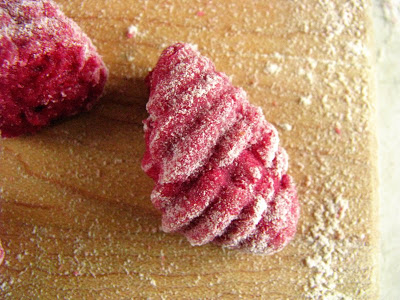
Mound the beets and potatoes together to make a brilliant pink mass, sprinkle liberally with about a cup of the flour and a pinch of salt, then make a well in the center. Crack in the egg, and beat well, adding more of the flour to the egg and then mixing it in well with the egg. When you have a dough forming, knead it by hand gently into a ball, continuing to add flour as needed, until you have a relatively smooth ball that isn't too sticky.

Have two sheet pans lined with wax paper or parchment paper ready. Cut off small portions, and roll into long "snakes" a little larger than the diameter of your thumb. Use plenty of flour (I found that I actually kneaded more flour into the small portions prior to rolling them out into snakes), to keep them from sticking. Using a sharp knife, cut them into 1 inch portions.

When you have a "snake's" worth of dumplings, roll them across the gnocchi paddle or the tines of a fork. (A good explanation of how to do this: here.) Dust the resting gnocchi with flour if they are sticky, and keep them in a single layer. If you are making them for later, freeze in a single layer, then transfer them to a jar or zip top bag and store in the freezer.

Bring a kettle of water to a boil, and add a bit of salt - as if you were cooking pasta. When the water is at a rolling boil, add gnocchi. (Mario has a bowl of ice water standing nearby to stop them from cooking as you remove them. I will remember to do this step next time! Mine were a touch sticky since I didn't.) When gnocchi floats to the top, remove them from the boiling water using a slotted spoon and plunge them into the ice bath. Let them sit there for a minute, and then drain. Mario tosses them with oil to hold them, but I did not since I made browned butter.

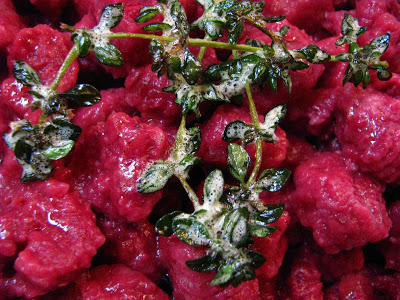
Browned Butter with Lemon Thyme
  • 3 T. unsalted butter
  • 3 or 4 sprigs of lemon thyme
In a small saucepan, heat butter over medium heat until it begins to foam. Add thyme (it will crackle and spit at you), and continue to heat until the butter turns brown. Watch it carefully or it will burn. Spoon the butter over the finished gnocchi, and garnish with crispy thyme.


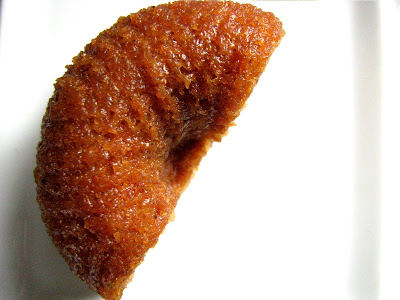
I wasn't sure what to expect when I took the first bite of hot beet gnocchi. Since I had neglected to do an ice bath, they were a bit sticky... Happily, they tasted terrific with a deep, beet-y flavor, and a very dumpling-esque texture. I had a gnocchi expert for dinner, since Sasa grew up eating it, and she told me that the texture was good, so I'm taking her word on it. I really don't think I have ever eaten gnocchi anywhere, so I have some more homework and experimentation to do. If anyone has a good recommend of any Milwaukee area restaurants making exceptional gnocchi, please let me know so I can go and eat it! I feel like I should have added more flour to my dough, but found myself likening it to egg pasta dough, which definitely can not be an accurate comparison.


Since I heeded Ina Garten's advice of never cooking anything you have never cooked before when you are having company for dinner, I had a fresh loaf of bread and a big slow cooker full of shredded Italian Beef ready before I even brought my kettle to a boil... and Sasa told me that in Croatia, they always had gnocchi with a beef sauce kind of like a goulash.

She easily convinced me to experiment with a portion of plain, un-butter-sauced gnocchi. We heated a pan over medium heat and added a tablespoon or so of leftover browned butter. Then, I made a roux by adding an equal amount of flour and stirring it for about a minute. I added maybe a half of a cup, all told, of warm water, and continued stirring with Sasa adding salt, aleppo pepper and finally, a good amount of sweet smoked Spanish paprika. Lastly we stirred in a heavy cupful of shredded beef and let it turn into a sauce:


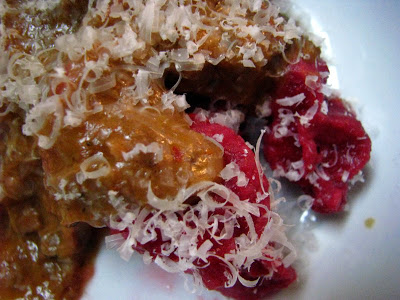
I grabbed my camera, and she told me that maybe it wasn't the most photogenic thing. I agreed, but was it tasty! We all mixed everything together as we ate, grating Parmesan cheese over our whole plates, and devouring all but about 11 little gnocchi. It was suspiciously quiet during dinner, so I know that it is certainly a meal that I would make again, and hopefully soon, since I only cooked half the amount of beet gnocchi that I froze.

I may be hesitant to join more organized groups, but I have to say I really like participating on a whim to "round-ups" such as the Veg of the Month Club, and Buttermilk Party Cake's Elevenses sweets. I do think that it forces me to be creative in my kitchen, if for no one else, then for myself. My Husband detests beets, and they are one of my favorite things, so I was very happy to have fellow beet lovers to enjoy my hard work with. If you love beets and have a beet recipe you want to share with others, consider submitting it to innBrooklyn before May 9, 2010. I know I'll be eagerly searching their results on the 10th for my next beet adventure!

Veg of the Month Club: Ramps (A Wisconsin Pie)


Since innBrooklyn announced their new seasonal cooking feature, Veg of the Month Club, I've been excited. I'm reminded of my favorite college professor, an artist who staunchly believed that the more restrictions you had on a theme, the more creative you would be forced to become. I find this is true so many times, especially in the kitchen. There are so many things I'd like to try, and if I just get a nudge in the right direction, I am sometimes all the better off for it.

That was certainly the case with this Veg of the Month Club pick: Green or Spring Garlics. I have to say while I've eaten ramps, the wild growing, leek-like Spring varietal, I never cooked with them myself. Laura gave me a pint of pickled ramps one year, and that was a particular favorite! Our Winter Farmer's Market has closed, and I was unsure where to turn in the city for a few of these delicacies. I was tipped by Lo that Outpost had them at the State Street location, so we took a drive out to Wauwatosa to pick up a small bunch.

After thoroughly documenting them photographically, I tasted the lovely looking greens. I really was shocked with their mild garlic flavor, and was plotting something to make the best use of their tenderness...

As I collected my ingredients, I knew I was going to aim for a quiche (or Pie, as we Wisconsinites - or at least I - like to call them). I figured since I had wild Wisconsin ramps, why not challenge myself to a fully Wisconsin Pie? I do try to eat local and preserve what I can from other Wisconsin growers (including some of the bounty grown from my own Parent's ample garden), but don't ever really set out using ingredients that are fully from my state. My result was astounding, in my ever so humble opinion, and I can see this pie becoming a Springtime favorite.


To make less work of it, I made the crust first thing yesterday morning. Then I roasted the ramp bulbs and "baked" the bacon. To roast ramps, drizzle them with olive oil, salt and pepper and put them in a 425 degree oven for 15-20 minutes until they are soft and lightly golden. You can do the same for the bacon, but use a 400 degree oven, and watch it so it doesn't get too dark. I like to use a rack over a baking sheet, but since it was so lean, I probably could have just let it go right on the baking sheet. My beautiful bacon came from the same pig that the rest of my pork stores are from, grown on an Amish farm just down the road from my Parent's house. It was very nearly like ham, so lean and nicely flavored. I think this may be the first of the bacon I've made from the hog, and let's just say until now I thought that Comet/Honeypie had the best bacon...

I swear I did not shellac this bacon.

Wisconsin Pie could be adapted to use your local ingredients, and that is one of the most beautiful things about a quiche, chief on my list however is that they are good any way you choose to serve them: hot, room temperature, or cold. One of the first cookbooks that I ever purchased was Mollie Katzen's The Enchanted Broccoli Forest. In it, she gives a "formula" for quiche that in the years since, I've used frequently. It is a very general and proportional recipe, and includes some suggestions for variations that lend themselves to great or small experimentation.

For my pie, I also decided also to use a completely unusual crust, one I've never used before: Oat Crust. It's not often, my friends, that I adapt a recipe to include more fat, but that is what I did for this one. Originally from Cooking Light, it only used 2 tablespoons of butter, and that was not enough to hold it together. (I imagined their test kitchen working with this recipe, and trying to be painfully patient in their attempts to get it right!) I love the texture of oats in most things, and this crust was no exception. It also gave me the unexpected assistance of soaking up some of the cheese and egg custard of the pie. I didn't actually notice this until I ate a piece for lunch today and could see how custard-y the bottom of the pie had become. It does add to the richness of this regal dish, and I will keep it as a quiche (or pie) base for years to come. (I will also note that the oats I used may or may not have been from Wisconsin. My Mom traded me many quarts of rolled oats - she seals them in canning jars after purchasing 50 pounds of oats from her co-op.)


Wisconsin Pie (a.k.a. Ramp Quiche)

9 in. pie crust of your choice, unbaked (Oat Crust recipe below)
4 oz. mild Swiss cheese, grated (Country Connections Sweet Amish Swiss Cheese)
2 oz. crispy, baked bacon (5-6 slices, but you can use any leftover for garnish - or eating while you wait)
1 bunch roasted ramp bulbs, sliced (there were 7 in my bunch)
Strips of ramp leaves, cut in half or thirds
4 eggs (Amish raised, farm near my Parent's house)
1/2 c. sour cream (my homemade - from Crystal Ball Farms milk)
1 c. buttermilk (my homemade - also Crystal Ball milk)

Preheat oven to 375 degrees. Into pie crust, layer cheese, bacon, ramps, and latticed ramp leaves. Whisk together eggs, sour cream and buttermilk and pour over the top. Dust with black pepper (but omit any salt until you taste it, I didn't need to add any due to the bacon and cheese). Bake for 35-40 minutes until the top is puffed and lightly browned around the edges, and a knife poked into the center comes out clean. Let stand out of the oven for at least 20 minutes if you can help it. The longer you let it sit, the easier it is to get neat slices.

Oat Crust

1 cup rolled oats
1/3 c. oat bran
4 T. (half a stick) cold butter, cut into cubes
3-4 T. ice water

Combine oats, oat bran and butter (and a pinch of salt if you like) in a food pro, and pulse to combine into a homogenized "coarse pebble" mixture. The rolled oats will not be fully processed to a flour state. Add ice water and continue pulsing until the dough holds together when pinched, adding a bit more water if needed. (Since oats are gluten free, you don't have to worry too much about over processing...). Gather dough into a ball (I like to dump it into a plastic bag, and form it into a ball and then a disc this way), and roll out between two sheets of waxed paper.

Lightly grease the bottom and sides of a 9 inch pie plate with butter (a bit of insurance against sticking), remove the top sheet of waxed paper, and carefully use the bottom wax paper to help you fit the crust into the pie plate. Fill and bake! I'd bet this crust would also be good pre-baked and filled with a custard or pudding...but it may be a little temperamental since it is a bit on the fragile side.


I was fortunate to have Sasa for my Pie dinner, since my Husband is not crazy about this kind of thing... but I do have a feeling if he would have had some, I may have won him over! It was so rich and delicious, I can't imagine anyone tasting it and then disliking it. It had a quiet garlic base, and the bits of bacon were a perfect thing to include to highlight them, though I guess I would be hard pressed to find something that bacon didn't improve.

Because I was so proud of my homemade sour cream, I made Sasa try a bit on the side. A subsequent serving then had to be served with it directly on top...


And wouldn't you know that the two of us ate nearly a whole pie? There were only 2 pieces left, one of which was eaten for lunch today. We just couldn't stop. It was that good.

So many times, restaurant food leaves me so full and heavy. Though this pie contained more rich ingredients than I ever usually use in one place and at one time, it somehow translated as light. Perhaps it was the spring essence of the ramp? Perhaps it was chatting over the slabs of pie for a couple of hours? Either way, I am proud of my state and her ability to healthily produce for us who love to eat and cook, as I'm certain so many others are proud of theirs.

If you have a spring garlic recipe, why not consider sending it over to innBrooklyn for the Veg of the Month Club? There are still a few days left, if you need to be properly "nudged" into making a recipe. Sometimes, that is the best way to cook!

Asparagus Pizza (with Lahey crust, of course...)


Yesterday, I read that innBrooklyn was starting a feature called "The Virtual Veg of the Month", in which they are are looking for seasonal vegetable submissions for photographs and recipes. Asparagus is first on the list, and fortunately for me, I had some on hand.

It seems like spring has been on fast forward this year in my neck of the woods. In less than 24 hours, the Maple tree out front has budded out completely, and the Forsythia in the back is showing off his bright yellow. Both are clear signs that this early warm spell indeed signals the end of the cold. I don't know about other cold-dwellers, but I almost go into denial when the weather warms up - forgetting that I don't need to grab any of my growing knitwear stash, or bundle up the Boy-O when we venture out of doors.

When I read about innBrooklyn's challenge, it made me more than happy to realize that asparagus season is finally here after all, and that I had a challenge to attend to. Moments after reading, I googled "asparagus pizza", since I knew I wanted to make a pizza today. I like to have a jumping off point, but this is dangerous, since it does lead to link saving most of the time. Fortunately for me, I ran into another amazing blog: A Chow Life.

Not only is this a really lovely blog, full of amazing photography and effortless writings, here was an asparagus pizza, exactly as I could imagine one to be. Needless to say, RedMenace instantly gained a follower, and I knew that I would have no chance at making my pizza look as wonderful as hers! But that is OK with me, since there is a lot to learn from viewing beautiful photographs, and there are many, many of them there to choose from.


While A Chow Life photos of asparagus pizza are ethereal and light, mine remind me of an abstract Pollock's - hard and vivid. I know I'm starting to take myself too seriously, when upon waking to a dark, thunderstorming sky this morning, my first thoughts were "how am I going to get great photos of my pizza this evening?"...


While at the moment, photography takes a back seat to my learning of Spanish, I'm more than content to focus still of the making of a pizza. And the eating of a pizza, since this one was really delicious and used up some Easter leftovers. It was actually one of two pizzas, since I had unexpected company from Frankee and her two girls. Let me also note that if you happen to have some leftover frozen meatballs in your freezer, they too make a delicious pizza...

The beauty of pizza is always that you can use as much of each ingredient you like, however, I will note the amounts I used below.

Asparagus, Ham and Roasted Red Pepper Pizza (on Lahey Crust)
  • 1/2 lb. asparagus, blanched in boiling water for 2 minutes and plunged into ice water. (Then carefully slice each in half lengthwise. I used extra thin asparagus, if you use thicker, you may need to boil for an additional minute or so.)
  • 1/2 medium yellow onion, sliced as thinly as you are able
  • 1 1/2 roasted red peppers, sliced into strips (I had some in my freezer from last fall, but you can also use jarred or roast them yourself.)
  • 1 c. diced ham (prosciutto or Serrano ham would also be great substitutions)
  • grated cheese, 1 cup or more to your taste. I used a Wisconsin Munster (made just down the road from my Parents' house), and a little mild provolone, since I was using up what was in the fridge.
  • drizzle with olive oil and sprinkle liberally with black (preferably Tellecherry) pepper.
Preheat oven to 500 degrees.

Arrange your toppings, except for the cheese, on the pizza dough (recipe below). Bake for 10-12 minutes until the crust begins to look brown along the edges, and center appears cooked. Remove from oven, and sprinkle with cheese. Bake an additional 5-8 minutes until cheese is melted and browned to your liking.

Lahey Pizza Dough
You have to buy this book, since it is the greatest! He includes the weight measurements that I use in addition to the conventional measurements listed below.
(makes 2 half sheet pans, use a half recipe for a single pizza.)
  • 3 3/4 c. bread flour
  • 2 1/2 t. active dry yeast
  • 3/4 t. salt
  • 3/4 t. sugar
  • 1 1/3 c. room temperature water
Stir flour, yeast, salt and sugar together in a medium bowl. Add water and mix until blended. Cover the bowl with a towel, and let rest at room temperature until dough has more than doubled in volume, about 2 hours.

Scrape the dough from the bowl out onto a floured surface and form it into a rough ball. Divide it in two pieces, place them apart from each other, and cover with a damp towel to rest for 30 minutes.

When oven is hot and you are ready for making the pizza, liberally oil the pans. Place a ball of dough in the center of the pan, moist side down. Pull, press and stretch the dough to the size of the pan. It will cover the entire thing. It is now ready to top!


You, too, can join in the fun of the Veg of the Month Club! I love a challenge, especially, since sometimes I get sidetracked by what I want to make and not by what needs to be used up. The freezer is still very, very full and countless meals could be produced here without leaving for a store. Augmented by seasonal veg, I think I'll see what I can come up with in the next few weeks as a way to make space in my freezer and make room for strawberries. Last year, I froze 15 pounds in quart jars, and that takes up some space! I'd also wager that I could eat pizza, especially with the Lahey crust, every day for at least a week. And I never thought I'd say this, but I could almost do it without the cheese! You know then for sure that Lahey crust must be a great recipe.

Recent Carbohydrate Consumption

I am one of those people who gets very easily inspired. Looking even briefly at new websites is compellingly dangerous, since I immediately mentally catalogue what I have to make and in which order. (I totally identify with msmeanie who mentioned in her post today about mentally ranking recipes...) Of course, new websites turn into ones I follow, and a vicious cycle of too many carbohydrates inevitably ensue. But sometimes, a girl just needs some cake.


Fortunately, or unfortunately depending on the point of view, when I was cakeless on Sunday night, I plucked a Mostly Foodstuffs Majestic and Moist Honey Cake from the deep freeze. When I made these, I froze 2 petite bundts, and figured I'd eat them in the future. At the time I didn't know that future meant 5 months later. It was every bit as majestic and moist as the day it ventured into the freezer, and not a bit affected by such a long slumber. A half bundt per day, is all one really needs in life, methinks.

I have run into a number of new blogs that I really enjoy lately; one that is thankfully recipe-less is Horno Magico. I'm hooked, partly because this list of foods eaten is making me aspire to be virtuous, partly because I'm reminded of how I should be drinking more tea and less coffee, and mostly because it is peppered with amazing and simple photographs of eaten journeys.

Another is Chocolate Chip Trips, in which I saw these muffins, which I have patiently had in the back of my mind since I first saw them, and in which a reward was finally had after I remembered to pick up some white chocolate chips...


Unfortunately, msmeanie posts amazing recipes, which could only be a bad thing for someone who can easily be addicted to making more than can be consumed. On a positive note, she does tend to have healthier recipes, like this cauliflower, which is going to be made sometime very soon, since I also remembered to buy a cauliflower when I got the white chocolate chips...

These banana muffins with walnuts, dried cranberries and white chocolate are really amazing - especially just out of the oven. I did use quite a bit less sugar, and think that I could reduce it further when I make them again, since believe it or not, I'm getting used to eating less sugar. I will say that when you have to wonder if you are eating a cupcake or a muffin, you know you have hit a happy conundrum.


I had planned to make a couple different types of cupcakes today to equal the 3 dozen I needed, and unfortunately, only got to make one type: these amazing Chocolate Cinnamon Devil's Food cupcakes with Vanilla Bean Buttercream. As if the name doesn't say it all, these cupcakes posted by La Spicy Vita are going to be a new staple here at Casa Rcakewalk. They are so dense and almost brownielike in texture, they will make you weak at the knees. The only downside, is that the recipe was true to its original yield and I got 37 cupcakes... That's right, one blessed leftover cupcake all for yours truly.


going, going, gone...

The only downside I could see, was that they prevented me from making these lemon beauties from Chocolate and Whine. I have to find an excuse to make them soon, because "ugly yellow sprinkles" or not, I think they look fantastic.

Thanks to Talia's suggestion, I downloaded Feedly for all my blog browsing organizational needs... and I'm glad I did, since it shaves many, many minutes off fumbling about looking for new posts. I feel a bit more liberated to bookmark a few new blogs and keep tabs on more amazing people in their amazing kitchens. Next, I'll have to reexamine my own blog's links lists and update.

Meanwhile, I have some carbohydrates to keep me company, and a slew of recipes to try before bookmarking more. It's the double edged knife, this blogging world... never a moment's rest between finding that next thing that MUST be made. But at least it is all a quite friendly competition in the battle of raging foodies, and one I'm not likely to give up on anytime soon.


UPDATE: April 11th, 2010

I made the Devil's Food Cupcakes R1's housewarming party yesterday and added chiles to the frosting. I considered adding some spice right to the batter, but couldn't quite commit to a level of spiciness. But, adding chiles to the butter-heavy frosting proved to be the right move, and has the added bonus of better control over the final level of heat. The fat of the butter also tempers the raw heat of the cayenne. I aimed for the middle of the road, and added (and I'm guessing here) about a tablespoon of Aleppo pepper and maybe a scant teaspoon of cayenne to the buttercream recipe that La Spicy Vita posted above. The resulting cupcake was addicting, and many in the small party indulged in more than one (or several, as was also the case). Another benefit is that the recipe makes 3 dozen. I know R1 ate one for her breakfast this morning, and I confess that one was also mine.

It is also worth noting that the original recipe from Epicurious uses an almond extract spiked frosting. Chocolate with almond extract is one of my favorite combinations, and no doubt it is worth the 6 (yes, 6!) sticks of butter. Maybe next time, I'll give this one a shot.

It's Not Too Late for a Very Important Date...

I think dates are some of my favorites in the vast world of dried fruit. While figs are charming, there are seeds to contend with. While raisins are workhorses, especially when soaked to proper plumpness in either liquor or boiling water, they can err on the side of sweet. Dates, however, are perfectly palatable in sweetness and texture when properly stored. In either sweet or savory application, there is no better candidate for versatility either. Tagines with lamb and dates are perfection in my mind, and these cookies that I'm about to share with you are now officially on the Food Obsessions list in the sweet category.

One of my favorite new blogs is innBrooklyn, which is a design/food/green living/technology/knitting blog run by Noerah and Talia. They began late in December, and have a number of good ideas - and all of it makes for a unique experience each time you visit. I couldn't wait to try these Date Biscuits that were posted on Jan. 30th, but I made myself wait judiciously until the very last piece of my chocolate cake was gone. For those of you keeping track, I actually kept a chocolate cake on my counter for 8 days. Boy-O and I were the only eaters, and though it wasn't my favorite recipe, it got the job done in the dessert department.

Now this will tell you something, since normally, I would have made the date biscuits anyway and then tried not to eat two desserts simultaneously. I'm well on the road to reducing my consumption by just simply making less food. This is hard for me! I love to bake especially, and to not turn on my oven is excruciatingly hard. But not only did the day finally come that my cake was gone, in true innBrooklyn green living fashion, I didn't even need to turn on my oven to make these amazing "cookies".


This recipe melts butter stovetop, and adds the remaining ingredients without heat involved: a no-bake method. I'll let you look over at the link for the proper recipe, but will note that it calls for British Marie Biscuits, which you may be able to find in a specialty foods store, but are very closely related to Maria cookies, which are widely available in the Hispanic food section of many stores. I weighed a package on my digital scale, and removed just one cookie to get the 200 grams called for in the recipe. Bet you can guess where that one went...

At this point, I'd have to say that SOMEone NEEDS to make a pie filling based on this date/butter/cocoa powder filling! My first choice would be none other than Gina, the Goddess of Pie. If the GOP can't find a way to turn this recipe into the most delicious pie ever made, I'd be surprised. The only other alteration I made to the recipe was to let the date mixture cook just slightly after I added the egg to make sure it got hot enough, since I melted my butter at a pretty low temperature. After adding the hot mixture to the Maria cookies, I found it near impossible to stop "sampling", hence my dreams of a forthcoming pie.

We had pretty snow globe snow most of the day yesterday, and as I used the remaining afternoon light to photograph these roly morsels, I thought how perfect to make such snowy looking things on a day like this. Promptly after photography, the eating ensued. Bite sized things are always hard to resist, and these are deservedly no exception. Boy-O loved them, and I had to be a good example and not eat them all in one sitting. My confession is that they are probably almost half gone, and that just thinking about them makes me want to go and sneak another. But like I said to Lo earlier, they can be nearly be construed as healthy, what with all of the fiber packed in there svelte, round selves, so why not?