Sally Fallon

On The Addictive Nature of Breakfast Cereal.

I live a moderate life. I usually insist upon whole, from scratch foods (especially in my own home), but I will stop for an ice cream cone once in a while. I will eat greasy pizza that I know has dough conditioners, and I will eat canned "baked" beans - but those are all occasional indulgences, part of the philosophy I grew up with to "do what we can, and trust God with the rest".

I also read a whole lot about health and diet, but am slow to jump on the latest trend. I never was sold on Atkins, The Zone, South Beach or other low carb or carb-free diets. I can, however, see valid points to "real food" diets such as GAPS, Paleo and what is usually referred to as the NT or Nourishing Traditions diet. Nourishing Traditions ("The Cookbook that Challenges Politically Correct Nutrition and the Diet Dictocrats") is a book I've had on the shelf for several years now. I got my copy after running into an old boyfriend's parents in the health food store. His mom saw the canola oil in my cart and said innocently, "You are still eating canola oil?" Within the month, a copy of that book found its way from her generous zeal to my hands. I opened it and scoffed at the shear ridiculousness of the length of it, the unbelievable attention to detail, the amount of information also crammed into into the margins, and the simplicity of the numerous recipes.

To that point, I had never heard that canola oil may not be good for you, that whole milk and full fat dairy were not actually the things that clogged arteries were made of. I couldn't be bothered with crazy, time consuming diet ideas when I had a 2 year old kid to chase around. But little by little I read that book, and found supporting information in many other places around the Internet. Gradually, I became one of the crazy people who actually think that what we put into our bodies has a huge outcome on our general health - from skin and hair to dental and digestion. My moderate lifestyle was altered even more by gradually cutting back on sugar and caffeine, and especially changing the way I think about whole grains.

In particular, I no longer buy breakfast cereal. What? But breakfast cereal is the staple of my generation, the stuff we all learned to get ourselves in the mornings before school. I'll bet the vast majority of Americans still choose a box from a shelf to validate themselves as a "breakfast is the most important meal of the day" type. Breakfast cereal is still my Kiddo's most favorite thing, and given the opportunity, he will eat huge amounts of it and request it for every meal. That alone could be why I just stopped buying it. Now I get him a single box for special occasions and limit him to one smallish bowl per sitting. Even though boxes haven't been entering my house for at least 2 years now, he still loves the stuff - and I'll admit that I still occasionally long for the crunchy, quick staple too.

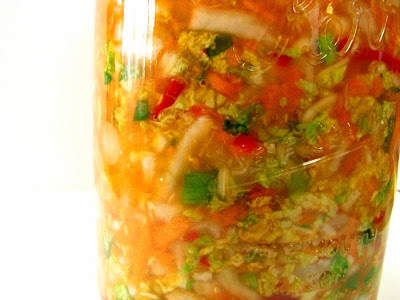
But why are the health food nuts like me demonizing breakfast cereal? It all boils down to processing. Any quick Google search will show you in a number of places that all grains contain phytic acid, a naturally occurring acid that prevents the minerals in grain from absorption into you body. You can unlock the nutrition in whole grain by giving it the time to soak in acidulated liquid (like buttermilk, yogurt, or whey), or by first sprouting the grain and then dehydrating it and grinding it into flour.

Just typing that last sentence in seems like a lot of work, but consider how fast paced our lives are now. Traditional foods dictate traditional time, and when you have no t.v. show or Facebook to get to, gobs of time suddenly appear. This is the opening paragraph of Sally Fallon's Nourishing Traditions book:
Technology is a generous benefactor. To those who have wisely used his gifts, he has bestowed freedom from drudgery; freedom to travel; freedom from the discomforts of cold, heat and dirt; and freedom from ignorance, boredom and oppression. But father technology has not brought us freedom from disease. Chronic illness in industrialized nations has reached epic proportions because we have been dazzled by his stepchildren - fast foods, fractionated foods, convenience foods, packaged foods, fake foods, embalmed foods, ersatz foods - all the bright baubles that fill up the shelves at our grocery stores, convenience markets, vending machines and even health food stores.
Breakfast cereal is the definition of fractionated food: it is made from grain that is treated harshly with heat and pressure, coatings to keep it crunchy and artificial colors and flavors. Even the added vitamins are from suspicious sources - most of which are not even viable after the heat and pressure treatments. Grains are reduced to liquid form and extruded into shapes, and as Fallon mentions in this article, it costs pennies to produce and sells for $4-$5 a box, making it one of the highest profit margins in the food industry. Skeptical as I can be about the latest health crazes and claims, it seems fairly logical to me that something that makes so much money for so many involved is hiding and harboring all kinds of things that consumers don't want to know about. (Like the recent reveal of GMO's in Kashi...)

real breakfast cereal

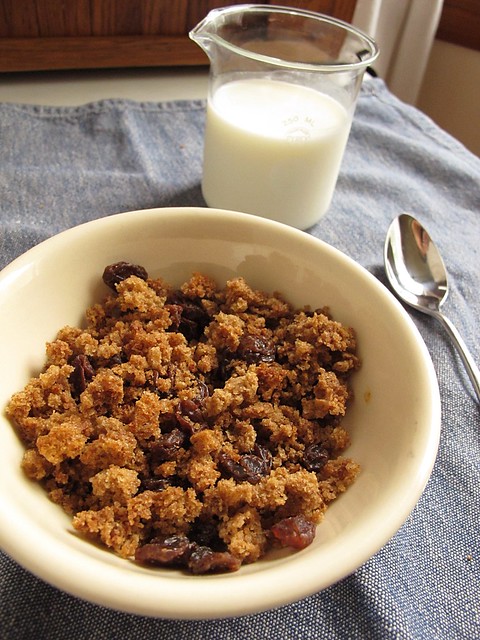
But enough on boxes of processed cereal. We can eat real breakfasts! We can even eat real breakfast cereal once again. I just finished making a big batch of this cereal I recently read about on The Healthy Home Economist. It's good. It's really good. And even the Kiddo liked it.

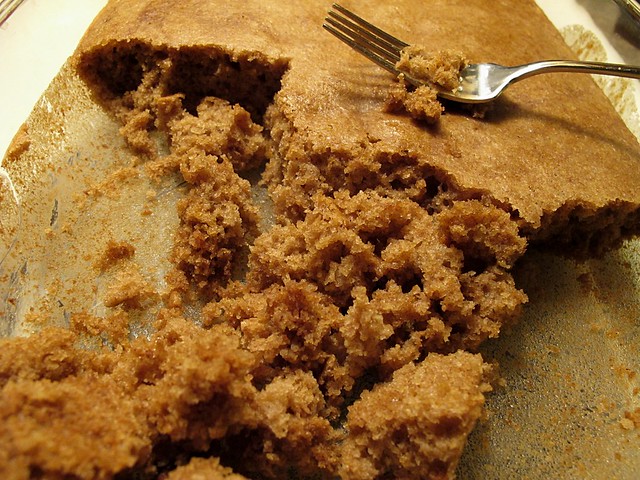
The best thing about this recipe is that it is basically a cake that is crumbled up and dehydrated. Not only can you just enjoy it as a cake the possibilities are endless for cereal flavor variations. I'm thinking even a chocolate version could easily appear sometime in the near future. I dehydrated this because I have a dehydrator, but Sarah bakes hers at a low temperature until crisp and dry.

Real Cold Breakfast Cereal (the Healthy Home Economist)

(my yield was 2 half gallon jars of cereal)
  • 6 c. freshly ground organic flour (I used about 3 cups each of soft wheat and spelt)
  • 3 T. whey added to enough water to make up 3 cups
  • 3/4 c. coconut oil, melted prior to measuring
  • 1 c. maple syrup
  • 1 t. maple extract
  • 1 t. vanilla extract
  • 1/2 t. salt
  • 1 T. cinnamon
  • 2 t. baking soda

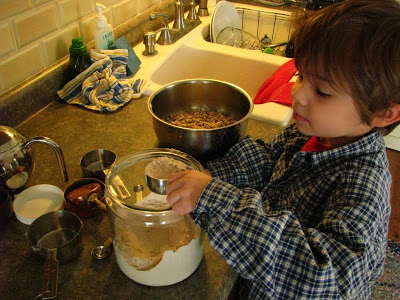
In a very large bowl, mix the flour with the whey/water until it is smooth and well combined. Cover with a clean towel (I like to also top it with a lid from a large pot to prevent a skin from forming on the top), and let soak at room temperature for 24 hours. (I have read elsewhere that as long as you soak 7 hours or longer, the enzymatic change has taken place in the grain. I let mine soak for about 20 hours.)

After soaking, preheat oven to 350 degrees. Add the rest of the ingredients and stir very well until well mixed. Batter will be very sticky will kind of form a single mass. Divide the batter into 2 9x13 glass pans (no need to grease them, and no need to be exact), and bake for 20-30 minutes until a tester comes out clean.

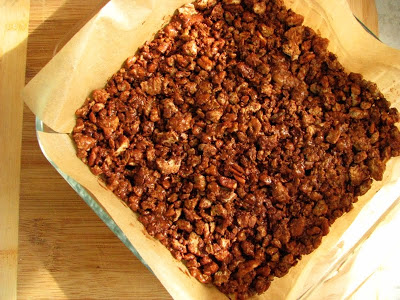
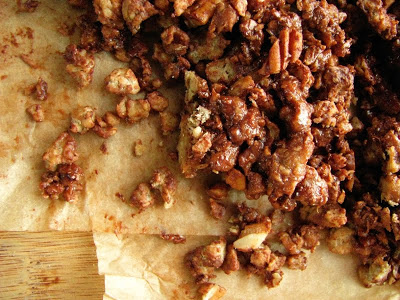
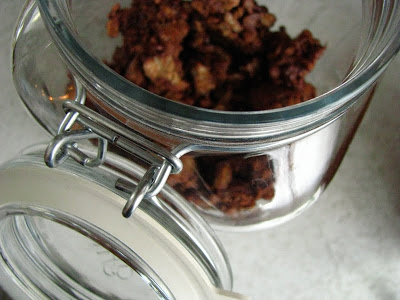
Cool the cakes in their pans, then crumble them into small pieces. Spread onto dehydrator trays and dehydrate at 147 degrees (or as hot as your dehydrator goes) until fully dry and crisp - this was just overnight for me. Time will vary with heat and the size of the cake pieces. When dry, you can crumble the pieces further if you like. Store in glass jars or a zip top bag - it's recommended to store in the fridge, but I have some space so I may pop my jars into the freezer for optimum crunch preservation. I would recommend storing without dried add-ins, and adding them directly to your cereal bowl.

real breakfast cereal

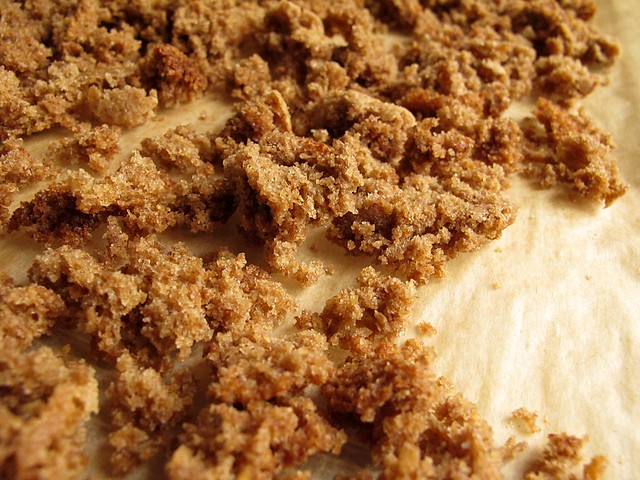
This cereal tastes exactly like a raisin or "All-Bran" type cereal, and was especially great with raisins. I'd recommend storing it out of sight quickly, because it's really easy to keep on munching on it dry. If you eat at a moderate pace, it keeps fairly crunchy in milk too. I'd really like to sneak some ginger into the batter, but may have to settle for a few cubes of crystallized ginger in my own bowl since the Kiddo doesn't share my taste for it.

Also, earmark this recipe as a really great cake in its own right: it reminded me of the soaked and sourdoughized applesauce cake I've made in the past. Add in some raisins and nuts prior to baking, and you're in business! (I may recommend using half the recipe, unless you need 2 9x13 cakes...)

real breakfast cereal

It's easy to want to grab a quick breakfast before running out to start our harried, modern days, so it's easy to see just why marketed boxes invade our homes. My challenge to myself was just not to buy any cereal, and then I was forced to make and eat real food for breakfast. I usually just have a smoothie fortified with chia, but it's definitely more of a challenge to satisfy a child without the aid of the almighty cereal box. But time has passed enough now that we don't miss cereal as frequently as we once did. Now with the revelation of "dehydrated cake as breakfast", the upcoming school year may have one more breakfast option on the menu. I'll take the long waiting times to produce my own convenience food, it's definitely worth it!

Soaked Granola Bars

Of all the things I am reading about the traditional foods diet, soaking grains is probably the most confusing. Not confusing due to the labors involved, but confusing as to the benefits of soaking. I am all for making work for myself, but am I making more work for a reason? Is there actual value to soaking, say, oatmeal in whey inoculated water for a day and then dehydrating it for many hours before using it? On taste alone, I would say yes - since these granola "bars" were superior to any granola I've ever made at home. But as for nutritionally, I would say that for me the jury is still out.


Soaked and Ready Oats.

It is so easy for me to read and believe almost anything written relating to healthy diet. It wasn't hard for me to banish my microwave to the basement (for occasional Husband-usage only) and to commit to using my cast iron pans for almost all stove-top duties. After a while, it wasn't even hard for me to give up canola oil - though that was probably the most difficult given the overwhelming insistence that for years health and diet sources told me was the superior and healthiest oil to use. But giving up non-soaked grain, oatmeal in particular, proves to be the highest hurdle to date.

The flavors that come from soaking and sprouting grains and then grinding them is reward enough for the extra demand for my time and devotion. But soaking oatmeal in whey-water and then drying it... well, that isn't so intoxicating. You need the bit of acid to kick-start the process in things, like oatmeal, that won't sprout. The smell of the dehydrating oats was pleasant enough (I am so lucky that my Mom never got rid of the food dehydrator that we used years ago - it's now proudly perched atop my childhood play table in the basement), but the taste of soaked then dried oats was not so much. Aside from looking rather like dog kibble, it had a certain fermented sourness that I knew I would have a hard time passing over on my picky boys.


A sure way to get this one to try something is to have him help me make it!

Cultures around the world have soaked or fermented grains before consumption for generations. Americans, and our independent and inventive spirits, appear to have successfully removed this extra work from our lives and perhaps that may play a role in some of our collective poor health. Obviously, I don't think just because we have modernized and something has a Whole Grains Seal of Approval that it is going to be healthy - I'm certainly not going to run out and buy General Mills cereals. But sometimes I think it is probably speculation at best. Other cultures are subject to other climates and geographic anomalies that we New World-ers are not. The coconut and palm oils well used by tropical cultures are readily available in those areas, and maybe my northerner ancestry will never do well with them. It's hard to say, but so far, I'm happily using coconut and olive oil most of the time; I am choosing not to worry too much about it.

We do know that the phytic acid present in all grains, nuts and seeds can be reduced greatly by a gentle pre-treatment of either acidulated soaking or sprouting. According to Sally Fallon (who is very well-researched), "untreated phytic acid can combine with calcium, magnesium, copper, iron and especially zinc in the intestinal tract and block their absorption. This is why a diet high in unfermented whole grains may lead to serious mineral deficiencies and bone loss." How about that, Sally Field?

Last week I read this post at Kitchen Stewardship bulleting the differences between soaking and sprouting and the benefits (or disadvantages) of each. It is confusing to know what to do or what is best for human consumption. We all will "live until we die", I suppose, but sometimes I wish I was a more science minded type who could really know and decipher all the dietetic contradictions I come across.

No matter what I have read and the confusion I feel, I still wanted to try this recipe for soaked granola bars from Kitchen Stewardship. I made a half batch using the soaked and ready oats, and let the Boy-O dictate the add-ins: equal parts chocolate chips and coconut. Since the soaked and dehydrated oatmeal is so crunchy, the recipe is better than any other granola I've tried. (I chose the baking method: 10 minutes at 325 degrees.) I couldn't cut true bars from them, but rather have large chunks that are easy to pick up and eat. Because you essentially make a caramel from honey and butter, the chocolate melted - masking all remaining traces of whey flavor from the oats. The final result was a richly satisfying snack that the Boy-O loved, and I felt good about giving him. Since I have the dehydrator now, I will be making more soaked and ready oats.


Soaked and Ready Oats (Kitchen Stewardship)
makes enough for 1/2 batch of Soaked Granola Bars (easily increased)
  • 3 cups rolled oats
  • 1/3 c. whole wheat flour
  • 1 cup water
  • 1 T. whey
Place the oats and wheat flour in a non-reactive bowl. Measure water and add whey to the water, stir to mix. Pour water/whey over oats/flour, and stir well. Let sit for at least 7 hours at room temperature. (I didn't have any standing liquid at all, and didn't need to drain any off. Most of the liquid should be absorbed.)

Spread in a thin layer on a baking sheet lined with a silicone mat or parchment paper. Since I dehydrated, I lined the dehydrator tray with parchment - and dehydrated at 147 degrees for about 12 hours until completely dry. Kitchen Stewardship recommends drying until hard and crispy in a 250 degree oven for 2-4 hours.

When dried and cooled, break into chunks resembling oatmeal size. You can pulse in a blender or food pro, or even break by hand.


Kitchen Stewardship really does have many great recipes, and I love them as a resource for both soaking/sprouting grains and for using sourdough starter. The soaked granola bar recipe is actually from the ebook Katie Kimball wrote called Healthy Snacks to Go. I have never purchased an ebook, and am thinking that this may be my first one. There is something about holding a book in my hands, even though I appreciate the paper-freedom of the computer, especially in the kitchen. (Obviously, since the "M" key and some punctuation near my right hand are sticking on this kitchen netbook... How do you even clean that?)

Meanwhile, I'll likely go on sprouting and soaking a number of things. It is true that the more fermented foods you introduce your taste buds to, the more they will accept and even crave them. And, while I can't see cooking up a bowl of "soaked and ready" oatmeal in the morning, I can see making more of this delicious granola. I may eventually try eating it plain, but likely will need to add some sweetener, maybe maple syrup.
What do you think about sprouting and/or soaking? I am anxious to hear some thoughts from other fermenters and experimenters!


Alone = Quiche.

Quiche. That misunderstood brunch or dinner delicacy that is wrongly accused of being girlie, chic (or chick?) food. Whenever I have the opportunity to make dinner solely for myself, I like to use it to my advantage by making quiche. It's filling, versatile, and uses up whatever needs using up - and it requires just enough work to make me feel like I'm worth the fussing over. Besides, I like eating it straight from the fridge for lunches too.


Most people would serve quiche alongside some kind of green salad, but not me. Since I usually partake alone, I fortify it with whatever veg I can, and chalk it up to a one dish meal - a casserole that is so much more attractive seeing as it comes at me baked into a pie. This leads me to believe I know why quiche has the bad-rap of being girlie food: usually it contains no meat. When my Husband (who was on his way out to a basketball game) saw, and likely smelled, the results of my casual labors coming out of the oven, he said "what! I like quiche" to which I responded "since when?" (that was code for "keep away from my leftovers"). My filling was really of no matter to me tonight. What I was really after was a trial run of Sally Fallon's yogurt dough, made from 100% whole wheat that ferments with yogurt and butter prior to baking.

As with most of these new-to-me nourishments, this yogurt dough did not disappoint. It was actually light and flaky, and as complementary to a savory pie as I could see it being to a sweet one. Most whole wheat baked goods seem dense, but not this pie crust. It held up to the filling without sogginess and the edges browned and crisped up nicely. The flavor had just a nuance of graham cracker, which made me immediately think that the next time I get a taste for chocolate pudding pie, I will most certainly use this crust - though likely I'll add a tablespoon or two of honey to enhance it's nutty sweetness.


Sally Fallon's Yogurt Dough (Sally Fallon, Nourishing Traditions)

I used half amounts to yield 1 pie crust - otherwise, it will make two. (Sally says that the recipe will allow enough for two 10 inch, French style, tart shells - and that it cooks more slowly than doughs made with white flour.)
  • 1 c. plain whole yogurt (I used my homemade, which is made with 2% milk)
  • 1 c. butter (1/2 lb. or 2 sticks), softened
  • 3 1/2 c. whole wheat flour (or she recommends spelt flour)
  • 2 t. sea salt
  • unbleached white flour for rolling out
Cream yogurt and butter together. Blend in flour and salt. Cover and leave in a warmish place for 12-24 hours (I left mine only about 8 since I didn't plan too far in advance).

Sally recommends rolling out on a pastry cloth lightly dusted with flour, but I used a lightly floured wooden board, and had no problem with sticking whatsoever.

She also says that if you are baking for a pre-baked shell, prick the bottom well with a fork and place in a cold oven. Turn heat on to 350, and bake for 20-30 minutes. For the quiche, I filled it and baked in a preheated 375 degree oven for 30-35 minutes, and it worked perfectly.

UPDATE:  For using this as a quiche crust, I find that it works best to pop the formed crust into the freezer for 30 minutes to firm it up nicely prior to filling and baking.  It's a soft dough at room temperature, so if blind baking, be sure to line with parchment and fill with weights.


I always use Mollie Katzen's approach to quiche, the dog-eared page 131 of The Enchanted Broccoli Forest guiding me on my way to chic (or chick) dining. Tonight, I only had a bit of Wisconsin Colby cheese, a half pound of mushrooms and an onion. I used garlic, Aleppo and thyme to season, and along to my egg and milk custard, I added about 1/4 c. of the cultured "sour cream" I kind of made by adding my villi yogurt culture to heavy cream. I'm always surprised at the complexity in the flavors of something that has so few ingredients. Of course, that wheaty yogurt dough crust helped quite a bit, too. (I used the same basic Mollie Katzen formula to make another memorable pie, the Wisconsin (Ramp) Pie I made last spring.)


I often wonder what it would be like to cook only for myself again, not worrying about the other members of my family and what their picky palates would prefer. I'd likely eat quiche more than twice a year, I'm sure. When my son saw that there was a pie cooling on the stove, he wanted to try some, until he got right up next to a bite I held out for him - dashing all my sincere hopes that he would enjoy the eggy, mushroomy goodness that I was unable to share with anyone. I'm not giving up, I will offer until there is nothing left for me to offer. Instead, he ate leftover sourdough pancakes that I popped into the toaster to warm.

So, to each of us, our own fermented grains, I suppose. I feel happier eating these soaked and fermented things, still as excited and wide-eyed at the flavors and as eager as ever to share them with others. Convinced my own food revolution will transform at least my household if it goes no further than that. That, or just annoy my fellow family members... But, this pie was great and smelled great. I'm going to get them, if it's the last thing I do!

Ahhh, Weekend Breakfast.

Saturday is a leisurely day for many people, although I feel privileged to lead a life mostly comprised of Saturdays so to speak. Lo mentioned something about sourdough English muffins yesterday, and here on my table for a shared Saturday breakfast are gorgeous sourdough English muffins. Let me tell you, sourdough fiends, they are amazing.


Food classified under the terms of traditional food, nutrient rich diet, or the Nourishing Traditions diet seems to be my reading and obsession focus as of late. Tiny whispers of things like brined nuts that entered my thoughts via Food 52 this week spurred me to delve into yet another section of Sally Fallon's book on soaking nuts and seeds. Sproutman's Kitchen Garden, on my shelf since summer, has received a thorough perusal. No more Maseca to make tortillas, instead I can sprout popcorn? Can my Vita-Mix even handle this after 5 days of waiting and watching and then an hour's worth of boiling pebble-like, jaw-breaking popcorn? Just to make tortillas? It is a good thing I live mostly in the extra time of Saturdays with all of the things that I have on the list of things to do. This ever-growing curiosity that so easily overtakes me without my consent, it's unrelenting.

Fortunately for me, most traditional foods are not complex or expensive, just a bit time-consuming. Usually unattended time, as I've mentioned before. Last night I decided that I had to have the English muffins, so I mixed up the batter and let it ferment until morning. The breaking of dawn, and I rushed to my kitchen to add minuscule amounts of salt, baking soda and honey, then made a complete mess of my counter by pouring olive oil over it in attempt to ward off sticking. But for a first attempt at naturally leavened English muffins, I am already in love.

I knew from making English muffins before that the dough is unruly. Sticky and stubborn, it has to be on the wet side to properly form the famous nooks and crannies. The oil-covered counter did work, but really I think that my method of making these beauties is only going to improve over time. Even by the time I griddled my last muffin, I had improved my method - finding that overlapping the edges of the risen dough to the center, then quickly transferring to the hot cast iron skillet on a well-oiled metal spatula gave me the best raise and the roundest muffin. But, as with most things homemade, I take delight in the notion that they are imperfectly beautiful.


Sourdough English Muffins (Erin, via GNOWFLINS - a really great pictorial tutorial, so click over there!)
  • 1/2 c. sourdough starter
  • 1 c. liquid (pretty much anything, but I used water... could use whey, milk, yogurt, coconut milk . . .)
  • 2 c. flour, any kind or combination (I used half AP flour and half wheat)
  • 1 T. honey
  • 3/4 t. salt
  • 1 t. baking soda
12-24 hours before you want to make the muffins, mix the starter, liquid, and flour. The batter will be very wet, but it will depend on the hydration of your starter. In my opinion, it can't really be too wet, though it makes it a tad hard to work with.

An hour before you want to make the muffins, sprinkle the honey, salt and baking soda over the top and stir in. Pour a tablespoon or so of olive oil on a clean counter top (I'm guessing that a smooth surface is going to prevent sticking more than a wooden surface), spread it around, oiling your hands in the process, and pour the batter out onto the slick counter. Knead with oiled/floured hands to make sure that the honey, salt and soda are well incorporated.

Divide into 8 pieces, and form into loose "patty" shaped mounds, using flour on your hands to help prevent sticking. Let the muffins rest on cornmeal covered silicone mat, or similar, for about an hour.

Griddle on medium to medium-low heat, preferable on cast iron. (I don't have a huge cast iron griddle, so I used 3 different cast iron pans. I found that I had to keep decreasing the temperature as I griddled, since cast iron holds the heat so well. I also have well-seasoned pans, so I didn't need to grease them at all). Griddle side one for 5 minutes, then flip and griddle 5 minutes on the other side. Moderate the temperature so that the interior will bake fully and the exterior doesn't burn in the time allotted each side. After 2 or 3 muffins, you'll have it down.

Erin, via GNOWFLINS, said that these will last a week covered at room temperature, and will freeze well. This first batch is nearly gone, so I'll likely have no reporting to do on the shelf life for awhile...


I wasn't even going to go all out and make a full breakfast, but as soon as I smelled these, I ran down to the basement freezer and grabbed a package of pork sausage from last year's pig. I still have a few packages left before I can make room for this year's... which makes me think that I should have shared weekend breakfasts more often. I never seem to fuss when it is just for me, or even just for me and my Husband - but given the opportunity to cook for someone who loves to eat as much as I do, I quickly change my disposition. Sasa ate hers mopping up her sunny-side-up yolks, and I doused mine in lemon marmalade and grape jelly. We both agreed that these English Muffins are the best.


After breakfast, I attended to my growing kitchen responsibilities, which now include rinsing grains along with feeding that thriving sourdough starter. What kitchen miracles are unlocked each day when nutrition is enhanced by doing simple tasks! I swear, I've never tasted a nut or grain in it's full glory before brining it and then slow-roasting it, hovering and tasting my progress along the way as if I have another newborn child. This stuff actually tastes different: sweeter, healthier! I'm sure it is in part in my mind, but I don't even care. It's cheap thrills over here at casa rcakewalk... the kind that aren't bad for you in any way.


I've never even had spelt, let alone sprouted it...


Sally Fallon's "Crispy Nuts": forever ruining me from roasted...

I'm now looking forward even more to "borrowing" my Mom's dehydrator, so I don't have to attend to the oven, it's door ajar for hours when I monitor the drying of various things. And next time I go up to visit, I'll likely be packing some of these delicious English muffins as a trade.


UPDATE:
I have found that I can totally skip the oiled countertops and wrestling with super sticky dough! Just sprinkle the honey, salt and baking soda over the top, and stir to combine. Then, let it sit for an hour. When it's time to griddle, just fill a pint glass with water, and dip a disher (I use 1/2 c. size) in it. (Water prevents the sticky dough from collecting on the disher.) Then, scoop up the scoop of dough and deposit it on the hot griddle. Quickly dip your fingertips in the water, and briefly flatten the muffin into a nice round shape. That's it! Continue as described above, and enjoy less kitchen clean-up!!

More on the Lacto-Fermenting Addiction.


I am a little perplexed as I begin this post. First off, try as I might, I just can not understand food chemistry. A product of small town America, where the sciences were not stressed (except in farming matters), I just did not pay well-enough attention in my little 3rd floor high school science class... and even if I did, I'm not sure that at the time I would have found it very interesting. It's too bad, since I read this description of lactic acid fermentation over and over again, even out loud, in hope that the chemical breakdowns would make sense to me. Though I'm painfully visual, even Alton Brown's comical yet scientifically accurate approach to educating viewers on the "why" and not just the "how" of cooking leaves me smiling but still bewildered.

Obviously, then, I'm no expert then to teach anyone about the "why" of lacto-fermented vegetables. I mean, I can read recipes and see why they would taste good, but can not make out why they won't spoil in many months of cold-storage after lactic fermentation has taken place. I can tell you that the health benefits, cost efficiency and certainly the flavor involved in such experimentations are all the reasons I need to be hooked! Throw in the minimal time effort, and you have the stuff obsessions are made of.

First off, it seems to me, that pretty much anything can be fermented. A clean, quart jar (glass, of course) serves as an airtight local for the vegetable to take up residence in, and salt is added to preserve the vegetable until the lacto-fermentation kicks in. So far, I've been roughly following recipes in Sally Fallon's Nourishing Traditions. A concise excerpt she has written explains a great deal about the process and multiple benefits of this live food process.

If you are vegan and do not use whey, most of her recipes involving vegetables up the salt content to preserve the vegetable. I am hoping a science-minded reader will let me know why it is that salt can stimulate the lacto-fermentation process without the inclusion of pro-biotic rich whey, since I can't seem to make any sense of that part!


The above photos are of Sally's kimchi recipe. So far, this is the only lacto-ferment recipe that I opened after 3 days at room temperature and the jar bubbled over with excitement onto my counter. Even after the lid was off for a couple of minutes, tiny bubbles were still making their way to the surface, evidence that this is a living food. It's packed with garlic and ginger, and tell-tale heat of hot red jalapeno, an addition I just had to make. It is gorgeously orange due to the shredded carrots, a jar that just plain looks like Fall to me.

After that project matured and went into the basement refrigerator for cold-storage, I made her spiced beets which were really only flavored with the seeds of a couple cardamom pods and salt:


The liquid level should come up to over the top of these...

I opened them yesterday to check on them, but as I'm reading more I realize that I should probably curb my curiosity to checking after the 3 day mark, since oxygen interferes with the fermentation process. I even read an article by someone who was considering using an airlock method for her lacto-ferment veg. Hmmmmm. I wonder if I can retro-fit one into a canning jar lid...

But by far, my favorite experiment so far is the "Tomato Pepper Relish" or salsa. I brought back some tomatoes from my last visit back to "the Farm", and I intended to can salsa with all of them. I did can 7 pints of hot wax pepper salsa (a recipe adapted from The Complete Chile Pepper Book), that has a vinegary base and great flavor. But then I did save out enough peeled and chopped tomatoes to get a couple of different jars of this lacto-ferment salsa:


Unlike it's canned brother, it is vibrantly dark red and packed with a whole bunch of cilantro. The flavors are so fresh and explosive since it doesn't cook at all - it just hangs out on the counter for 3 days and then goes to sleep in the fridge. I used lime juice in my second jar, and did not use any water in either of her salsa type recipes. I had quite a bit of liquid from the tomatoes, and my vegetables were fully submerged, so I omitted it. The recipe below is Sally Fallon's, and I noted any changes. For my second jar, I added the juice of one lime.

Lacto-Fermented Salsa (Sally Fallon, Nourishing Traditions)
makes 1 quart
  • 4 ripe tomatoes, peeled, seeded and chopped
  • 1 bunch green onions, chopped
  • 1 green pepper, seeded and chopped
  • 1-2 jalapenos, seeded and chopped
  • 1 bunch cilantro, chopped
  • 2 cloves of garlic, mashed
  • 1/4 c. whey
  • 1 T. sea salt
  • 1/2 filtered water (I omitted)
Mix all vegetables in a bowl, and pound lightly with a wooden spoon. Place in a quart size wide mouth mason jar, and press down until liquid completely covers the tomato mixture. Leave at least 1 inch headspace in the jar. Cover tightly, and keep at room temperature (70-75 degrees) for about 2 days before transferring to cold storage (about 40 degrees).

As I quoted Fallon in my first lacto-fermentation experimentation post, your nose is your guide to how long these jars will be good in cold storage. I think several months is a given, but the few jars I've made will likely be fully consumed long before that. I hope to make time to get several more jars packed away with the last of Summer's wealth of fresh and local vegetables, and let them hang out for a while before eating them. I will say that it does take some re-tweaking of my brainwaves to remember that this food preservation method pre-dates any home-canning method and is a viable home-preservation method. I love this quote from Sandor Ellix Katz in his book Wild Fermentation, and find myself using it more all the time: "Cleanliness, not sterility". If you keep a clean home and a modicum of common sense, lacto-fermentation is probably the easiest form of home preservation you could experiment with!

One extra benefit is that you don't need to understand the science to know that it works, and that the results are delicious - good thing for me!