sprouting

Sprouted Grain and Poppy Seed Crackers


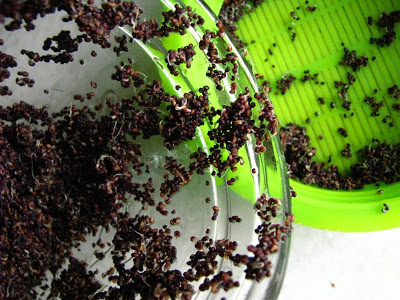
I never knew you could sprout poppy seeds. When looking for my next kitchen project, I thought I'd give Sally Fallon's sprouted grain crackers a try, and began a 4 day sprouting adventure on some of the tiniest seeds in the world. Poppy seeds happen to be one of my most favorite things, I assume because they naturally pair well with almond extract, an elixir I'm fairly sure I could drink straight up and not feel too bad about.

I had poppy seeds in mind for my Daring Baker Challenge this month (I'll make that next week, and post it on the 27th as usual). In looking up information on the poppy seed and ways to make them into pastes, I discovered that there are between 1 and 2 million seeds in a pound - 3300 seeds making up a single gram. They are an oily seed, and as I've actually noted firsthand, they can go rancid rather quickly. Prior to my project, I got what is considered the finest poppy seed in the world, Dutch poppy seed, from the Spice House. I'll admit, I was actually wondering all the while if they would actually sprout, and what in fact the sprouts would taste like. They did sprout, and were surprisingly tasty.


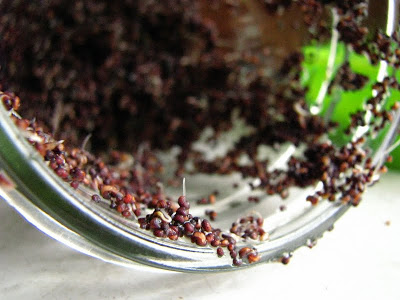
I'd say that they no longer had their characteristic nuttiness, but more of a "sprouty" flavor, still packed with a fair amount of crunch. I used about half of what I sprouted in the crackers, and ate the rest for lunch on sourdough flatbreads spread with hummus and radishes. It was probably one of my favorite lunches in recent memory - the tiny sprouts reminding me of a vegan caviar.

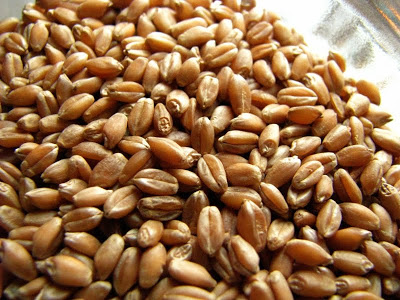
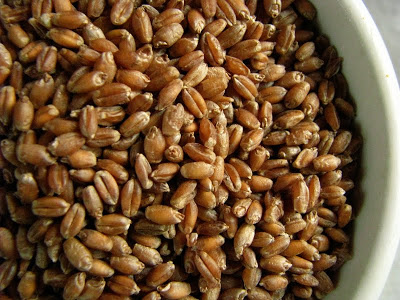
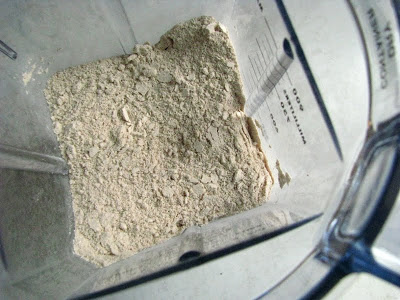
On about day 3 of the sprouting, I re-perused Sally Fallon's recipe, and noticed that the sprouted wheat wasn't supposed to be dried - that the seeds and grains should be sprouted and then mixed up into a paste, then the whole of it dehydrated together. I knew that I didn't have enough waiting time to sprout up some more wheat (and besides, I only had hard wheat for bread-making on hand). I poked around for a new recipe to use some of the sprouted, dried and waiting-for-me-in-the-freezer soft wheat I did have.

I discovered a site that is probably no secret to most people, but it was new-to-me: Cheeseslave. I had heard of Cheeseslave, but never ventured over before, and now I have just one more devoted place to stop by on my Internet rounds. I knew right away after mixing up the cracker dough that I was smitten...


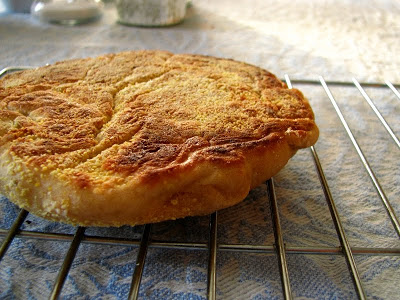
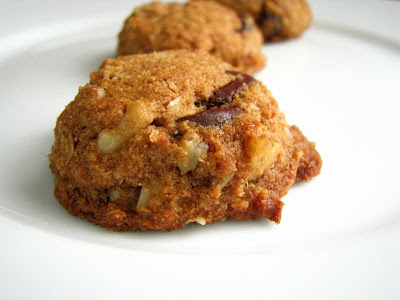
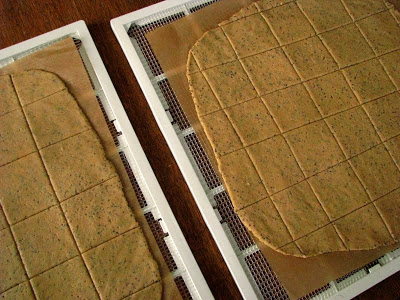
I found that rolling the somewhat soft dough between layers of parchment worked the best for me. I cut the parchment to the same size as my dehydrator trays, and then cut them into squares with a pizza cutter and slid the whole works into place. One new benefit I've discovered and love about dehydrating is the extra exercise it gives me - my set-up is in the basement, and I have to make several trips down there to load it and keep checking on it. Ann Marie (a.k.a. Cheeseslave) says that you can also bake the crackers, which would give them a nice toasty color. But despite their paleness, these are really packed with flavor. I made a half batch (the amounts listed below) just to test it out, but next time, I'll double everything and make better use of the dehydrator space.

Sprouted Grain and Poppy Seed Crackers (slightly adapted from Cheeseslave)
  • 2 1/2 c. sprouted wheat flour (purchased, or make your own)
  • 1 c. yogurt (or buttermilk)
  • 1/2 c. (1 stick) butter, mostly melted
  • 1/4 c. coconut oil, melted with the butter
  • 1 1/2 t. baking powder
  • 1 t. sea salt
  • about 1/4 c. sprouted poppy seeds
Using a stand mixer with paddle attachment (or by hand), combine sprouted flour with the yogurt. With machine running, add in the butter, coconut oil, baking powder and salt and continue to mix until a soft dough forms. Add in the sprouted seeds last, and mix until evenly distributed.

Divide the dough in half. Roll out dough between two sheets of parchment paper to about 1/8 inch thickness. Using a pizza wheel, cut dough into cracker size pieces - whatever shape or size you like. Transfer dough (I left it on the parchment) to a food dehydrator tray.

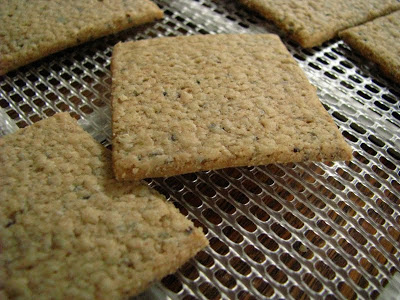
Dehydrate at 150 degrees or less for about 16 hours until fully dry and crisp. You can also use the low temperature oven method described by Cheeseslave, or bake them (on the parchment) on a sheet pan at 350 degrees for about 20 minutes.

When fully cooled, I stored mine in the freezer to ensure their freshness (and discourage myself from eating them all right away).


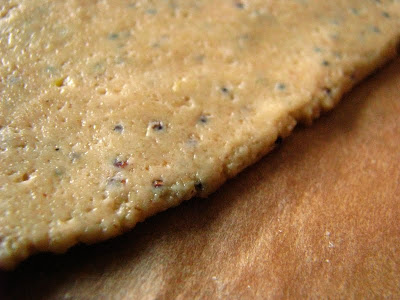
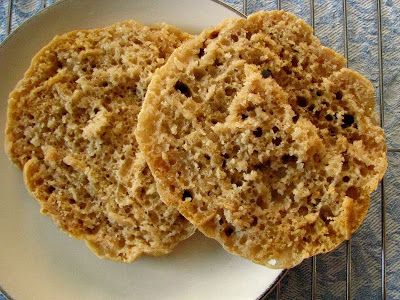
The crackers are surprisingly crisp and rich, but due to their fat content they are still amazingly delicate. They are rich enough, however, that I didn't feel like I couldn't stop eating them - just a few 2-inch square crackers were plenty for me. These taste like the most delicious wheat thin that you could ever imagine, and I would almost swear there was an addition of cheese to them too. That sprouted grain has such a specific, nutty sweetness to it... it's impossible to describe, and it's perfect in a cracker.


About half-way through the dehydrating process, I slid the parchment out from underneath the crackers.

I could see immediately a hundred different uses for these crackers - but since I'm trying Julia's awesome jam on everything lately, I tried that just after eating one plain. It was like a truly fancy dessert, one that upscale places serve that embrace both savory and sweet. The cracker almost took on a pie-crustiness that made me feel wildly trendy: like I could pull off charging $12 for a plate of 4 of these delectables. I smirked all the more knowing that I was tasting it mid-morning with no one else around to have to share with.


Ahhh, Weekend Breakfast.

Saturday is a leisurely day for many people, although I feel privileged to lead a life mostly comprised of Saturdays so to speak. Lo mentioned something about sourdough English muffins yesterday, and here on my table for a shared Saturday breakfast are gorgeous sourdough English muffins. Let me tell you, sourdough fiends, they are amazing.


Food classified under the terms of traditional food, nutrient rich diet, or the Nourishing Traditions diet seems to be my reading and obsession focus as of late. Tiny whispers of things like brined nuts that entered my thoughts via Food 52 this week spurred me to delve into yet another section of Sally Fallon's book on soaking nuts and seeds. Sproutman's Kitchen Garden, on my shelf since summer, has received a thorough perusal. No more Maseca to make tortillas, instead I can sprout popcorn? Can my Vita-Mix even handle this after 5 days of waiting and watching and then an hour's worth of boiling pebble-like, jaw-breaking popcorn? Just to make tortillas? It is a good thing I live mostly in the extra time of Saturdays with all of the things that I have on the list of things to do. This ever-growing curiosity that so easily overtakes me without my consent, it's unrelenting.

Fortunately for me, most traditional foods are not complex or expensive, just a bit time-consuming. Usually unattended time, as I've mentioned before. Last night I decided that I had to have the English muffins, so I mixed up the batter and let it ferment until morning. The breaking of dawn, and I rushed to my kitchen to add minuscule amounts of salt, baking soda and honey, then made a complete mess of my counter by pouring olive oil over it in attempt to ward off sticking. But for a first attempt at naturally leavened English muffins, I am already in love.

I knew from making English muffins before that the dough is unruly. Sticky and stubborn, it has to be on the wet side to properly form the famous nooks and crannies. The oil-covered counter did work, but really I think that my method of making these beauties is only going to improve over time. Even by the time I griddled my last muffin, I had improved my method - finding that overlapping the edges of the risen dough to the center, then quickly transferring to the hot cast iron skillet on a well-oiled metal spatula gave me the best raise and the roundest muffin. But, as with most things homemade, I take delight in the notion that they are imperfectly beautiful.


Sourdough English Muffins (Erin, via GNOWFLINS - a really great pictorial tutorial, so click over there!)
  • 1/2 c. sourdough starter
  • 1 c. liquid (pretty much anything, but I used water... could use whey, milk, yogurt, coconut milk . . .)
  • 2 c. flour, any kind or combination (I used half AP flour and half wheat)
  • 1 T. honey
  • 3/4 t. salt
  • 1 t. baking soda
12-24 hours before you want to make the muffins, mix the starter, liquid, and flour. The batter will be very wet, but it will depend on the hydration of your starter. In my opinion, it can't really be too wet, though it makes it a tad hard to work with.

An hour before you want to make the muffins, sprinkle the honey, salt and baking soda over the top and stir in. Pour a tablespoon or so of olive oil on a clean counter top (I'm guessing that a smooth surface is going to prevent sticking more than a wooden surface), spread it around, oiling your hands in the process, and pour the batter out onto the slick counter. Knead with oiled/floured hands to make sure that the honey, salt and soda are well incorporated.

Divide into 8 pieces, and form into loose "patty" shaped mounds, using flour on your hands to help prevent sticking. Let the muffins rest on cornmeal covered silicone mat, or similar, for about an hour.

Griddle on medium to medium-low heat, preferable on cast iron. (I don't have a huge cast iron griddle, so I used 3 different cast iron pans. I found that I had to keep decreasing the temperature as I griddled, since cast iron holds the heat so well. I also have well-seasoned pans, so I didn't need to grease them at all). Griddle side one for 5 minutes, then flip and griddle 5 minutes on the other side. Moderate the temperature so that the interior will bake fully and the exterior doesn't burn in the time allotted each side. After 2 or 3 muffins, you'll have it down.

Erin, via GNOWFLINS, said that these will last a week covered at room temperature, and will freeze well. This first batch is nearly gone, so I'll likely have no reporting to do on the shelf life for awhile...


I wasn't even going to go all out and make a full breakfast, but as soon as I smelled these, I ran down to the basement freezer and grabbed a package of pork sausage from last year's pig. I still have a few packages left before I can make room for this year's... which makes me think that I should have shared weekend breakfasts more often. I never seem to fuss when it is just for me, or even just for me and my Husband - but given the opportunity to cook for someone who loves to eat as much as I do, I quickly change my disposition. Sasa ate hers mopping up her sunny-side-up yolks, and I doused mine in lemon marmalade and grape jelly. We both agreed that these English Muffins are the best.


After breakfast, I attended to my growing kitchen responsibilities, which now include rinsing grains along with feeding that thriving sourdough starter. What kitchen miracles are unlocked each day when nutrition is enhanced by doing simple tasks! I swear, I've never tasted a nut or grain in it's full glory before brining it and then slow-roasting it, hovering and tasting my progress along the way as if I have another newborn child. This stuff actually tastes different: sweeter, healthier! I'm sure it is in part in my mind, but I don't even care. It's cheap thrills over here at casa rcakewalk... the kind that aren't bad for you in any way.


I've never even had spelt, let alone sprouted it...


Sally Fallon's "Crispy Nuts": forever ruining me from roasted...

I'm now looking forward even more to "borrowing" my Mom's dehydrator, so I don't have to attend to the oven, it's door ajar for hours when I monitor the drying of various things. And next time I go up to visit, I'll likely be packing some of these delicious English muffins as a trade.


UPDATE:
I have found that I can totally skip the oiled countertops and wrestling with super sticky dough! Just sprinkle the honey, salt and baking soda over the top, and stir to combine. Then, let it sit for an hour. When it's time to griddle, just fill a pint glass with water, and dip a disher (I use 1/2 c. size) in it. (Water prevents the sticky dough from collecting on the disher.) Then, scoop up the scoop of dough and deposit it on the hot griddle. Quickly dip your fingertips in the water, and briefly flatten the muffin into a nice round shape. That's it! Continue as described above, and enjoy less kitchen clean-up!!

Sprouted Grain Flour

I have wanted to sprout grains and make flour for quite awhile. I tend to read a lot of different things around the Internet and in books, and then mentally compile them into a rational reason for doing something. Certainly, it's easier to open a bag of flour and make a baked good, but the more I read about flours, chemicals, digestion, and nutrition, the more sprouting seems to make good sense to me.

Obviously, I am the type who often makes more work for herself than needed - and the truth of that is that I have the time and I enjoy it. As I read frequently by electronic means, I consider how I'd make a good Amishwoman excepting of this technology thing. Oh, and the dresses - not too sure I could swing that either. A few things withstanding, the Amish way of life is close to what I'd like if I could choose anything. The idea of making whatever I need, bartering with others, and country living all appeal to me greatly. I may lose a Husband if I ever felt I needed to act on this urge, but truly I am happy being urban-ish "amish" for now. Especially if I can make, barter, and discover on a whim, and with the aid of a computer.


soft wheat berries.

The Amish are in a time freeze somewhere around 1860, probably before the smooth mechanization and distribution of flour. From all of my readings on sprouting wheat (and other grains), I take away that sprouting wheat increases both digestibility and food enzymes and decreases phytic acid: the acid found in nuts, seeds, and grains that is undigestible to humans. When the grain is soaked and allowed to begin germination, the phytic acid breaks down, allowing the nutrition in the grain itself to enter our systems.

I think of the Amish, because every Fall, I witness the sheaves of corn and occasionally wheat dotting the countryside near my Parent's farm. I figure that even though most of that grain is likely going to livestock and is not for human consumption, it is most likely healthier for those ruminants because essentially it is sprouted. The sheaves are left standing in the elements, even the rain, and then allowed to dry - the way our ancestors likely treated their grains by necessity. When demand and modernization caught up with us, the grains and flours were able to be processed quickly, more efficiently. The once nutritional flour powerhouse we are left with is basically plain and white, devoid of life-giving, healthful properties.


soaking.

I won't lie. It takes time to sprout. Largely unattended time, but time nonetheless. Purchasing sprouted flour is costly, and really I have never considered it. My curiosity for most things culinary, and my new VitaMix that can actually grind wheat into flour, led me down the road of sprouted flour. I have to say it will be hard to turn around. After my first batch of soft wheat berries was ground up into flour, it bore no resemblance to anything I ever thought of as flour.


sprouted to tiniest tails.

The smell, and taste for that matter, of the freshly ground, sprouted and dried grain is incredible. I can't describe it, it's just wholesome and clean. I have no dehydrator so I dried the sprouted berries in the oven at my lowest temperature, 170 degrees. I left the oven door open with a wooden spoon, and frequently put my hands in to toss the grains around on the baking sheet. It took about 3 hours until the grains were dried, a much shorter time than I was expecting after reading around... but I chomped on a few and confirmed that they were fully dried.

After they cooled, I stored them in the freezer until yesterday when I decided I couldn't wait anymore to grind them. Since I sprouted the only wheat berries I had on hand, I didn't know if they were hard wheat (suitable for bread making) or soft. Yesterday when I visited the bulk bins at my co-op, I knew by sight that they were soft wheat, probably purchased for salad making. My dreams of making my first homemade, sprouted wheat flour into bread was gone, but a healthy baked good could result. I picked up some more hard wheat berries and some spelt berries to experiment with and headed home to figure out what to make.


sprouted, dehydrated wheat berries.


sprouted wheat flour.

I have to gear up to make my Daring Baker challenge, so I didn't want to make a cake. I settled quickly on making some cookies, which are wholesome enough to showcase the brilliance of this new sprouted flour. (And, the Boy-O devoured them too!) They were delicious, and I should have made a whole batch instead of a half... since these aren't going to last too long. For the half batch, I used 2 eggs, which worked out fine.

Sprouted Wheat Cookies (from GNOWFLINS)

(this is the whole batch amount, about 4 1/2 - 5 dozen)
  • 1 cup unrefined, virgin coconut oil, softened
  • 1/2 cup raw honey
  • 3 eggs (or they recommend 1/4 cup flax seed meal + 3/4 cup pure water)
  • 1 teaspoon vanilla
  • 1 teaspoon baking soda
  • 1 teaspoon sea salt
  • 2-1/4 cups sprouted wheat flour
  • 1/2 cup chocolate chips
  • 1/2 cup raisins
  • 1/2 cup chopped nuts (I used walnuts)
  • 1/2 cup unsweetened coconut
  • 1/2 cup rolled oats (soaking recommended, but I did not do that)

Cream together room temperature coconut oil and honey in large mixing bowl.

Add eggs to mixing bowl (or the flax seed/water mixture that has been mixed and allowed to stand for 5 minutes) along with vanilla and beat.

Sift flour, baking soda and salt in a medium size bowl, and add to wet ingredients in mixing bowl. Mix until just combined.

Add chocolate chips, nuts, coconut, and oats to mixing bowl. Mix gently until just incorporated.

Drop by tablespoons full onto parchment lined baking sheet. Bake at 350 degrees for 12 to 15 minutes, rotating pans halfway through.

Be sure to drop by the GNOWFGLINS website, as there is an enormous amount of information and great looking "traditional foods" recipes!


We do live in a "gluten-centric" culture here in America, and I have to wonder if that may account for the seeming increase in gluten allergy. My Husband's box of highly colored and sugared cereal even touts "whole grain" and "high in vitamin D", the buzz words that cause and reinforce consumer purchase. But what is whole grain? From now on, my whole grain is going to be an actual whole grain berry if I can swing it. The cost differential isn't that great, and if I am half as happy with the bread as I was with my cookies, it will be well worth it.

I'm sure this will not be the end of my sprouted grain tinkering. Here is a (partial) list of things I've been reading lately on sprouting: