fermenting

Alone = Quiche.

Quiche. That misunderstood brunch or dinner delicacy that is wrongly accused of being girlie, chic (or chick?) food. Whenever I have the opportunity to make dinner solely for myself, I like to use it to my advantage by making quiche. It's filling, versatile, and uses up whatever needs using up - and it requires just enough work to make me feel like I'm worth the fussing over. Besides, I like eating it straight from the fridge for lunches too.


Most people would serve quiche alongside some kind of green salad, but not me. Since I usually partake alone, I fortify it with whatever veg I can, and chalk it up to a one dish meal - a casserole that is so much more attractive seeing as it comes at me baked into a pie. This leads me to believe I know why quiche has the bad-rap of being girlie food: usually it contains no meat. When my Husband (who was on his way out to a basketball game) saw, and likely smelled, the results of my casual labors coming out of the oven, he said "what! I like quiche" to which I responded "since when?" (that was code for "keep away from my leftovers"). My filling was really of no matter to me tonight. What I was really after was a trial run of Sally Fallon's yogurt dough, made from 100% whole wheat that ferments with yogurt and butter prior to baking.

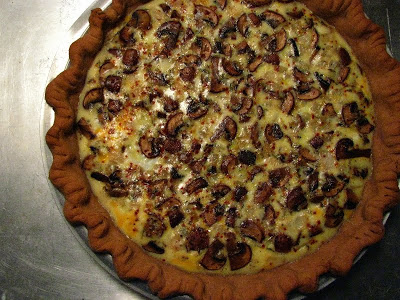
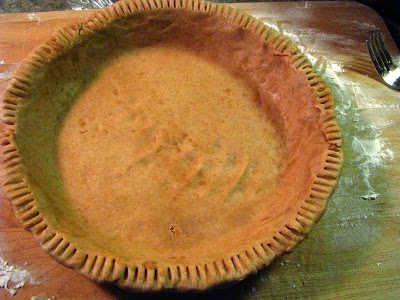
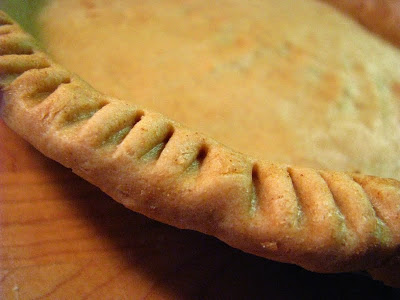
As with most of these new-to-me nourishments, this yogurt dough did not disappoint. It was actually light and flaky, and as complementary to a savory pie as I could see it being to a sweet one. Most whole wheat baked goods seem dense, but not this pie crust. It held up to the filling without sogginess and the edges browned and crisped up nicely. The flavor had just a nuance of graham cracker, which made me immediately think that the next time I get a taste for chocolate pudding pie, I will most certainly use this crust - though likely I'll add a tablespoon or two of honey to enhance it's nutty sweetness.


Sally Fallon's Yogurt Dough (Sally Fallon, Nourishing Traditions)

I used half amounts to yield 1 pie crust - otherwise, it will make two. (Sally says that the recipe will allow enough for two 10 inch, French style, tart shells - and that it cooks more slowly than doughs made with white flour.)
  • 1 c. plain whole yogurt (I used my homemade, which is made with 2% milk)
  • 1 c. butter (1/2 lb. or 2 sticks), softened
  • 3 1/2 c. whole wheat flour (or she recommends spelt flour)
  • 2 t. sea salt
  • unbleached white flour for rolling out
Cream yogurt and butter together. Blend in flour and salt. Cover and leave in a warmish place for 12-24 hours (I left mine only about 8 since I didn't plan too far in advance).

Sally recommends rolling out on a pastry cloth lightly dusted with flour, but I used a lightly floured wooden board, and had no problem with sticking whatsoever.

She also says that if you are baking for a pre-baked shell, prick the bottom well with a fork and place in a cold oven. Turn heat on to 350, and bake for 20-30 minutes. For the quiche, I filled it and baked in a preheated 375 degree oven for 30-35 minutes, and it worked perfectly.

UPDATE:  For using this as a quiche crust, I find that it works best to pop the formed crust into the freezer for 30 minutes to firm it up nicely prior to filling and baking.  It's a soft dough at room temperature, so if blind baking, be sure to line with parchment and fill with weights.


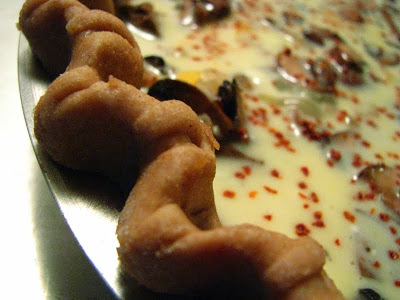
I always use Mollie Katzen's approach to quiche, the dog-eared page 131 of The Enchanted Broccoli Forest guiding me on my way to chic (or chick) dining. Tonight, I only had a bit of Wisconsin Colby cheese, a half pound of mushrooms and an onion. I used garlic, Aleppo and thyme to season, and along to my egg and milk custard, I added about 1/4 c. of the cultured "sour cream" I kind of made by adding my villi yogurt culture to heavy cream. I'm always surprised at the complexity in the flavors of something that has so few ingredients. Of course, that wheaty yogurt dough crust helped quite a bit, too. (I used the same basic Mollie Katzen formula to make another memorable pie, the Wisconsin (Ramp) Pie I made last spring.)


I often wonder what it would be like to cook only for myself again, not worrying about the other members of my family and what their picky palates would prefer. I'd likely eat quiche more than twice a year, I'm sure. When my son saw that there was a pie cooling on the stove, he wanted to try some, until he got right up next to a bite I held out for him - dashing all my sincere hopes that he would enjoy the eggy, mushroomy goodness that I was unable to share with anyone. I'm not giving up, I will offer until there is nothing left for me to offer. Instead, he ate leftover sourdough pancakes that I popped into the toaster to warm.

So, to each of us, our own fermented grains, I suppose. I feel happier eating these soaked and fermented things, still as excited and wide-eyed at the flavors and as eager as ever to share them with others. Convinced my own food revolution will transform at least my household if it goes no further than that. That, or just annoy my fellow family members... But, this pie was great and smelled great. I'm going to get them, if it's the last thing I do!

Homebrewing With Mr. Mork: Part 2 - Bottling.

So here we are at the second stage of the homebrewing process: bottling. Yesterday afternoon, I drove over to assist and learn as Mr. Mork transferred the progressing fermentation from carboy to bottle. It does not seem like more than a month, indeed most of the summer, has passed since I witnessed the birth of this Tounge Splitter Ale.

About a week after I was there, Mr. Mork transferred the original ferment to a new carboy stoppered with an airlock, a one-way valve that allows pressure from within the carboy out without letting air in. The second fermentation was then underway.


The bottles were already washed and sterilized when I arrived. You can reuse any beer bottle that does not use a screw off cap. Some of his bottles are as old as his first batch of beer! As I am kind of a glass jar/bottle fanatic, I loved the look of many mismatched bottles. Mr. Mork used to painstakingly remove the labels, but now doesn't bother... the bottles are all labeled with marker on their caps when the bottling is complete.


Airlock.

About a week ago, he added additional hops to the carboy. This is called dry-hopping, and adds an additional dimension to the hoppiness that already exists.


The only thing left to do before transferring this liquid to the bottles is to add the priming sugar. Priming sugar is made from corn and activates the yeast in the beer, stimulating them to create carbonation in the bottle. We tasted the priming sugar, which I thought was exactly like a Pixi Stix, sans artificial colorants and crazy artificial flavor. The flat beer was actually tasty, too. All of the metallic hop flavors that I witnessed last month were surprisingly mellowed, the barley flavors toned down. I know that in a couple of weeks, this is going to really be an excellent beverage.


The priming sugar needs to be dissolved in boiling water, and meanwhile, the bottle caps are sanitized by boiling as well.


This process of siphoning the beer from the carboy into the bottling bucket was easy, but for some reason, I could not figure out how it was going to work until I saw it. (It reminded me of when I learned to knit in the round, and used a place marker. I couldn't visualize how the marker wouldn't be stuck on the needle as I knit... That is ridiculous to me now! Sometimes the simplest things are the things that throw me the most.) In Wild Fermentation, Sandor uses a more archaic process of just sucking on the end of plain tubing, but this more sophisticated aid called a racking cane is filled with water, and the water provides the suction. A more sanitary solution to the mouth siphoning process, I'd imagine...


The bottling bucket is equipped on the bottom with a spigot that is inserted in the bottle, and fills when pressure is applied. Mr. Mork filled the bottles, and R1 demonstrates the capping process:


Easy, and addicting! I'm considering getting a bottle capper for my kombucha bottling... but I'm a little worried about the insane carbonation issues I've been having... I took over from R1, and capped the rest of the bottles, about 46 in all. They are now labeled and resting in boxes at the edge of the Mork dining room, where it is a bit warmer than the basement. After two weeks, the bottle fermentation will be mostly complete (give or take a few days), and phase 3 can begin: Drinking.


It is amazing that so little effort can produce spectacular results. I guess that is how I feel about most kitchen experiments - that if you just have a bit of time and can reasonably follow instructions, you can make almost anything! The longer you do something, the easier it becomes, it's just the learning curve that can seem to throw me.

Beer is something that humans have brewed for an extremely long time, and yet, the process is unknown to so many people. I guess it is like anything, and you can demand better beer just as you can demand better fruits and vegetables and better meats and poultry - or better yet, you can grow or brew them yourself.

Another aspect of the whole home fermentation process that I really like, is the waiting. Our society is so full of instant gratification and "bigger, better and more". Waiting 6 -8 weeks to drink something so full of quality is really a pleasure. My own small ferments like the ginger beer, rhubarb liqueur, and kombucha take far less than a month (except for the aging of the liqueur), but still require a week or two of timing, and drinking something off my counter that I've been patient enough to wait awhile for is infinitely more rewarding than getting in my car and driving to a shop and buying something to drink this instant. I hope you will agree, and be able to learn a process like beer brewing from someone who also enjoys the waiting, like Mr. Mork!

Fermentation Paradiso


Last Sunday, I bottled my second batch of kombucha. Following a couple of suggestions on a website that Lo had suggested to me, I finished the bottles with about a tablespoon each of different fruit, including the blueberry, ginger and strawberry teas seen above. I filled the swing-top bottles as full as I could, and left them on the counter to continue their bottle fermentation. Early this morning, I cracked open a strawberry-blueberry bottle and actually had to hold the lid down due to the overwhelming carbonation. I was excited since my first bottling was tasty but fairly flat. I decided to put them all in the fridge, and got ready for my tutorial in homebrewing with R1's husband, Mr. Mork.


Boy-O and I drove out to the House of Mork around 9 this morning, and I couldn't wait to witness the whole process of homebrewing. Mr. Mork chose a kit from Northern Brewer called Tongue Splitter Ale, a west coast style ale with plenty of hops. He has been brewing at home for more than 10 years, so the process is second nature to him. His explanation to me of the brewing process was concise, and I couldn't help but think of the Northern Brewer employee who spent so much time talking with me last week. He was mentioning to a new homebrewer about the journey of brewing, not the end product - but the means to the end. That is exactly the process I got to see today, and it made me appreciate the craft of fermentation even more.


Mr. Mork purchased a kit to brew this beer, and explained that a kit allows a tried and true formula to be reproduced with a consistent result. A lot of trial and guesswork is removed when you go with a kit, and companies like Northern Brewer seem to have very detailed descriptions of the end result. Much the same way as a chef would publish a recipe for a home cook to follow, beer kits take a basic formula and let a homebrewer tweak the flavoring components. This can be done a little or a lot, and like pretty much anything food and flavor related, the possibilities are endless.

I was actually pretty surprised at how easy the entire process is. I mean, brewing a beer seems like something that you should leave the professionals, right? But like anything worth enjoying to the fullest, doing (or in my case, witnessing) the work yourself helps you appreciate the entire experience all the more.


The standard amount for homebrewing is 5 gallons, and that is exactly what I saw today. 2 gallons of pure, un-softened water went into the stainless brewing pot, and needed to come to a boil. Around 100 degrees, the grains went in, and the grain "tea" steeped until the water heated to the 170 degree mark.


After the grains come out, barley malt extract goes in. Mr. Mork lets the container sit in a sink full of warm water to help it pour easier:


After the extract goes in, the mixture returns to a boil, and you officially have a wort: the brewer's term for unfermented beer. After this point, the mixture boils for 60 minutes, with various variety of hops added at different times in the duration of the boiling. When I saw the sealed packets of hops, I was envisioning the actual hop blossom. I was surprised to open it and find this:


Chopped and pelletized hops! If you have ever smelled an ale, the characteristic hop bite that comes to your olfactories is nothing like the pure hop bite I smelled today. The fermentation process tempers the strong and almost metallic floral aromas. Each package had an alpha acid percentage, a different one on each of the 4 types used. The higher alpha content hops were added earlier in the boil. According to Homebrewing for Dummies, at harvest time, hops are measured for this acid content which is related to their bitterness. The alpha acid content percentage is a ratio of the acid's weight in relation to the weight of the whole flower, the higher the content, the higher the bitterness of the hop.

After our 60 minutes of boiling, I asked if I could taste the wort. It was thickened and syrupy, and surprisingly sweet from the addition of barley malt extract. It was delicious, and not at all as bitter as I thought it would be after smelling the hops as they boiled along.


After the wort was cooled using a wort chiller, the mixture was poured into a 5 gallon carboy to continue on it's journey to complete fermentation. The wort went in, followed by enough water to equal 5 gallons. Yeast is finally added, 100 billion yeast cells ready to work their magic on the humble wort. It now graduates into a growing and living thing, and active fermentation will begin in Mr. Mork's basement sometime within the next 24-48 hours. 7-14 days from now, second fermentation will begin, and 2-4 weeks after that, bottling will commence.


The whole process of brewing beer is strangely similar to the process of brewing kombucha, only instead of a SCOBY, the yeast is added as a liquid and no symbiotic union of bacteria is present (and, of course, more alcohol is produced as a result of the fermentation). Indeed, fermentation of most fermentable things is similar, and that is really amazing. I don't know why I thought there would be some complicated steps in the process, but really it is just an ancient technique, only modernized slightly by good hygiene practices and more intricate knowledge of flavor. I love to think about how imaginative people figured out how to brew, culture and ferment foods as a method of preservation. Mr. Mork relayed this story of the real King Midas, and a beer that was made based on the remains of the funeral feast found in his tomb. Here is the story of how a 2700 year old beer was recreated!

My copy of Wild Fermentation (recently recommended to me by E in Maine...) just came in from the library, and will be the perfect thing to read when I'm out of town for the next few days. I hope that I don't lose any of the memory of smells from today, since every one of the components of the Tongue Splitter were very distinct. I'm looking forward to trying the finished product and matching them to what I remember.

The whole idea of flavor profiling and taste memory is very fascinating to me. It is what makes a great cup of coffee, a stellar glass of wine, or even a cup of milk taste exactly like where it came from; it is what will help me find a good flavor for my kombucha experiments, and it is something that I am increasingly conscious of. Almost as if the more attention I pay to every component of the foods and drinks I consume, the more I appreciate them - an action of gratitude through consumption.


I have a flickr set of annotated brewing pictures, that you may peruse to see more of Mr. Mork's homebrewing process today, and I will update it as I continue to watch to progress of this batch. I'd like to encourage any curious and adventurous readers to get out there and try and brew something! Be it tea or beer or even a cup of joe, try really tasting what it is that makes you happy on a day to day basis and really appreciate the work that was involved to produce it. I promise you, you will taste it in a whole new light.

I have a bit of work to do in the kombucha fermentation field, since it seems that my natural carbonation dissipates through refrigeration. When I popped a few bottles to take some pictures this afternoon, all of the amazing fizziness that I was so excited about earlier this morning had vanished. Just a trace of that lid-popping effervescence remained, but it was enough to make me curious about what I'm doing wrong. Sunday evening, I'll likely bottle another batch, and tweak the process yet again, in the same manner of curious brewers from ages past. I could be frustrated, but I am not at all. Getting to the final destination is really half of the enjoyment!