Cultures for Health

From Bean to Block: Making Tofu from Scratch

I made tofu from scratch this morning, and surprisingly, it wasn't time consuming and it didn't make too much of a mess. But the soymilk I made yesterday to make the tofu today? Well, that's another story.

pressed tofu

I began reading up on homemade soymilk last week and wondered what my efforts would produce. Many people claimed that the homemade version was "beany" and unpleasant. Some people took hours to separate the beans from the hulls after soaking them, claiming it would rid you of the nagging beaniness. Most of the recipes looked similar, but when paging through my VitaMix cookbook, I noticed their recipe called for one thing most of the others I read had not: the beans were steamed prior to blending. (But then just today, I read this nice post from Tiny Urban Kitchen. Give it a perusal.)

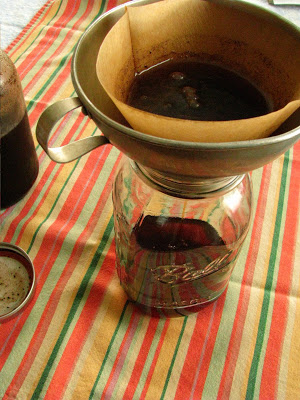
I followed their instructions, using metric weights for a 1 quart yield of soymilk, but even when straining through a very fine nut milk bag, I couldn't get the yield until I boiled more water and re-blended my mixture. Then, the texture and thickness of the soymilk was more like commercially available soymilk, and also was exactly the 1 quart yield I was after. As one other recipe source I read said, "You can not over-strain your soymilk". I wore kitchen gloves, and pressed persistently.

soybeans.

I could have cheated and just purchased some soymilk, but after reading so many vegan recipe websites for making my own, I realized that there is an awful lot of stuff in prepared soymilk. The only things in homemade soymilk is soybeans and water, and it seemed fairly painless, so I decided without much debate I would make my own. What I didn't count on was a bit of a mess, and a whole lot of manual pressing to get the soymilk to a thin consistency.

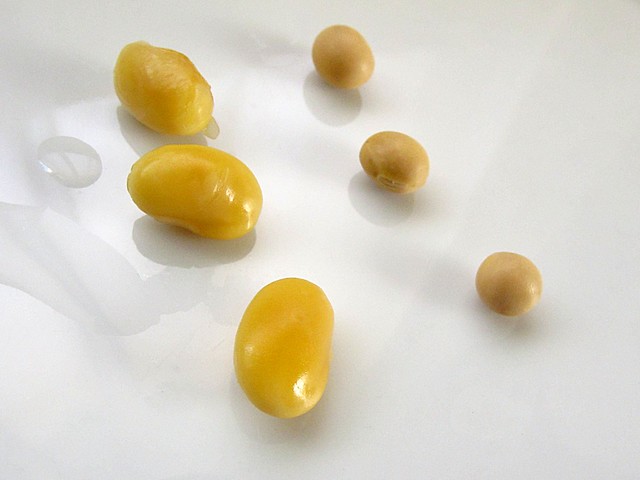
I soaked my whole, organic soybeans for 8 or 10 hours yesterday during the day. They turned from tiny, round pellets into golden yellow, familiarly bean-shaped things. Then, I steamed them for 20 minutes, until they were tender and didn't taste too beany. One tip? When steaming soybeans or boiling soymilk do not turn your back on the pot. It will boil over, and it will make a mess everywhere causing you to wonder why you didn't just buy a half gallon of soymilk and be done with it.

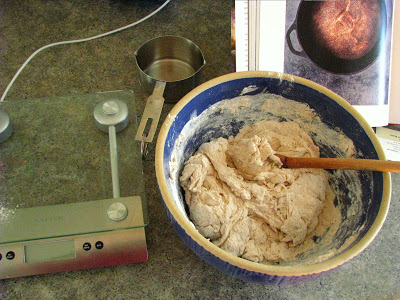
After steaming, cool the beans, boil the water, and blend. I used my VitaMix which does a superb job of emulsifying, but any blender should work ok. Like I mentioned, I had a super thick first batch, so I boiled more water and poured it over the soybean pulp that was very thick, returned it to the blender and then strained it again. You can see how I pretty much dirtied every bowl in my kitchen. I may just blend it in two batches when I make it again, that will probably cut down on the mess a little. For the ratios to yield 1 quart of milk:
  • 300 g. (1 1/2 c.) soybeans
  • 840 ml (3 1/2 c.) boiled water for first strain
  • 580 ml (scant 2 1/2 c.) boiled water for second strain

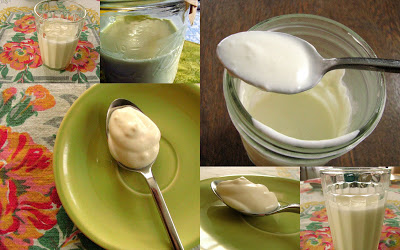
When I finally got there (at 11 o'clock last night), I declared the messing around with it to be fully worth it. I found the soymilk to be extremely tasty, it was wholesome and maybe slightly beany in flavor, but certainly not unpleasant. It was a creamy white color, a good thickness and I had exactly one quart. I cleaned up my mess, and went back to reading and monitoring the Brewer's extra innings...

<span class=

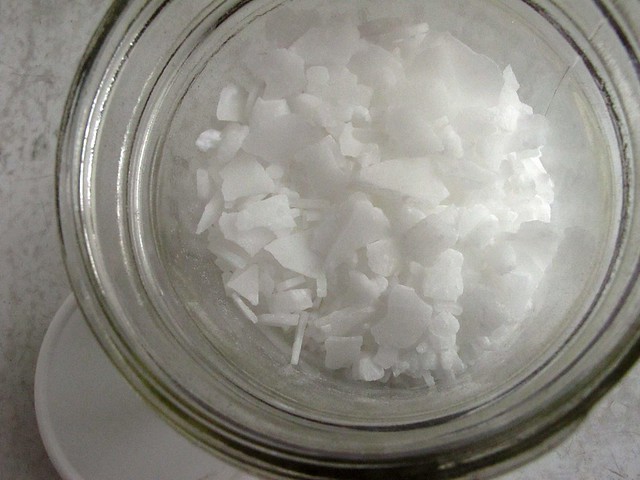
The transformation from soymilk to bean curd was then no trouble at all. Not too long ago, a friend and I split a package of Nigari flakes, a tofu coagulant, purchased from Cultures for Health. (The pound package makes 200lbs of tofu, so we'll have plenty to practice with!) When she gave me my portion in a glass jar, it looked and sounded like sea glass, a dreamy clinking that smelled vaguely of the sea itself.

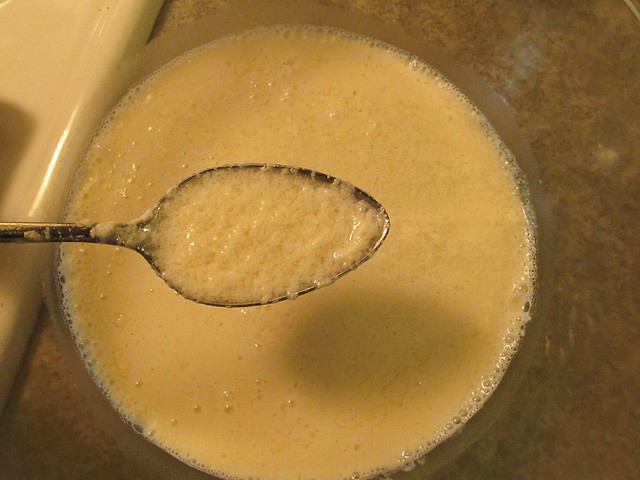
The directions for tofu making call to dissolve 1 teaspoon of the nigari flakes into 1 cup of warm water to culture 2 quarts of soymilk that has been boiled for 5 minutes, then cooled to around 165 degrees. My precious yield of soymilk was only 1 quart, so I halved that. I was expecting large curds to separate from the soy "whey", the way that dairy curds do, but they were very small, a curdled look that I hoped would work when it came time to press it. I let it sit for 25 minutes as recommended, then poured it into my makeshift press of pint-sized, plactic berry containers, one lined with several layers of cheesecloth and the other used as the press with a heavy cutting board perched on top of it. I had to pour the coagulated milk into my mold in several additions, letting some of the liquid drain off so that it would fit. Ideally, a mold/press set up that was this size, but maybe twice as high would work better.

coagulated <span class=

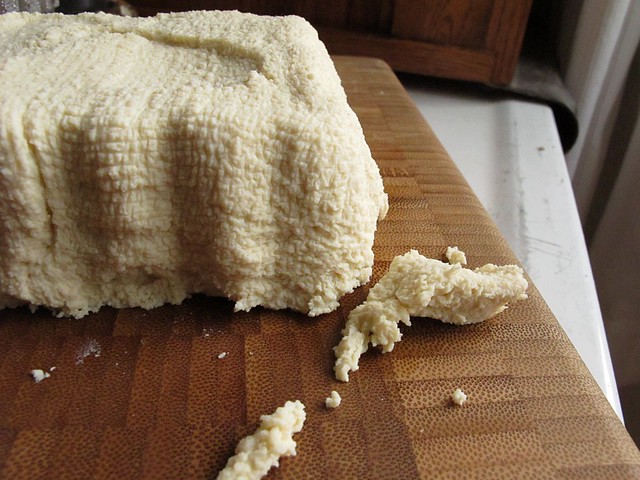
I only let the curds press for 30 minutes, and had a nice, semi-firm mass of beautiful tasting tofu. I nibbled a few bites, wondering what to turn it into that would be worthy of a day's worth of experimentation. I still haven't decided, so I packed it into a glass bowl, covered it with water and added a pinch of sea salt to see if it would help it to "cure" a little bit when I am pondering.

My quart of soymilk made 300 g. (10 oz.) of fresh, finished tofu.

pressed tofu2

I've been kind of into making alternative milks lately - and for no specific reason. I really love almond milk, and made some a week ago that I thoroughly enjoyed every drop of. I drank it neat, out of small glasses and savored it. I tried out a peculiar rice milk recipe that had me boiling rice for several hours. I was left with a thick, viscous liquid that was maybe a little strange, but I'm still enjoying it blended with ice and extra cinnamon like some strange horchata, or including it in smoothies to use it up. A cup of rice gave me close to a gallon of rice milk when I was finished diluting. There is no denying that it is economical, but come to think of it, I made quite a mess with that project too.

Soymilk is definitely more labor intensive than other nutmilks, but I really love the result so I will likely be making it again. As for the tofu - that is so simple, it practically makes itself. All you need is the culture, and a small measure of patience. The finished tofu can also be cultured further into tempeh, if left for more time at a constant 88 degrees for a day or two - maybe I'll try that sometime in the future as well.

Cultures, Generations, and Rhubarb


Since I got the buttermilk and yogurt cultures from Cultures for Health early last week, I've been a bit preoccupied in my new science experiments. Cultured buttermilk is where I began, after reading on the website that having different cultures too close together could result in cross-contamination. Since my house has been on the cool side, I thought I'd play it extra safe and do one at a time, held in the oven with the oven light on. As I mentioned the other day, this creates a mildly warm culturing environment, perfect for buttermilk making.

The cultures I received were large enough to start two portions. You begin with a small amount, and then build it into a larger amount - which I have determined to be a good thing since the future generations improve vastly. My first buttermilk was on the thin side and very "curdled" looking (I suspect in part due to the non-homogenized milk I've been using), but now that I have the 4th generation, it is thickened nicely and has nudged it's way into the List of Things I'll Never Buy Again.

The only somewhat bothersome thing is that to continue culturing, it is recommended that you use a portion of the existing batch to make a new batch at least once every 7 days. It could seem like a bother, but really, it is as simple as mixing 1 part buttermilk with 3 parts milk and then letting it sit. I'd bet even the busiest person with a hankering for homemade buttermilk could manage this! You let it sit undisturbed except for a peek here and there for 24-48 hours, so in scheme of homemade things, it doesn't get much easier than this. To make a silky smooth version, I used my little milk frother to approximate a bit of homogenization, and then the finished buttermilk was exactly perfect in every way.

After I had a nice 2nd or 3rd generation, I used a bit of it to make sour cream - a good way to use up the leftover heavy cream that I bought for the Schaum Torte Ice Cream. The first attempt at this turned out more like a Mexican crema, but after traipsing around the internet, I heated the cream to 80 degrees for my second attempt, and it was so thick I could turn the jar upside down! Ah, the wonders of culturing! I wish I could remember where I saw that tip, so I could give credit, but alas, my brain is full of microorganisms and I just can't recall. To make sour cream, use 3 tablespoons of buttermilk and 2 cups of heavy cream (half and half will yield a lighter sour cream), mix well and let sit at room temp (70 degrees) for 24 hours. If you have thickening issues, try heating the cream gently to 80 degrees, and then continue.

After the buttermilk was in full swing, I started the yogurt. Per the Cultures for Health instructions, I let the initial cup sit only about 8 hours. It was tasty, but very thin. However, when I used it to start a quart of yogurt and let it incubate for a full 15 hours, it was considerably thicker. This Bulgarian starter also has a wonderful flavor, much less tangy than YoGourmet culture I was using. This culture too needs to be re-cultivated every week or so to keep it viable and healthy, and the Culture for Health people purport that these can be used for years! We'll see how it goes, but so far, I am a very satisfied customer.


Meanwhile, my Mom came down for a visit, bringing a bagful of rhubarb from the garden, and color coordinating vintage finds as an early Mother's Day gift for me. After we got her in the door, she washed and cut up all of the rhubarb: some for the freezer and some to go right into some rhubarb juice. I really wanted to make Mostly Foodstuff's Rhubarb liqueur, but after some discussion (and inspiration from so many of the last CanJam pictures of cordials and infusions from so many different sites lately), I opted to go for rhubarb juice. I canned 4 pints in a hot water bath for 15 minutes (hot-packed). I felt a bit on the wild side, since I didn't use a proper recipe. Since rhubarb is high acid, I used the amount a rhubarb seen above and enough water to come just about half way up. My Mom has canned rhubarb juice this way for quite a long time, though hers is much sweeter than the one I produced. She helped me strain it through some cheesecloth, and told me if I wanted absolutely clear juice not to press on the cheesecloth to get all of the juice out of the expired vegetable. I always go for delicious quantity over color clarity in things like this, so I squeezed until the remnants of rhubarb looked kind of like dry paper pulp. But just look at the amazing color!


I added a scant 1/2 cup of sugar for what turned out to be about a half gallon of juice, but it would be a matter of taste. I would also imagine you could freeze the juice instead of canning it, but I was happy enough to can just 4 little pints of something. I think this is the first time I've done such a small batch, and it got me considering joining the CanJam...


I had just enough leftover juice to have a small cup. I drank part of it hot, which reminded me of a cider, and then put it in the fridge to cool. Cold, the juice has a such a pleasant viscosity, and without too much sugar, it is truly a delicious aperitif. I think it could be used rather well as a cocktail base, too, so everyone can be happy!


The remaining 12 cups or so of rhubarb is now being patient in the freezer. There are so many good rhubarb recipes floating around right now it is certainly not going to be difficult to find inspiration for it's use. The only caveat being that I will need to eat it all myself, since I am the sole rhubarb lover here. Something tells me that won't be much of a problem...

Recent Kitchen Adventures and the Mechanization of the World as I Know It.

Late last week, my KitchenAid died. Mid-dough, it ceased up and I quickly shut it off. I panicked. I know I have some serious issues when the sudden demise of an electrical appliance causes me to panic. I quickly called the helpline, a number I was able to find in about 30 seconds on the iPhone, and quickly made my way through a cue of automation to a live person.

The funny thing about the mechanization of the world is that it also mechanizes human beings. I'm pretty sure that the woman who initially helped me didn't hear a word I was saying. She, no doubt, was a mid-range, hourly employee who was doing everything by the textbook she was trained by. She was pleasant, but not personal.

Now, I am really not a bad person to deal with. I am as quick to call and complement as I am to call and complain, (and I like to think that I can complain with tact and class!) but when I challenged her on the way that KitchenAid stands behind their products, the one sentence straight out of the manual was not enough for me. I pleasantly got off the phone, but I was Upset. Upset that my Professional grade mixer that I use (actually more often than I at first realized) was going to have to go somewhere out of state for repair, and upset that people don't actually hear you when you talk.

After noting my unpleasantness on my Facebook page, I got a swift response from another KitchenAid employee. Not only was my experience totally different, I came out thinking much higher of the product. Within a few emails, I had a phone number to an actual person with an extension, and the person actually listened to me. Curiously, she gave me the exact same information as the first person I talked to, but she did it in such a human way that I realized that my initial displeasure was totally unwarranted.

Further, we discussed that the use of my beater blade may have contributed to the problem. I did not know that the beater blade is really not recommended for use with stand mixers, I mean, Dorie Greenspan of all people was recommending this product! I would say in the past 2 months, I was relying on the beater blade more and more for the amazing job it does incorporating batters without having to stop and scrape down the sides. This is what happens when humans listen to humans and really Hear them, real results can happen - and this is true with so much more than KitchenAid stand mixers. When my machine is repaired, I will be retiring my beater blade... and I would have to say I'd recommend you do the same if you have one.

One machine I don't know if I can give up is my digital scale...

The dough that brought down the mixer was the Multigrain Sandwich bread. I was able to finish it by hand, and gave one loaf to Peef and Lo, and just finished the last of our loaf on Monday. On the first batch, I had a third of a leftover loaf which I dried and pulsed into fine breadcrumbs. I am waiting for the perfect opportunity to pan fry some breadcrumb-dredged fresh mozzarella for one of my favorite ways to use up breadcrumbs...the crumbs smelled earthy and nutty and would be perfect fried onto some cheese and tossed into a spring salad. I think my waiting may be due to my recent obsessions with culturing (which will naturally lead to at home cheese making, I think...).

Another revelation, is that when I first started playing around with doughs, I usually did so by hand since I did have a circa 1940's mixer (my first stand mixer that now resides at Sasa's house), but I rarely used it except for cookies or cakes. After the floor-denting incident of my second KitchenAid (which really was not strong enough to keep up with what I was asking it to do: it vibrated off the counter when I was attending the Boy-O and that mixer even still works and is in my Parent's apartment as a spare), I kind of migrated to the whole "no knead" world of doughs, which is fine and convenient and does yield excellent results. But I think I have lost touch with the dough a little, and forget that it is really a living thing, full of organisms that respond to my hands.

I recall Marcella Hazan writing that to make pasta dough, it should be mixed by hand on a wooden board for a full 8 minutes. I used to do this, set to a timer, and it is fully physical work. Now, I usually get it into a mass, but rely on the power of the Pasta Queen to complete the kneading for me, rolling it through the metal rollers repeatedly with a bit of flour dusting on each pass. Faster, yes, but is it more satisfying to let machines take over? I'm not really sure. In the following days that I am KitchenAidless, I believe I will return to some good, old-fashioned hand kneading experiments. After all, these hands are the greatest multipurpose tools ever designed, and maybe I need to appreciate them a little bit more.


I got two cultures, a yogurt and a buttermilk, from Cultures for Health that was a resource Lo recommended to me. I was so impressed with the site, and their wealth of free information, that I could have also invested in some kefir and kombucha starters as well. I figured it would be best to start off slowly, one culture at a time, so I started the buttermilk on Monday. Simply mix part of the powdered culture with fresh milk and leave at warm room temperature (70 degrees) for 24-48 hours. I went the full 48, since I suspect my room temp was a bit on the cool side to begin with. I then took the tip of placing the jar in the oven with the oven light on. A strange amount of heat is generated this way... and it was a perfect way to not turn my home into a sauna for 2 days.

Now that I think I have a viable 1/2 cup of cultured buttermilk, I can begin to build it into a larger portion - according to the site, I can keep portioning off the culture and use it indefinitely! I am using this ambient oven-heat trick now to keep my culture comfortable since especially in these early spring days, when I don't have the heat on much, it can be a bit on the chilly side. Another thing for The List of Things I'll Never Buy Again, all thanks to this post by Julia which made me realize that I could do this, and easily!


I sometimes get behind in reading as much as I like, but do often peruse the photos of my flickr contacts. Marisa at Food in Jars posted photos that I knew would be explained on her site and I clicked to find exactly what I wanted: Cold Brewed Coffee. I am pretty bland in my coffee-brewing techniques at home, and rely on my favorite, local Alterra, to get me a fix of anything special I may be up for. Since I am rather home-bound most of the week, a good cup of drip joe is usually just fine for me, and I drink it (16 oz. from my little 4 cup Cuisinart) in a range of temperatures throughout the morning. I turn off the maker as soon as it is brewed, and seriously drink it from it's hot goodness around 8 until it is stone cold around 11:30. I did the method Marisa outlined last night, and enjoyed some iced coffee this morning. It's worth playing around with, and is pretty much labor and machine free!


Meanwhile, Boy-O is on the pancake diet. It is all he will eat. I have committed to making them as healthy as I can and use only oat flour, whole wheat flour and a tad of olive oil. (I can make them in my sleep: 1/2 c. rolled oats, ground in a spice mill to flour, 1/2 c. whole wheat flour, 1 1/4 t. baking powder, 1/4 t. baking soda, 1 c. buttermilk (soon to be homemade!), 1 egg, 1 glug - a Tablespoon or so - of olive oil. Mix and let stand about 5 minutes to let the batter thicken before commencing with your flap-jacking.) I can get him to eat an apple, if there is peanut butter for him to dip it into, and really nothing else. I have no idea why he is getting pickier instead of less picky, and am trying not to worry about the holes that must be evident in his nutrition... I hope this phase passes soon, and that I don't turn into a caterer which I fear has already happened.

So when this morning, as I actually swept the kitchen floor instead of plugging in the vacuum, I was reminded how much I have come to depend on machines. I used to sweep all of the time, then I bought this vacuum (the best one ever, by the way) a couple of years ago and have lost the art of the broom. I've come to the point that I use the stand mixer to even mix my no-knead bread, since I like letting it raise in the 6 quart bowl, and I figure "why not just let the dough hook do it?" since I will have to wash a spoon anyway. I let my iPhone signal me when I have email, I brush my teeth with a Sonicare, I let my dryer do most of my clothes drying. Well, today I'm getting some more clothesline and going to start to knead some dough ladies and gentleman: because I fear I am getting citified! Stay tuned, because it's going to be the Rcakewalk's Rise Against the Machines around here for awhile! Not sure where that is going to lead me, but it may even lead me more outdoors and less into the world of postings... but I'll be sure to check in, I'm sure.