Burp Where Food Happens

Currently, Currants.

red currants.

Well, yesterday's doctor visit confirmed that baby number 2 will likely be late, like baby number 1 was.  Am I such a good hostess that my children just don't want to enter the world?  As I look past my tomorrow due date, I try to remember to be patient and also try to remember that there will still be a good amount of summer left after I get back to feeling normal.

Part of my impatience has to do with the normalcy that I crave.  Ordinarily, as soon as the weather warms I find myself interested in searching out new and different things to preserve and then beyond excited to take their pictures and write about them.  My new normalcy is the feeling that I can't really plan anything, go anywhere too far away, and certainly not to wait around on ripening produce.  It's frustrating for me because I'm not a good idler, I prefer my old spirit of juggernauting forward, that always propelling forward motion that feels so good, especially in the summertime.

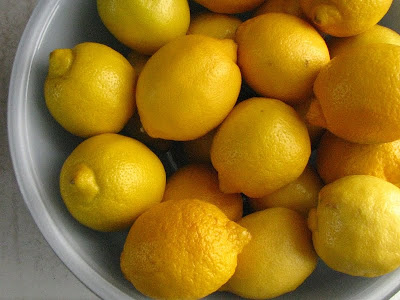
When I woke up early on July 4th (every day, I wake up at exactly 5:22, don't ask me why...), I found a message from a localish orchard; the currants I'd been looking forward to experimenting with for the past 2 years were finally ready, and the farmers had two ice cream pails already picked and waiting for me if I was still interested, and hadn't had my baby yet.  For a brief moment, I felt my old self return.  I hopped out of bed and immediately searched my sources to see about how many currants I'd need to do the few things I had in mind.

I'm not  used to depending on others to do what I'd like, especially when it comes to climbing behind the wheel of the car and taking off on a whim.  In our family, I'm the usually always the driver, in part because I just love the road (and in part because I'm a terrible passenger).  But this close to a delivery date, I'm not driving much - and not very far.  I was actually surprised that my Husband offered to drive us down to the little farm where the currants were, even more surprised that he tried different varieties of currants and gooseberries, and was interested in the workings and stories that the husband and wife team running Klee's Out on a Limb Acres had to offer.  It was a perfect afternoon, and even though the journey wasn't actually so far away, it was was just rural enough to satisfy the summertime longings for the country that always plague me - and it was even better that my boys were both appearing to be enjoying every minute as much as I was.

red currant jelly
Last year, our whole state was devastated by a strange and early spring promptly followed by a killing frost.  Sadly it left us without many cherries, apples, and other orchard fruits, and when you could find them, they were almost prohibitively expensive.  The entire season was decimated for small timers like Klee's - they had no crops for sale last year at all - and that was the year that I read about them and found that they grew old-timey things I was looking for like gooseberry, quince, and currants.

I have had currants on the brain for two years.  It's been more than that long since I first had a tipple made by friends Paul and Lori of the Burp! blog, and I was really smitten.  Their liqueur had been aged for quite some time by the time I tried it, and it was earthy, complex, and just plain lovely.  As I'd never even seen currants growing, and never picked or tasted one, I longed to find a source so that I could anticipate tiny cupfuls of that delicious liqueur of my own making - and experiment with other things as I usually do when I get too excited over a new best friend and overbuy considerably.

crème de cassis
I double checked with Lori to be sure the drink I had tasted so long ago was made with red currants and vodka, because as I recall it was dark in color and so deep and raisiny tasting I couldn't imagine the jewel red berries resting out so much.  I made the recipe exactly as they suggest, not adding or subtracting a single thing... and I plan to age it until at least Christmas before trying it.

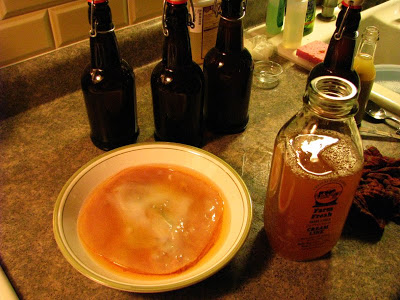
I had just enough Mount Gay rum left in the bottle (given to me so I could make flourless chocolate rum cakes for a friend's birthday in January) to do a batch of Pam Corbin's Currant Shrub.  I was under the impression that shrubs were usually non-alcoholic, sweetened vinegar bases that were mixed with seltzer.  But, in her book The River Cottage Preserves Handbook, she details this one made with red currant juice and rum (or brandy).  Also taking several months to mature, I figured another thing to try around Christmastime would be welcome.

Pam Corbin "shrub".


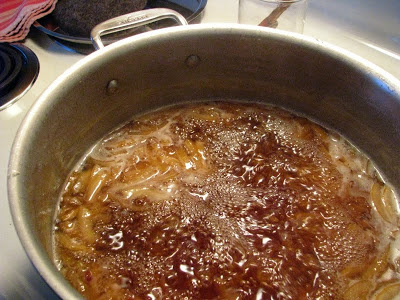
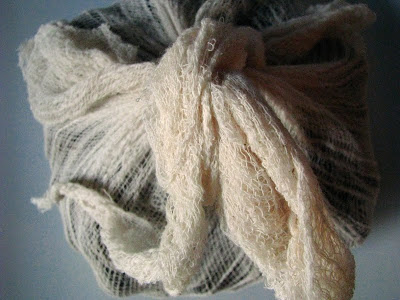
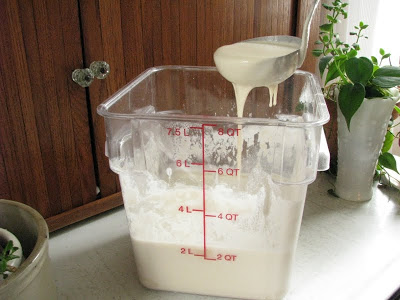
Pam's shrub is so easy to make.  I knew I was already doing a batch of currant jelly and simply steamed enough extra currants to allow for the 1 1/4 cups for this recipe.  Given my state of pregnancy, I steamed the berries on July 4th, and made the jelly and liqueurs the next day.  For every pound of currants, I used Linda Ziedrich's advice and added 1/2 cup of water.  (I did 4 1/2 lbs of currants and 2 1/4 cups water, and had more than enough juice for this recipe and a batch of jelly.)

Pam Corbin's Currant Shrub
  •  1 1/4 c. red currant juice
  •  2 1/2 c. rum (or brandy)
  • finely grated zest of one orange
  • 1 t. freshly grated nutmeg
  • 1 1/2 c. granulated sugar
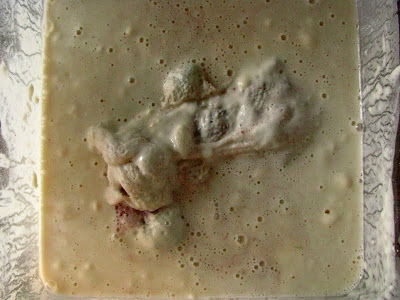
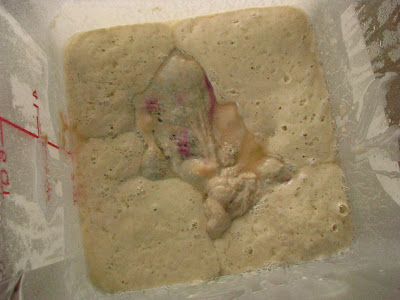
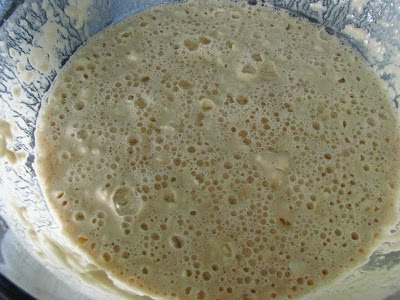
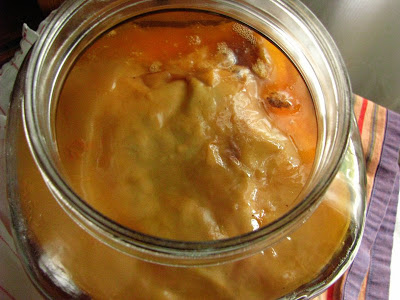
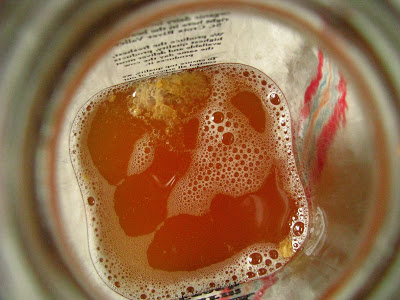
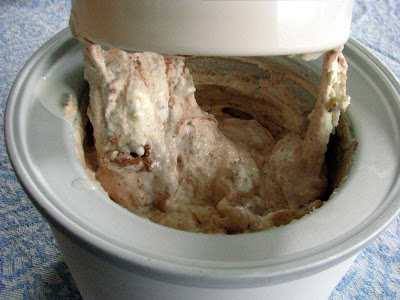
Mix the currant juice with rum (or brandy), orange zest, and nutmeg.  (Currants are naturally high in pectin, and adding the juice to alcohol may cause it to form a gel, as it did for me.  Corbin says it will turn back to a more liquid state after the sugar is added.)  Let this mixture stand for 7-10 days well sealed and in a dark place.

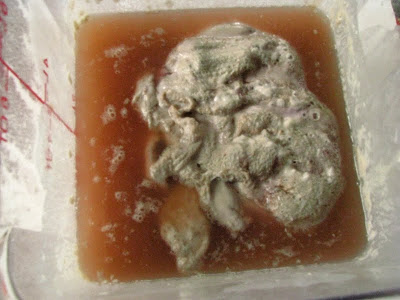
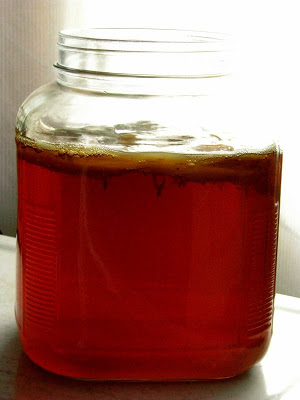
Transfer the mixture to a pan, add sugar and heat gently just to dissolve sugar, about 140 degrees.  Strain the mixture through muslin or cheesecloth, decant into a sterilized jar (I saved the rum bottle), seal tightly, and let age for several months (again, in a cool, dark place) before enjoying.  Drink within 2 years.

The way the currant juice gelled with the alcohol and suspended the orange zest within the jar was absolutely mesmerizing.  As was the intoxicating (literally) scent of warm orange, nutmeg, rum, and currant.  It was hard to stash this one away in a dark place, I can tell you that.

red currant jam pot.

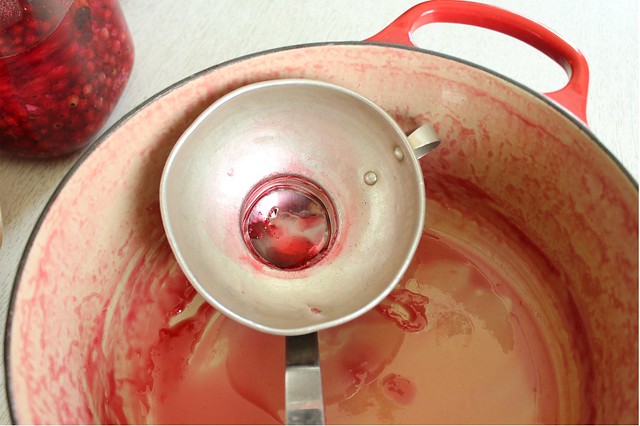
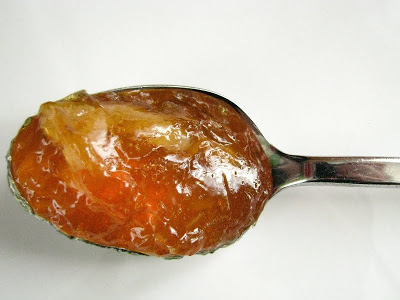
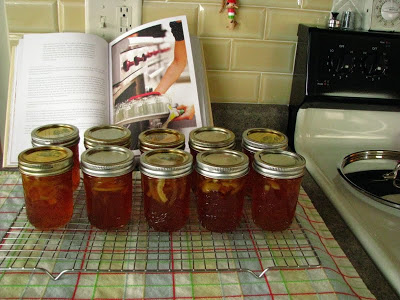
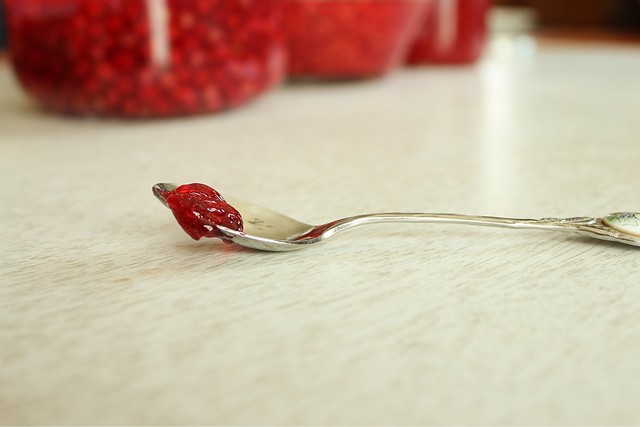
After I had my liqueurs underway and tucked away, I tackled the jelly - which is so simple.  Both Linda Ziedrich and Pam Corbin  had methods that used equal measures juice and sugar - so I used 4 cups juice and 4 cups raw sugar.  I thought maybe I'd like to add something "unique" to the jelly, but once the sugar dissolved and I tasted it, I couldn't bear to mar the clean flavor.  It is simple and delicious, and though I've pledged not to overmake in the preserves department this year, the 5 half pints of jelly are very welcome on my shelf!

quince & red currant on scones
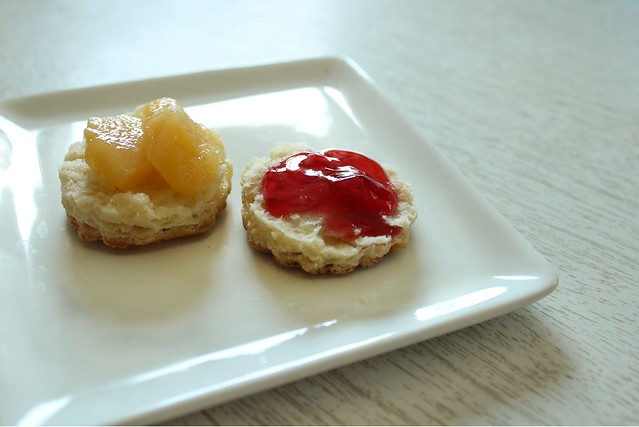
Sugar preserved quince, and fresh currant jelly.

I couldn't be happier with this 4th of July, and even though my spirits were dampened a bit with the thoughts of an overdue baby, I have to say the currants broke me free of feeling a bit sorry for myself.  If you are local and looking for a nice little farm to pick your own currants, gooseberries, quince, elderberries and other old-fashioned orchard fruits, check out Klee's!  They have a webpage, and update a Facebook page (and are quick to return questions if you give them a call.  Give them a "like" to stay updated, and take a little drive.  Candy shared with me a little jar of quince, which was also a first taste for me.  If I'm feeling up to it, I plan to get some to play around with... just as soon as it ripens, and this baby comes!

Lemon (Daydream) Marmalade

I'd feel funny saying that I worked for 3 days on this lemon marmalade only because it didn't seem at all like work. My house has been transformed into a lemony clean paradise as the skies above are overcast and sun is scarce. In the world of preserves, marmalades are a bit famous for being fussy and time consuming. They are also a paradox of flavor, being sweet, sour, and bitter most of the time. That could be why they are some of my favorites to eat. I've read lately of some people dipping their spoons again and again into their various nut butters and homemade versions of "Nutella", but I'm certain that my future sneaky spoonfuls will contain fat dollops of this lemon marmalade instead.


I actually didn't plan on making any marmalade this year, since I have one jar left over from my canning party with Lo and a fully stocked preserves shelf in the basement. When my hold on the Blue Chair Jam Cookbook by Rachel Saunders came in at the library (and I was as impressed both with the weight and size of it as I was the photography), I set out scheming to make this lemon version shortly after reading about it. One particularly interesting thing about Rachel's method is that she uses the oven both to sterilize the jars and lids and to can the finished product. I wasn't sure about that, but decided (after a brief consultation with Julia) to give it a shot.

I'm pretty sure I had two different kinds of lemons, some were thinner skinned and smooth, and some thicker and dimply. I can't claim to know much about lemon varietals, since they don't grow in Wisconsin, unfortunately. I love reading things like this where lucky people have things that I can only imagine growing myself dropped in their laps. It's curious that I recall such instances as if they happened to me. I know I had *wished* that I could make Deena's lemon thyme marmalade last summer when I read about it. But like most things, I forgot about it when "lemon season" has hit me here, right now, in the broadest part of the Winter.

How do I know it's lemon season? I make an assumption based on when my co-op has specials on citrus; I got my 6 lbs of fruit for around $8.50, which works out to about 65 cents per jar for organic marmalade (if you don't include the sugar price).


Rachel's method is easy. The work is shared with three days, but each day's work is rather light. Day 1: soak cut half of the lemons overnight, Day 2: boil soaked lemons to make lemon juice and strain overnight and cut more lemons into thinly sliced eighths and let them soak overnight, then Day 3: add sugar and a touch of fresh lemon juice to the past 2 day's labors and boil until you reach marmalade.

I will say that I admire canners who develop recipes. It seems to be a highly specialized art. I can follow instructions (and in the event of canning, follow them without addition or subtraction which is usually hard for me), but I'm not sure I would be cut from the cloth of precision as canning writers are. This recipe delivers what she says it will, it is very pretty and hard to improve upon. I'll say that it is a miraculous balance of flavor that stems from the patience in 2 days worth of various soaking periods. There is bitter, there is sour, and there is sweetness. And, when you catch a piece of peel and bite into it, it is pure summertime even in the depths of snowy winter.


perfectly gelled.


I've actually only made marmalade one other time, with the aforementioned Lo. While the flavor was really good, the set was not. We did not, however, employ the method of spoons. Prior to making the marmalade, stick 5 spoons in the freezer to get good and cold. When the time comes to test for the gelling, you can pour a little onto the spoon and put it back into the freezer for 2-3 minutes. If properly set, it should not run off the spoon. I liked this step immensely, especially since I got to eat the spoonful after the check. It took me 3 spoonfuls to determine the set, and a full hour and (almost) a half to get to that step.


the method of the spoons.

Cooking down marmalade when the snow was falling was especially enjoyable. I made my coffee and pulled up a stool to lazily keep an eye on it, stirring every so often. I thought about the Italian tradition of serving espresso with lemon peel on the side of the cup. I took hipstamatics using my new free film in the app upgrade I downloaded this morning. I took apart and cut hearts out of an Alterra coffee bag, that I intend to string up and hang somewhere. I in general gave thanks that I am a stay-at-home mami that can do what she pleases, so long as the house is clean and so forth. And, I daydreamed of Summer and it's business of growing and walking and playing: those things I love that prevent me from sitting down at the counter for a couple of hours and tinkering with a jam that I don't even know will work.


thankful for cameras.

The recipe as written did not give an exact amount of lemon juice liquid that should have been extracted from the fruit during the process leading up to the boil. I think that the water just needs to evaporate to the proper stage, and so no exact amount is probably needed. My liquid level decreased by a good 3 inches in my stockpot. Because I kept testing with the spoon method, and because I had pulled up a chair to properly observe, I could actually tell when the boil changed from aggressive bubbling to more subdued activity.

All the while, I had my 10 clean jars with lids in a 250 degree oven. This technique of sterilization and canning I have never done. It actually seemed like something that was too good to be true. No boiling water turning my fan-less kitchen (and the rest of my smallish house) into a sauna? I love this method! I had only one that didn't seal, and I added it to the extra three I had, so I have some to devour straight away. Obviously, I have a couple unsealed to give away as well. This is the time I break out my favorite strange canning jars that I can't really use to preserve in - one triangular jam jar that Sasa gave me is my favorite:


It originally contained a Croatian fig and chocolate jam. Next time I see her, I'll give her this unsealed jar of lemon marmalade knowing I'll get it back again to fill with more surplus jams or jellies. I'm telling you, it's the simple things in life that give me the most joy.


peels seemed to rise to the top, but the gel is set so no matter.

I confess, that so far I've only read through the beginning and "Winter Through Early Spring" sections of the Blue Chair Jam Cookbook. I was smitten, my heart at first purchased with luxe paper and pictures, but now also with a sound recipe written very well. Now, I busily page through the rest of the book and drop it into my bottomless Amazon cart. I daydream of warm weather, thankful for California and it's bounty that provides me lemons in January.

I pause, and suddenly shutter at my thoughts: at the end of this summer, I will have officially hit my mid-thirties and I daydream some more that I'm still 23. But then I lighten at the hope that my first ever knit sweater should be complete by that time (I cast on yesterday!). This is what happens to me in the winter. Roller coasters of retrospect and expectation move in when I have time on my hands. I try to remember not to dream it all away and be thankful for each second.

Nancy Silverton and the Wildness of Bread


The beginning of bread.

I confess that I have probably read the book Nancy Silverton's Breads from the LaBrea Bakery at least ten times. I have habitually rented it from the library several times a year, long before I ever baked any bread on a regular basis. I feel like I actually know this book like I would know a person, like it has become part of my general knowledge. I even feel like I know Nancy, like I can hear her voice on the page, working through her processes in an authoritative conversational way. Thanks to a woman I met at Annie's class who was paring down her cooking library, I received a copy of my very own, and busily re-read most of it yet again in July.

I actually know whole passages by heart, including the foreword written by Ruth Reichl. In it, she describes Silverton one Thanksgiving as she arrived as her guest with an ice cream maker to accompany the pie she brought. She set it up on the floor, the only surface not being used, and nearly tripped hostess Reichl as she carried the turkey into the dining room. Why? Because ice cream tastes so much better when it's fresh, and apparently she didn't dream of making it anywhere but on the spot of it's imminent consumption.

Obviously, then, I knew that if I were to attempt catching my own wild yeast and making it into something palatable, I would follow Silverton and in all of her exacting madness. Obsessed people usually make the best teachers and the writings that follow them tend to be as detailed and true as instructions can be. I collected my grapes from my Parents Farm, not only because I wanted to have organic fruit that I didn't need to worry about washing, but also because I wanted a deep Wisconsiness to my bread... a bread that has yet to be baked.


Silverton's method of starting a starter from wild roots is a 14 day process beginning with immersion of a pound of grapes in a bit more than a pound of bread flour and 2 pounds of water. I followed the weight instructions to a tee, including the temperature of the water she suggested. I didn't panic when the Concord grapes turned my contents suspiciously purple, and I did note the changes in its scent as the days progressed. Grapey-ness turned to a slightly alcoholic sour smell within several days, until by day 14 a fairly mild and uniform bread-like aroma ensued.


Day 1


Day 2


Day 3


Day 4 (sorry for the blurriness on this one...)

The grapes actually stay in the mixture a whole 10 days. I didn't have any mold appear, but it is normal if it would have. After day 10, I carefully began to feed my baby 3 times a day. According to Silverton, we humans can survive on one meal a day, but really it's not advisable, so if 3 meals is better for us and our metabolisms, it is also better for our living breads. Again, I followed her methods exactly, feeding about 6 hours apart, and with increasing amounts of flour and water on each successive feeding in the day. Every new morning, I dutifully poured off all but a pound and 2 oz. of starter and started the process over again until on day 15, this past Monday, I tried to bake.


Around day 10...

It is completely obvious to me that my sourdough starter is active and alive. After each feeding, it takes awhile to bubble up, it smells sweet and good, and towards the time of the next feeding, it begins to separate - a layer of clearish yellow liquid on the top that is easily mixed in to what reminds me of a sticky crepe batter consistency. Every time I feed it, the same thing happens all over again.

But, when I tried Monday morning to make actual bread, it did not work. It felt like bread as I worked with with the dough, but it lacked any strength to leaven the dough during the first rise. After about 8 hours, and still no change in bulk, I figured I'd just pat it out onto an olive oiled baking sheet and bake it into a "focaccia" after emailing with Lo. It still didn't rise in the oven, not that I expected it to - a leaden thing that tasted surprisingly delicious with sour tang and well complemented with generously sprinkled rosemary and Parmesan cheese...


Late yesterday afternoon, I began my research elsewhere. I have no idea how to bake with my starter - especially when all seems well and living and tasty, if not proper. Meanwhile, I've decided to take my starter down to 100 grams and add 50 grams each of flour and water at each feeding for the next few days (after preliminary research here). I also need to talk to someone who has baked with sourdough I think, since no matter how much I think I know Nancy Silverton, I can not channel the wealth of knowledge that could otherwise be learned firsthand or hands on by a non-book dwelling human being. If anyone in my area (or any not-so-close reader) has any tips for me, please let me know!! Lo has already been a really great resource, but her starter is probably at least 100 years old, or even 250 - if it came from King Arthur Flour. She got it from a friend, and it always seems to work for her.

Since I have had nearly a half gallon of starter by the end of each day, until today when I decided to maintain a smaller amount, I had planned to make one of Peef and Lo's recipes: Sourdough Waffles. This morning, after I weighed out my saved starter to feed, I used a cup of what was destined as waste to make a sweet version of their delicious waffles. No bacon or cheese in here, but they were delicious when served with bananas and newly made peach butter. They were substantial, like bread, the telltale tang of sourdough that I know is alive and active beneath my uncertainty of this newborn.


I have to be out of town this weekend, so I hope I can safely tuck my little baby into the fridge where active fermentation can slow into dormancy until I get back and can resume hovering over it like a mother hen. I want to believe that it is just too young to be productive, after all he's only on day 17 of life. I like to remember that I am dealing with a living thing here, and just like my Boy-O, he's not going to do what I ask him to until he's good and ready - or is explained to that good behavior is something that is going to be expected. But maybe good behavior does have something to do with 3 good squares a day, and plenty of "cot" time. Three squares and a cot. That's what I'll try and remember as I feed for a few more weeks before trying to bake bread again...

My Bravest Adventure Yet: Kombucha


GT's brand was my first experience with kombucha, a fermented tea beverage, probably about a year ago. Now through the wonders of friendship and Internet, I can say I will probably be GT's free indefinitely. Starter teas and finishing flavors including different juices, can vary, but the hallmark vinegar bite generally does not, and home brewing of kombucha allows the brewer a hand in controlling the amount of tang in the finished drink. This was certainly one thing that a year ago I would never have envisioned myself making in my home kitchen.

Kombucha is another item in the list of "love it or hate it" type things, due to it's unique flavor profile. I think, for me anyway, kombucha could be likened to cilantro; when I first tried cilantro - sometime in the 1990's I think - I hated it. Really, really hated it. Then, a few days later at work, an indescribable craving for cilantro came over me. I had to have cilantro, and from then on I couldn't get enough. That is how kombucha was, one sip and I was kind of amazed, a day or two later, I was full out obsessed.

Prior to my first sip, I had only generally overheard people talking about kombucha, and had seen it sold for exorbitant prices in the co-op, when I decided to purchase a 16 oz. bottle for about $4.50. I didn't know what to expect, so I didn't know that opening a freshly shaken bottle, in the car mind you, was going to be a really bad idea. About a third of my expensive trial run ended up stickily coating the interior of the Olds, and I learned firsthand about the natural effervescence of kombucha.

While the price of bottled kombucha appears to be going down (I assume in part due to increased competition from other brands), it is by far less expensive to make it yourself. And if you have a need for kitchen projects, as I do, the attraction to this one is purely irresistible. For some reason, I used to think that this was something best left to the controlled environment of a commercial kitchen laboratory, but now that I have been living with a SCOBY for a bit more than a week, any fears I had about home brewing tea from a living organism have evaporated. It is interesting to cohabitate with a culture of this nature, who goes through daily changes, and can perpetuate many generations. It could be the stuff of science fiction, or it could be age old wisdom in the new-fangled guise of popularity. Whatever it is, it is delicious, and it's worth giving a try!

Ok. If you are squeamish, this may be where you want to depart for the day. The kombucha brewing process begins with a SCOBY:


SCOBY, circa day 3 of first batch brewing.

SCOBY stands for Symbotic Colony Of Bacteria and Yeast. So this little guy above, a baby SCOBY given to me by my friends Peef and Lo at the Burp! Blog, is an actual living organism. He feeds off sugar, growing and fermenting the liquid he is in until the tea is ready and full of healthful strains of vitamins, enzymes and acids, usually 7-10 days but as long as 30 days depending on your fondness for vinegar and your sensitivity to sugar. The longer the SCOBY resides in the tea, the more sugar it eats. The final elixir is slightly alcoholic, but contains far less than 1% alcohol, and the SCOBY produces multiple beneficial organic acids during the process.

It seems there is no real medical fact to back up any of the health claims, of which there are many. Even the Mayo Clinic notes that there is no human trial on record to back up any such heath claims. Most fascinating to me, however, are the claims by numerous people of the beneficial effect of glucuronic acid produced by the SCOBY.

Glucuronic acid is touted as having superior detoxifying abilities, and cleans the liver. Cancer and other vicious afflictions such as rheumatism appear to have drastic positive reactions to glucuronic acid, and to the host of other beneficial acids contained in kombucha. It appears the glucuronic acid is best produced in tea stored at a constant 74-84 degrees farenheit, and not as well at cooler temperatures. I'd say my kitchen has been a little cooler than that, but it seems that I've been doing ok so far. There is no shortage of information to be Googled, if you are interested. I found some great overviews here at the Happy Herbalist and here at Food Renegade for starters.

But more important to me than unsubstantiated health benefits, kombucha is adventurous. The name, obviously, sounds very Japanese, and is thought to originate in the far east. According to Seeds of Health, around 415 AD a Korean physician named "Kombu or Kambu" treated the Japanese Emperor Inyko with "cha"(tea), and the result evidently was positive as the tea then took the name Kombucha. Kombucha then migrated to Russia and on to Eastern Europe. (The Seeds of Health link above also outlines the numerous beneficial acids contained in kombucha.) Traveling tea, made from living organisms that, I'm guessing substantiated or not, are pretty darn healthy? Sign me up!

In our food geekery talks, Lo told me of her aunt who had multiple SCOBY's and kombucha batches going. Different teas, green or black, lead to different flavors, and Lo's aunt sounds like she has an awesome "laboratory" to choose from. The culture that Lo chose was from an Earl Grey tea, a tea that generally is considered a poor choice for growing a SCOBY. We both have had good luck so far, Lo in her 3rd or greater batch, and me in my 2nd, using a high-grade Earl Grey tea from Rishi. Burp! Blog will no doubt also be posting on their kombucha adventures, so be sure to check in on their site! Peef and Lo graciously gave me my SCOBY, and a nicely typed and articulated way of brewing my first batch of kombucha. I started a week ago Sunday, and in 7 days, had a batch of tea ready to be bottled.

In the interim, I read (and still am reading) tons of information on kombucha, SCOBY's, and the health benefits of both, and also more than once have been sucked into reading disaster stories of how natural things can be bad for you. It does appear, however, that "bad kombucha" will only lead to nausea and vomiting, so it's a risk I'm willing to take. It also serves any adventurous kitchen warrior to take extra precautions when handling a SCOBY: clean, non-latex gloved hands, and a clean environment just make good sense. Another rule of thumb for kitchen experimenters is if it looks funny, smells funny or grows fuzzy mold, best not to chance it and throw it away. Also, I went a step further and after reading about PH levels, decided that I should test for my acid content prior to bottling.


To purchase snazzy swing-top bottles, I visited Northen Brewer. I had never heard of Northern Brewer, and was glad I could not (even with iPhone's help) locate my original destination and had to call my home-brewing friend, Mr. Mork - R1's husband. I have never considered brewing beer myself or even getting that excited about brewing/fermenting, but I guess in the course of culturing buttermilk, yogurt, vegan cashew cheese and sour creams the seeds were planted. This shop was so infinitely inspiring. They had a whole "Grain Room" and refrigerated liquid yeasts from Europe! I got a class sheet, and their catalog to peruse wort chillers and glass lab equipment like a crazy person over my breakfast.

Beer is just fine, but I don't go out of my way to drink it most of the time, and here I am daydreaming over descriptions of hops! I called up Mr. Mork, and asked when his next brewing session would be since now I just have to learn more (without becoming totally committed to home-brew craft all by myself). We set a date for next week, and I am going in like a sponge to soak up all the hands-on information I can on beer brewing, and I hope to have a series of posts on my observations!

The Northern Brewer employee that helped me was completely knowledgeable and the perfect person to continue inspiring me. He was interested not only in fermenting beer, but in lacto-fermentation of pickles and ginger beer plant. I didn't realize at the time we were talking that the Ginger Beer uses the exact same process to ferment as kombucha! He convinced me, easily by the way, to invest in a product called StarSan to sterilize my jars. I did the math, and for a half gallon of water, I only need a single teaspoon of this sanitizer as a rinse for my bottles. I went ahead and sterilized everything I used in a half gallon bowl of sanitizing rinse: funnel, ladle and finally my clean and ready to be refilled 1 gallon glass tea jar.

The next day, I returned to purchase PH testing strips and while waiting to consult with him, overheard him assisting a new home-brewer. He told him it isn't the end result that home-brewing exists for, that it is the whole process of brewing that leads up to the end result. "A Machiavellian approach to life" is how he put it, which put a smile on my face to know that I am not alone in my gusto for reading more into the culinary world than meets the common eye.

He also said that testing my acid levels probably wasn't "necessary", but would be fun to know - exactly what I thought. An article I read said to prohibit the growth of bad bacterias, the acid levels should be between 2.5 and 4.6, mine checked in at 3.2 on day 7, and tasted fizzy and light without being overwhelmingly vinegary, so I decided to bottle. In two of the bottles, I added a little bit of pure ginger juice, since I read that the inclusion of juices can improve the natural carbonation. In the back of my mind, I wonder what the American Dental Association would think of my consumption of kombucha given it's rather high acid levels, but since I am not a soda drinker, I'm not going to let a daily glass of tea worry me.


I even dipped the bowl that temporarily held my SCOBY in sanitizer...

I got 4 16 oz. bottles, and about 3/4 of a quart jar of bottled tea, saving out at least 1/2 c. of tea and the SCOBY for the next batch. I was impressed at how thick the SCOBY got in just 7 days. I had almost no trouble separating it, but it did tear just a little. Aready, it appears to be mending itself.


Second batch, day 2: the baby SCOBY.

I was also reading that if you want to start your own kombucha and are not fortunate as I was to know someone with an extra SCOBY to get you started, you can take a bottle of purchased kombucha and let a culture begin on it's own. I was a little skeptical that this could work, until I did my own bottling. My quart jar has been out on the counter for two days (I moved it to the refrigerator today), and you can begin to see the growth of a new SCOBY near the top of the photo:


I imagine if you take a bottle of purchased kombucha, pour it into a sterilized glass bottle, and leave it at room temperature, you may discover that it can produce a baby SCOBY. If not, do a bit of research and I'm sure you will be able to find someone willing to share. The keys to any successful project of this sort are research, first person "wisdom of the ages", as the Northern Brewer employee put it, Internet/book knowledge, and old-fashioned common sense.

It's always a pleasure to run into other curious minds, and ones that are gonzo experimenters. For that and so many other reasons, blogging has enriched my life. I am lucky to be able to compare notes on this fascinating process with Lo, and as we both continue to gain knowledge and understanding of our little science projects, I'm sure there will be many posts to come. I will leave it to Lo to come up with some killer flavors, since she towers over me in that department... so you can be sure I'll be checking out the Burp! Blog anxiously to see what experimenting they are up to.

I'm also excited to see where my own blog takes me, now that my culturing obsession is moving forward slowly into fermentation. I have a copy of Wild Fermentation on hold from my library, and I'm sure that will only serve to add fuel to the fire. Just when I think there is nothing new on the food horizon for me, something steps in, confirming to me all the more that I am doing exactly what I should be doing at this point in my life... experimenting, reading, testing and writing about food from the standpoint of my small kitchen.

The Best Ice Cream in The Whole World.


I should preface my remarks of The Best Ice Cream in The Whole World, since that is a pretty big blanket of a statement for me to declare. I am reminded when I see my Parents that when I like something, I frequently clarify them as being the best things in the whole world. Granted, most of them are foods or usually desserts, but as a lifelong ice cream connoisseur, I can assure you that at least in my mouth, this one takes the supreme title.


My story really begins back February, when Lo posted her family recipe for Chocolate Hazelnut Schaum Torte. (You can read all about it, and the contest it was entered in here.) I had eaten similar confections called Pavlovas or Sheet Meringues, but never had even heard of this German immigrant version. Of course the Burp! Kitchen added chocolate, which makes it the king of all egg foam cakes, hands down, in my book. I ate more of this cake in February and March than I ever have in my life (or as my Parents would confirm that I also often say: My Whole Life). I ate it first at Il Mito, where it was featured for a week on their menu - the profits of doing so benefiting the Hunger Task Force of Milwaukee. The next day, it so happened that I ate it at a lunch at MATC Cuisine dining, where it was fairly "squoodgy" in the center. Squoodginess is the hallmark of a great Schaum Torte according to my personal Schaum Torte Academy: Burp! Kitchen. After a week passed, I ate it again at a soup nite they hosted, and it was the best of the best I have ever eaten. Both achingly and angelically sweet, yet light, and yes, squoodgy. I finally knew why this term was used to describe it, since this simple to make egg foam cake is close to divine perfection when baked gently in a springform pan. I made my own for Easter, and figured I really shouldn't devour the entire thing myself (which I was certainly on the way to doing). I scooped out it's fluffy, mallowy middle and froze heaping tablespoons full on a sheet of parchment, to wait for the appropriate time to make it into an ice cream.


Don't you know, that in the course of a month in the freezer, the half of a Schaum Torte shockingly decreased in size? Partly, because the cold compressed it, and partly because I had to taste it, to make sure it wasn't going bad or anything.

Last week, I made the Daring Baker Challenge, which was kind of altered to better serve my dessert eating needs. It is currently nestled in the freezer, half-eaten, and waiting to be unearthed and served with a scoop of this delectable ice cream on the side. I was suspecting it needed just a little something... and this my friends is it. You'll have to check back on the 27th to read all about it.

Meanwhile, you can have a look at the ice cream:


Since Lo has really become my personal expert source for things exactly like ice cream (since she has made some pretty amazing ones), I asked her which plain vanilla ice cream was one of her favorites. She immediately emailed back that it was this one by David Leibovitz. I have read a bit of David's blog from time to time, but never have tried one of his ice creams. This one is my ideal ice cream: light, crystalline and easy melting. Devoid of egg, it is easy to put together and even easier to eat.

David Leibovitz's Vanilla Ice Cream
  • 2 cups heavy cream
  • 1 cup whole milk (I used 2%)
  • 3/4 c. sugar (I used a scant 1/2 cup)
  • pinch of salt
  • vanilla bean
  • 3/4 t. vanilla extract
Heat 1 cup of the cream with sugar, salt and vanilla bean (I used a leftover bean, so I used the whole pod, you can scrape out the seeds if you are using a new bean) over low heat until the sugar dissolves.

Remove from heat, and add remaining cream, milk and vanilla extract.

That's it! Cool it in the fridge - I left mine overnight - for 20 minutes if you like and then churn using whichever method you prefer. (Nigella Lawson has made a similar no-churn ice cream for those without ice cream makers: I would substitute some confectioner's sugar for granulated, and use only the heavy cream. Beat the cream to soft peaks, and freeze. Not really proper "ice cream", but delicious nonetheless and worth trying if you are in a hurry or without mechanization.)

The first spoonful reminded me of the time my family was invited to churn ice cream with our Amish neighbors. We brought ice, and they had everything else ready. We all took turns cranking the non-electric maker in the gentle, kerosene light of their home until this amazing, soft-set cream emerged. It was so good and vanilla-y and the ice crystals that marked my machined effort yesterday are exactly the same as this one I first tried nearly 20 years ago. I was half tempted to pop some popcorn, since this is how our Amish friends ate ice cream - piled high in soup bowls, served alongside equally big bowls of freshly popped and salted popcorn.

Of course, my ice cream wasn't finished in it's vanilla state, though it certainly could have been. When it was nearly done, I spooned in the remaining Schaum Torte (a little more than a cup). I could smell the little engine turning inside, making me remember how old my little appliance actually is. E sent me my ice cream maker for a Christmas present when I was living in Wilton, in the year 2000. Can I believe that this small kitchen appliance is a full ten years old? Can I also believe that one of my best friends could send me something that amazingly cool? Nope. I remember walking back to the Pie Shop Apartment with a huge box one cold December day, and opening it in GOP's company.

As I plugged it in yesterday, I was surprised at the flood of memories that returned to me and also noted that my Rise Against the Machines isn't going very well. I did hang the clothesline, and my ex-Navy Father-in-Law came to work some knot magic (knot tying is totally on my list of things to learn) on the lines, so that they will never go anywhere. I'd bet I could go to a chin up on those lines and bring down the pole before I'd snap the knot loose. But machines aside, I'm glad I got this batch of ice cream done without burning out the motor.


I felt like a drug addict: spooning cold dollops of this amazing ice cream into my mouth as fast as it was melting. I was hungry, but trying not to ruin my appetite by shoveling myself full of dessert in the late afternoon. I was half suspecting that like many things, the ice cream was at it's best right that moment, and freezing it would alter it for the worst. Fortunately, this isn't the case. I have a whole quart of this premium Schaum Torte Ice Cream languishing in my freezer, softly calling my name, and it is as soft-set as when I put it in there yesterday. Another thing for The List of Things I'll Never Buy Again: Ice Cream. Thank you very much Lo, and Mr. Leibovitz!