pastry

Improvising: Pear Almond Galette

I have a newer friend who doesn't really know how to cook, or bake.  She tries, and when she tells me about her trials I can't help but note to myself that cooking and baking are definitely arts - and the arts come easily to some and not so much so to others.  Not that you can't become a better cook or baker by simply working at it:  this is the point where I think personally I have arrived.  After you do something enough times, you stop worrying if you are doing it right, and you just do.

pear almond galette

When considering that I wanted to have a nice dinner for my family yesterday evening, I didn't really know where to begin.  I didn't even know what I had a taste for.  I had soaked and cooked a half pound of pinto beans and had them ready in the fridge for several days, just waiting for a application, and that seemed like a good place to begin.

I'm not always one to rely on printed recipes anymore, but I do frequently use them as inspiration - and I even will admit that I truly love the Epicurious iPhone app for just this reason.   (Though this isn't really a technology-related post, I'll even go further to say that I would probably be a perfect candidate for the iPad or other tablet device solely for kitchen use.  I do not have one to date.)  Epicurious has made their entire library of recipes available, decades of Gourmet and Bon Appetit magazine pages right there for me to filter.  I typed in "pinto beans" and found what turned out to be the most delicious version of pot beans I've made in a while - Dominican Beans.  It wasn't long until I ran an errand to pick up some fish for tacos and just like that, dinner was served.

Because every nicer dinner at home should also have a dessert, I also searched the app for a suitable starting point that could make use of the bowl of ripe pears I had on the table and the leftover empanada dough I had in the fridge.  I was just a few taps away from one of the best fruit desserts I've made in some time.

pear galette

pear galette

Like my kitchen-challenged friend, there was a time when I would have been uncertain where to start in altering a printed recipe to use what I had on hand.  I believe that the world of food blogs has opened a brave new world of opportunity for home cooks; we now have the empowerment to be creative and alter for alteration's sake - improvising to suit ourselves and to share not only with friends and family, but a growing "audience" of new acquaintances who can hopefully also learn and alter along with us. 

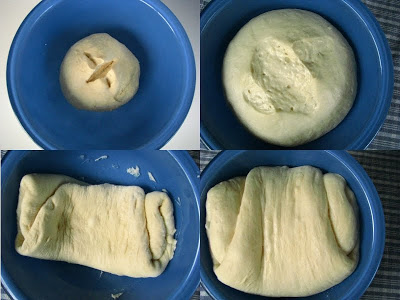
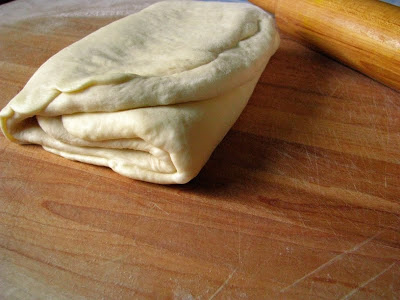
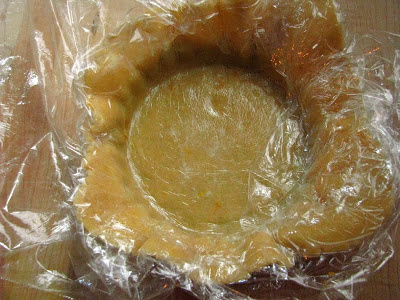
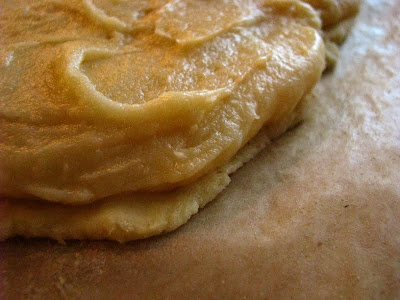
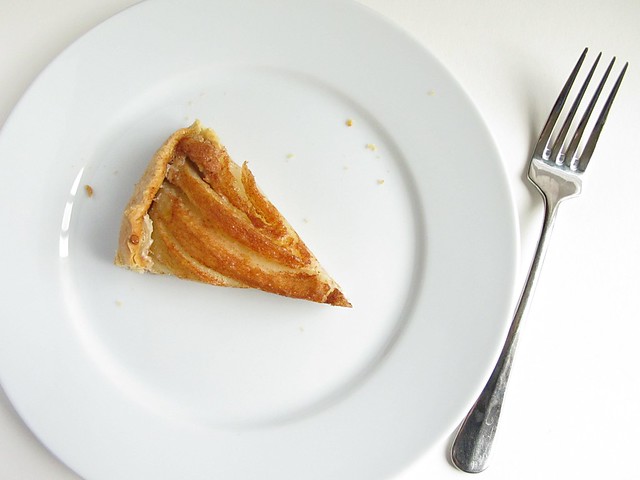
This improvised pear almond galette actually started long ago.  Back before I had ever made a single tart, I had picked up a tart pan at a discount store.  It is an odd size, 7 inches across the bottom and 8 when measured across the top.  Now I thought most tart tins had straight sides, but that could be why I found the pan in the first place, neglected in part because of a non-conformist nature.  My Daring Baker Challenge emplanada dough last week left a lot of scraps to be re-rolled... and I did re-roll it and then store it in a plastic bag on a plate so it would remain round and flat.  Days passed.  Pears ripened.  Lemons were gone and oranges and limes were all that remained in the crisper drawer.  And finally my galette was formed with the help of all of these happenstance things. 

My Husband loved it, which is also definitely something to record!


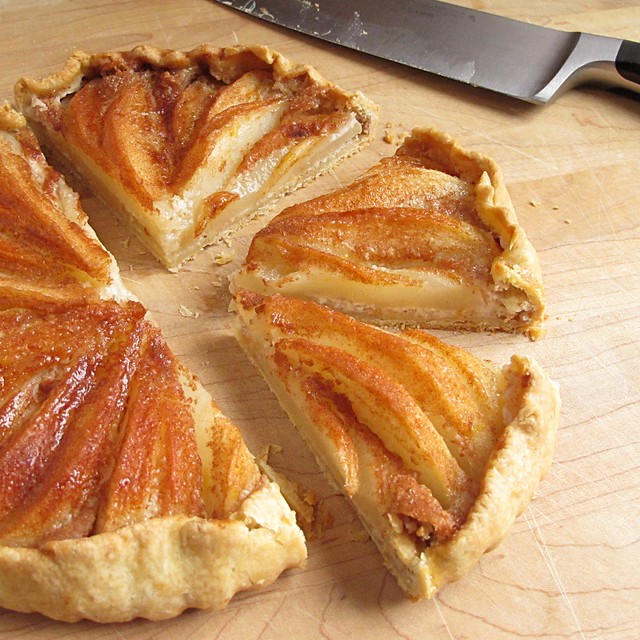
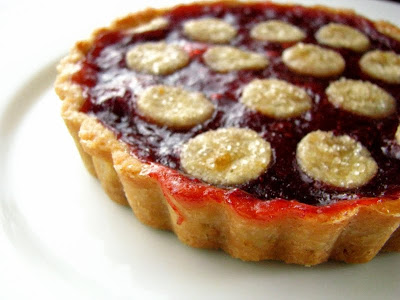
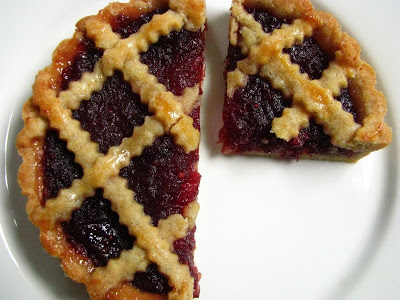
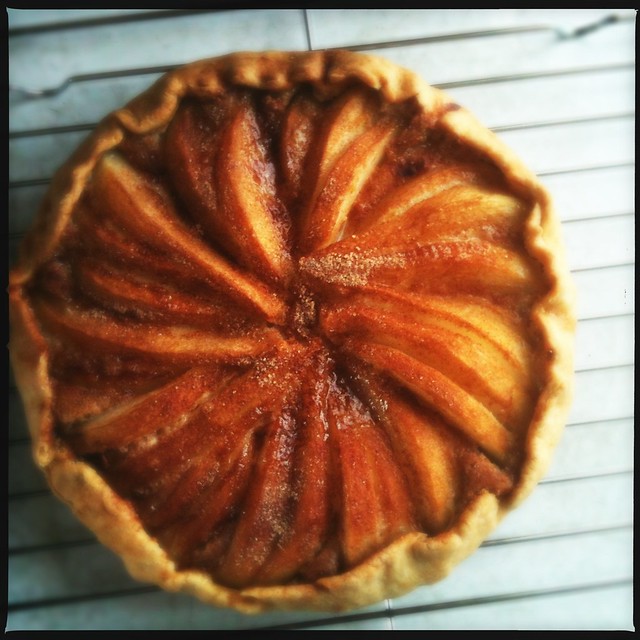
Galettes are technically free-form pies, some of which are nearly covered completely in flaky crust.  I used my tart tin to keep everything initially contained, and then removed the form halfway through the baking time so that it would brown uniformly.  The original recipe link has a pastry crust recipe that include a little extra dose of almond extract, if you use your favorite pastry, do as I did and increase the almond extract in the cream layer.

Improvised Pear Almond Galette (adapted from Self)
  • pastry crust, to fill a 7-8 inch tart tin
  • 2 pears, 3 if you have a larger pan
  • zest of half an orange
  • cinnamon sugar to liberally dust the top
  • a few cold pea-sized bits of salted butter
For the "cream" layer:
  • 1 egg white
  • 3 T. powdered sugar
  • 3 T. ground almonds (I ground them in my coffee grinder)
  • 2 t. melted butter
  • heaping 1/2 t. almond extract
  • pinch of salt
Preheat the oven to 400.  Line the tart tin with pastry crust that is rolled to about 1/8 inch thick.

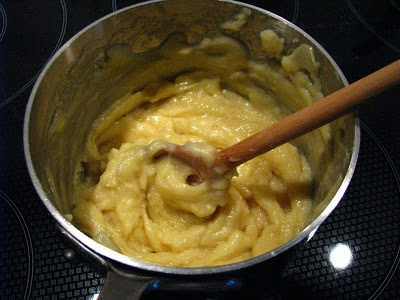
Make the cream layer by whipping the egg white with the powdered sugar until good and frothy (and slightly thickened).  Add the ground almonds, melted butter, almond extract and salt and continue to beat until well combined.  Place in the fridge when you slice the pears.  (I did use a hand mixer for this.)

Peel, core, and slice the pears into 16ths (cut each quarter pear into 4 slices).  Place carefully in a large bowl, and grate the orange zest over.  Mix carefully with your hands so the slices remain whole.  

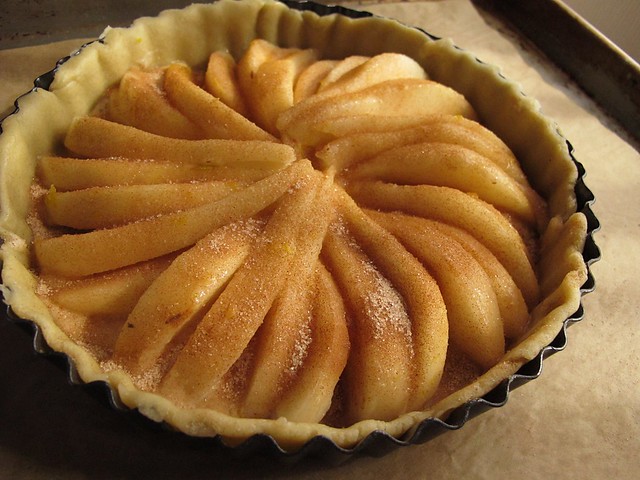
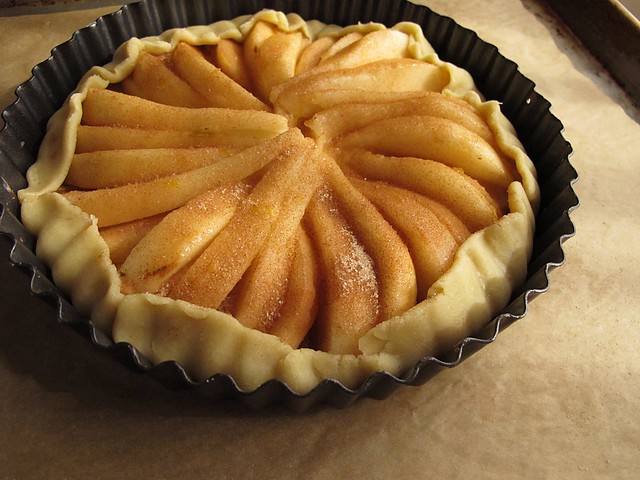
Take the cream out of the fridge and pour it into the center of the pastry.  (I shook a layer of cinnamon-sugar over the pastry crust first, since my crust was not sweetened at all.)  Beginning in the center, arrange the pears in a concentric way.  Two pears fit my pan exactly, with two slices leftover for me to eat.  Shake cinnamon-sugar heavily over the top, and carefully fold the edges of the dough down gently over the edges of the pears.  

Place the tart pan on a sheet pan and bake for about 20 minutes - until the center is somewhat set and the pastry edges have some color.  Remove the sheet pan from the oven, and carefully remove the tart pan side from the galette.  (I had both hands in  oven mitts, and balanced the bottom of the tart pan on one hand when removing.)  Return the panless galette to the oven, and bake until the center isn't wobbly at all, and everything is nice and brown, about 10-15 minutes longer.  (Your times may differ with your choice of pastry crust.  Just keep an eye on it.)

Turn off the oven, but turn on the broiler to high.  Dot the top of the galette with a few bits of butter and another shake of cinnamon-sugar for good measure.  Place under the broiler for a minute or two until the top is bubbly and deeply caramel colored.  Cool the galette on a wire rack completely before slicing.

slice

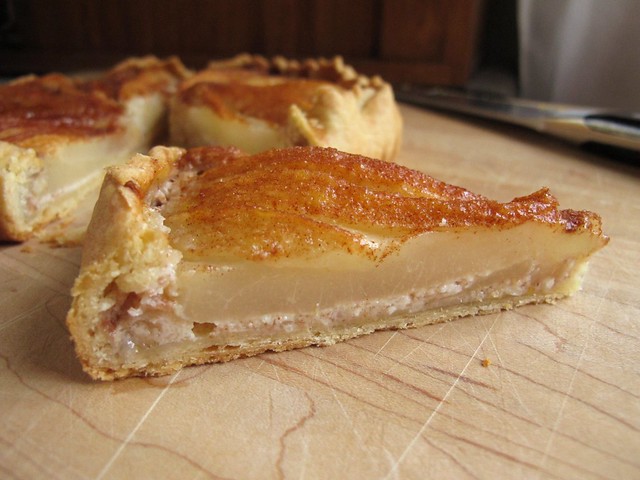
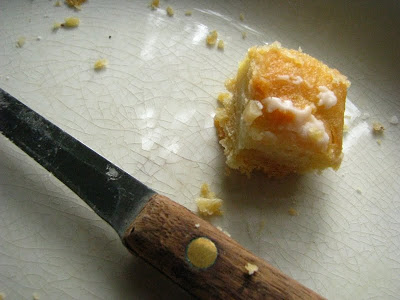
I stored the leftovers in the refrigerator due to the eggy bottom layer, and it was as good cold the next day as it was the day of at room temperature.  The pears keep their firm "pear-ness", and orange and almond are always happy company.  Even though I may have liked my crust with a bit of sweetness, I really liked the crunchy, plain pastry flavor of the one I used - and I had the bonus pleasure of using up something already on hand.

pear almond galette

It is possible that all recipes are merely suggestions.  When I read through Michael Ruhlman's Twenty earlier this Summer, I recall him stressing heavily that to cook well, first think.  Whether using a recipe or an idea of a recipe, thinking through your process before beginning is a probably the best way to start.  Surprise and stress is greatly reduce when your brain is the first thing you consult in the kitchen... and no matter how experienced you are in those arts, it is always a good reminder.

I used to think that anyone can cook.  I still do actually think this, but I've also come to realize that it is just as important to recognize that there are people who just love to eat and who simply really appreciate eating great food.  I am never happier than when I find new friends of this nature, those with whom the pleasures of sitting around nibbling on somethings are the greatest joys.  Being at home in the kitchen or not is no longer the issue, but the acknowledgment of good taste is.

Daring Baker Challenge September 2011: Croissants

The Daring Bakers go retro this month! Thanks to one of our very talented non-blogging members, Sarah, the Daring Bakers were challenged to make Croissants using a recipe from the Queen of French Cooking, none other than Julia Child!


Before you read any further, you must watch this. Really. Take 29 minutes, and really enjoy it. I sat for a rare half hour and watched it, smiling the whole while. Not much more could entice you to give croissants a whirl for yourself, after watching it yesterday I certainly felt well equipped to tackle these pastries.


I have never made croissants before, but thanks to the Daring Bakers, I have made one other laminated dough: puff pastry. Other than being extremely fun to say, laminated doughs are fun to work with - enormous rewards coming not from intense labor, but from a fair amount of anticipation. Julia Child's recipe from Mastering the Art of French Cooking is, according to our host (and her copy of Larousse Culinary Encyclopedia), technically more Viennese than French, but wherever it hails from, it is absolutely perfect.


I started my batch of croissants yesterday around 11 a.m., and by 9 o'clock this morning, I was enjoying the first fruits of my patience. The yeast dough is incredibly active for only containing 1 1/4 t. of active dry yeast, twice it forced it's way through the plastic wrap when it was under refrigeration. The first 3 rises happen without the butter, then the flattened butter is made malleable with a mallet and rolled out encased in the soft. This was the first time I used a small rectangle of my Mom's countertop as a substitute for a marble slab. (It was leftover from her kitchen renovation, and I have had it for quite a few years now just taking up space really...) I wished it were larger so I could have rolled directly on it instead of on my maple board, it keeps it's coolness well, and aids in keeping the butter cool too. If I can ever build a dream kitchen, I will include a marble slab for rolling pastries.


The best thing about the Julia Child video above is her descriptions of her rolling pins. The rolling pin I have is the pin she describes as useless, the one she doesn't know why she keeps at all. It's about 7 inches long, and I don't even know where I got it. I've had it so long in part because I just never bought a large pin and in part because I like that the small size works in my small counter space and fits in my small drawers. This challenge, however, makes me confident to invest in a new, heavier, pin. A pin with some heft would have helped me have an easier go of rolling out this dough to be sure.


prior to rising.

There are many points during the making of these croissants that you can pause the process until you have time to get to it. I'd suggest making them on a day that you'll be home, then holding them overnight until you can bake them for breakfast, since the final roll and rise takes just over an hour. I loved that there were more than 50 steps to this process - so I have included them here. You can also find a printable version of this recipe here. It really reads more complicated than it is.

Croissants (Julia Child via the Daring Kitchen)
  • 1¼ t. dry-active yeast
  • 3 T. (45 ml) warm water (less than 100°F/38°C)
  • 1 t. sugar
  • 1 3/4 c. (225 g.) of strong plain flour (bread flour)
  • 2 t. sugar
  • 1½ t. salt
  • ½ c. milk
  • 2 T. tasteless oil (I used grapeseed oil)
  • ½ c. (1 stick) chilled, unsalted butter
  • 1 egg, for egg was

1. Mix the yeast, warm water, and first teaspoon of sugar in a small bowl. Leave aside for the yeast and sugar to dissolve and the yeast to foam up a little.
2. Measure out the other ingredients
3. Heat the milk until tepid (either in the microwave or a saucepan), and dissolve in the salt and remaining sugar
4. Place the flour in a large bowl.
5. Add the oil, yeast mixture, and milk mixture to the flour
6. Mix all the ingredients together using the rubber spatula, just until all the flour is incorporated
7. Turn the dough out onto a floured surface, and let it rest a minute while you wash out the bowl
8. Knead the dough eight to ten times only. The best way is as Julia Child does it in the video (above). It’s a little difficult to explain, but essentially involves smacking the dough on the counter (lots of fun if you are mad at someone) and removing it from the counter using the pastry scraper.
9. Place the dough back in the bowl, and place the bowl in the plastic bag.
10. Leave the bowl at approximately 75°F/24°C for three hours, or until the dough has tripled in size.

11. After the dough has tripled in size, remove it gently from the bowl, pulling it away from the sides of the bowl with your fingertips.
12. Place the dough on a lightly floured board or countertop, and use your hands to press it out into a rectangle about 8 by 12 inches (20cm by 30cm).
13. Fold the dough rectangle in three, like a letter (fold the top third down, and then the bottom third up)
14. Place the dough letter back in the bowl, and the bowl back in the plastic bag.
15. Leave the dough to rise for another 1.5 hours, or until it has doubled in size. This second rise can be done overnight in the fridge

16. Place the double-risen dough onto a plate and cover tightly with plastic wrap. Place the plate in the fridge while you prepare the butter.
17. Once the dough has doubled, it’s time to incorporate the butter
18. Place the block of chilled butter on a chopping board.
19. Using the rolling pin, beat the butter down a little, till it is quite flat.
20. Use the heel of your hand to continue to spread the butter until it is smooth. You want the butter to stay cool, but spread easily.

21. Remove the dough from the fridge and place it on a lightly floured board or counter. Let it rest for a minute or two.
22. Spread the dough using your hands into a rectangle about 14 by 8 inches (35 cm by 20 cm).
23. Remove the butter from the board, and place it on the top half of the dough rectangle.
24. Spread the butter all across the top two-thirds of the dough rectangle, but keep it ¼ inch (6 mm) across from all the edges.

25. Fold the top third of the dough down, and the bottom third of the dough up.
26. Turn the dough package 90 degrees, so that the top flap is to your right (like a book). (Photo 19)
27. Roll out the dough package (gently, so you don’t push the butter out of the dough) until it is again about 14 by 8 inches (35 cm by 20 cm).
28. Again, fold the top third down and the bottom third up.
29. Wrap the dough package in plastic wrap, and place it in the fridge for 2 hours.

30. After two hours have passed, take the dough out of the fridge and place it again on the lightly floured board or counter.
31. Tap the dough with the rolling pin, to deflate it a little
32. Let the dough rest for 8 to 10 minutes
33. Roll the dough package out till it is 14 by 8 inches (35 cm by 20 cm).
34. Fold in three, as before
35. Turn 90 degrees, and roll out again to 14 by 8 inches (35 cm by 20 cm).
36. Fold in three for the last time, wrap in plastic, and return the dough package to the fridge for two more hours (or overnight, with something heavy on top to stop it from rising)

37. It’s now time to cut the dough and shape the croissants
38. First, lightly butter your baking sheet so that it is ready
39. Take the dough out of the fridge and let it rest for ten minutes on the lightly floured board or counter
40. Roll the dough out into a 20 by 5 inch rectangle (51 cm by 12½ cm).
41. Cut the dough into two rectangles (each 10 by 5 inches (25½ cm by 12½ cm))
42. Place one of the rectangles in the fridge, to keep the butter cold
43. Roll the second rectangle out until it is 15 by 5 inches (38 cm by 12½ cm).
44. Cut the rectangle into three squares (each 5 by 5 inches (12½ cm by 12½ cm))
45. Place two of the squares in the fridge
46. The remaining square may have shrunk up a little bit in the meantime. Roll it out again till it is nearly square
47. Cut the square diagonally into two triangles.
48. Stretch the triangle out a little, so it is not a right-angle triangle, but more of an isosceles.
49. Starting at the wide end, roll the triangle up towards the point, and curve into a crescent shape.
50. Place the unbaked croissant on the baking sheet
51. Repeat the process with the remaining squares of dough, creating 12 croissants in total.
52. Leave the tray of croissants, covered lightly with plastic wrap, to rise for 1 hour

53. Preheat the oven to very hot 475°F/240°C/gas mark 9.
54. Mix the egg with a teaspoon of water
55. Spread the egg wash across the tops of the croissants.
56. Put the croissants in the oven for 12 to 15 minutes, until the tops are browned nicely
57. Take the croissants out of the oven, and place them on a rack to cool for 10 minutes before serving.


These smelled delicious as they baked, were feather-light and buttery, crispy and flaky: perfect croissants. After they cooled ten minutes, I ate only one. To mark this occasion, I opened the first of the Summer preserves, choosing the Limey Rum Cherry Preserves to eat with such a powerhouse of a pastry. It seemed French enough to me!


Daring Baker Challenge November 2010: Crostata

The 2010 November Daring Bakers’ challenge was hosted by Simona of briciole. She chose to challenge Daring Bakers’ to make pasta frolla for a crostata. She used her own experience as a source, as well as information from Pellegrino Artusi’s Science in the Kitchen and the Art of Eating Well.


This was not actually the first crostata that I've made. I made a different version in March that was free-formed and filled with apricots and taleggio. This version of pasta frolla dough came from this month's host, Simona. Her website is full of Italian food history and excellent descriptions, and her introduction of this dessert for the month's challenge reflects it fully. Though she prefers a crostata filled with pastry cream, she remembers an aunt who filled hers with homemade jams. Seeing as I have lots of jam, I decided this would be the way to go for me, even if it isn't the most creative. I love that this dough is easy to make, delicious, and leaves very little to clean up.

The dough can be transformed into different sized crostatas, or simply be rolled into crisp cookies. It can be flavored with different zests, or essences, and can nuance whatever filling you prefer. Given the season, I chose orange zest. I also used Simona's proportions for using part whole wheat flour, which also lent a pleasant bitter note to the sweet jams I chose.


The dough is rolled between two sheets of plastic wrap, leaving very little to clean up. I made a full batch of the dough and decided to cut it in fourths. It was the perfect amount to fill my 6 inch tart tins, with just enough left over to create lattice designs for the top.


I've had quite a few sweets around lately, so the day I mixed up the dough I baked my first crostata using cranberry apple jam I had made last year. The dough baked up crisp and perfectly flaky - and my suspicions about the wheat adding enough bitterness to counteract the sweetness of that much jam were correct. I let the dough sit well wrapped several days before making another crostata and I'd have to say that it was still good but not quite as good as the first day it was made. I used plain strawberry jam in my second one, and decided to cut small circles to polka-dot the top. I jury-rigged a piping tip to use as a small enough cutter, but it worked just fine.

I think these jam-filled crostata would make the perfect ending to either a light meal or a heavy one. They are heavy, rich enough to complete a light meal. They would be great as a part of a dessert table for a sweet bite or two to end a nibbling dinner satiated and not wanting more. I also think that they would provide a well defined statement at the end of a heavy Autumn or Winter meal, when dense proteins and starches have filled you, and you just need a mouthful of something to call it a day. Not to mention, it's a way to use up some of the homemade jams I'm addicted to making. All in all, I'd say that the crostata could be my new favorite dessert!

I also love that the dough comes together exactly the same way as a pasta dough. You make a well in the dry ingredients, and then add the eggs. I do this in a bowl, just because of the size of my counters. Since Simona's directions are so concise and well written, I am leaving them at length.

Pasta Frolla (Simona at briciole)
1 9 or 9 1/2 inch tart tin, or several smaller tart tins (roughly 4 6 inch tart tins)
"
  • 1/2 c. minus 1 tablespoon [105 ml, 100 g, 3 ½ oz] superfine sugar (see Note 1) or a scant 3/4 cup [180ml, 90g, 3 oz] of powdered sugar
  • 1 and 3/4 cup [420 ml, 235 g, 8 1/4 oz.] unbleached all-purpose flour
  • a pinch of salt
  • 1 stick [8 tablespoons / 4 oz. / 115 g] cold unsalted butter, cut into small pieces
  • grated zest of half a lemon (you could also use vanilla sugar as an option, see Note 2)
  • 1 large egg and 1 large egg yolk, lightly beaten in a small bowl
Note 1: Superfine sugar is often also referred to as ultrafine, baker’s sugar or caster sugar. It’s available in most supermarkets. If you cannot find “superfine” sugar, you can make your own by putting some regular granulated sugar in a food processor or blender and letting it run until the sugar is finely ground.

Note 2: There are different ways of making vanilla sugar. I keep vanilla beans in a jar half-filled with sugar until I need to use them, for example, to make vanilla ice cream. After I remove the split bean from the custard that will go into the ice cream maker, I rinse it, dry it and put it back in the jar with sugar.

Making pasta frolla by hand:

  1. Whisk together sugar, flour and salt in a bowl.
  2. Rub or cut the butter into the flour until the mixture has the consistency of coarse crumbs. You can do this in the bowl or on your work surface, using your fingertips or an implement of choice.
  3. Make a well in the center of the mounded flour and butter mixture and pour the beaten eggs into it (reserve about a teaspoon of the egg mixture for glazing purposes later on – place in the refrigerator, covered, until ready to use).
  4. Add the lemon zest to your flour/butter/egg mixture.
  5. Use a fork to incorporate the liquid into the solid ingredients, and then use your fingertips.
  6. Knead lightly just until the dough comes together into a ball.
  7. Shape the dough into a flat disk and wrap in plastic wrap. Place the dough in the refrigerator and chill for at least two hours. You can refrigerate the dough overnight.
Making pasta frolla with a food processor:
  1. Put sugar, flour, salt, and lemon zest in the food processor and pulse a few times to mix.
  2. Add butter and pulse a few times, until the mixture has the consistency of coarse meal.
  3. Empty food processor's bowl onto your work surface
  4. See step 3 above and continue as explained in the following steps (minus the lemon zest, which you have already added).

or Version 1 of pasta frolla:

If you want, you can make the pasta frolla using a combination of all-purpose flour and whole-wheat pastry flour.

If you choose to try this variation, use 1 cup [240 ml, 135 g, 4 3/4 oz.] unbleached all-purpose flour and 3/4 cup [180 ml, 100 g, 3.5 oz.] whole-wheat pastry flour.

Crostata di Marmellata (crostata with a jam filling using Version 1 pasta frolla)

If you choose to make a crostata with a jam filling, you will need:

  • 1 and 3/4 cups [415ml, 600 gm, 21 oz] of jam or fruit preserves, whatever flavor you like (Note: I use my homemade fruit preserves, which have a low sugar content. I recommend you choose a good quality product, made with mostly fruit.)

Assembling and baking the crostata di marmellata:

  1. Heat the oven to 375ºF [190ºC/gas mark 5].
  2. Take the pasta frolla out of the fridge, unwrap it and cut away ¼ of the dough. Reserve this dough to make the lattice top of the crostata. Refrigerate this dough while you work on the tart base.
  3. To help roll the crostata dough, keep the dough on top of the plastic wrap that you had it wrapped in. This can help rolling the dough and can also help when transferring the dough to your pan. You can also use parchment paper for this. However, you can also roll the dough directly on a work surface if you prefer.
  4. Lightly dust the top of the dough and your work surface (if you’re rolling directly on a work surface) with flour. Keep some flour handy to dust the dough as you go along.
  5. If the dough is very firm, start by pressing the dough with the rolling pin from the middle to each end, moving the rolling pin by a pin's width each time; turn the dough 180 degrees and repeat; when it softens, start rolling.
  6. Roll the dough into a circle about 1/8th inch (3 mm) thick.
  7. If you used the plastic wrap or parchment paper as rolling surface, flip dough over the pan, centering it, and delicately press it all around so the corners are well covered. Peel away the plastic wrap.
  8. Trim the excess dough hanging over the edges of the pan. Press the remaining dough around the border into the sides of the pan making sure the border is an even thickness all the way around.
  9. Prick the bottom of the dough with a fork in several places.
  10. Take out of the fridge the reserved pasta frolla you had cut away earlier. Roll it with your pin and cut into strips or use cookie cutters to make small shapes (this is not traditional, but it looks cute); or roll with your hands into ropes.
  11. Spread the jam or fruit preserves evenly over the bottom of the crostata.
  12. Use the prepared strips or rolls of dough to make a lattice over the surface, or decorate with the cut shapes. (Note: You can use dough scraps to make cookies: see the Additional Information section for some pointers)
  13. Brush the border and strips of dough with the reserved beaten eggs. You can add a drop or two of water to the beaten eggs if you don’t have enough liquid.
  14. Put the tart in the oven and bake for 25 minutes.
  15. After 25 minutes, check the tart and continue baking until the tart is of a nice golden hue. (Note: Every oven is different. In my oven it took 34 minutes to bake the tart until golden.)
  16. When done, remove the tart from the oven and let cool. If you have used a tart pan with a removable bottom, then release the tart base from the fluted tart ring. Make sure the tart is completely cool before slicing and serving."


I found one quarter of a 6 inch tart plenty enough dessert... and that is coming from a die hard dessert fiend. I suspect a pastry cream filled crostata would fill me up considerably less and be far less sweet. You can blind bake the crusts by lining them with foil and weighting them with pie weights. Bake at 350 degrees for 20 minutes, then remove the weights and foil and continue baking for 5 minutes until lightly browned. Layer with pastry cream of your choice and top with fresh fruit. If you were Ina Garten, you would brush your fresh fruits with a tad of watered down peach or apricot jam to bring out their luster. I'll probably opt for this version in the Summertime.


I think I continue to be so interested in the Daring Baker Challenges because I'm always trying something new. I tend not to always want to take the time to make a pastry dough, but this month's challenge convinces me that it can be very easy and even not so messy. This is certainly a dessert I will reach for in the future, and one I would recommend to others. It's a perfect way to showcase some of your homemade jams, making even less work of this easily elegant dessert. Please be sure to drop by Simona's site and also to check out other Daring Baker's take on this month's challenge.

The Infamous Tennis Shoe Pastry.

Ok, Julia... this one's for you.


After reminiscing about the Spanish Bar Cake (Applesauce Cake) last week, which itself was a response to What Julia Ate's Applesauce Cake recipe, she commented about the tennis shoe coffee cakes of my youth. The mere mention spurred me on a mission to remember to get the recipe from my Mom. Since I was there over the weekend, I asked her for the recipe. It didn't take much prompting to "might as well just make it", and using the last half pound of butter in her fridge, I did just that. Julia will also be pleased that it is fairly almondy, since another thing that she and I have in common is our passion for Almond Extract. Perhaps she will make it using her homemade butter, something that's also on my list to do!

Driving up Friday afternoon, I was able to catch part of Food Friday on Wisconsin Public Radio (Radio Without Borders). The hour was devoted to Gourmet's Cookie Book, and featured Sarah Moulton, the longtime executive chef of Gourmet Magazine. The book highlights one cookie recipe for every year of the magazine's life, from 1941-2009. (You can listen to the hour in the archives from Friday 11/12/10.) I always like "vintage" recipes, and noting how things have changed over time. This book shows the fascinating progression of cookies from wartime rationing to luxury chocolate decadence. When my Mom found the yellowing card in an old recipe box, I knew right away that this must also be one such rationing recipe. I read and reread to be sure that there was no sugar in it - and there isn't. The only sweetener comes from the powdered sugar glaze drizzled over the top.


My Mom received this recipe when I was young (so likely, the '70's), from a woman named Ruth Peterson. It's technically called Danish Puff, but my Great Aunt always said they looked like a couple of tennis shoes. Maybe, but they are so good that they won't be around long enough for anyone to notice.

I'm actually glad that I was able to make this recipe at my Mom's house. Had I made it here, I would have employed the food pro to cut the butter into the flour and then how vintage would it have been? I love being reminded that the hands are my most valuable asset, and they served me just fine. In fact, I think they are key to the recipe, since the warmth of them aids in the formation of the base dough layer. Without warm hands, the dough would not come together with a mere 2 T. of water. Remember that when you are working the dough together the bowl, and you start to think that you need to add additional liquid.


"Tools were made, and born were hands." William Blake

When the dough (very sticky eventually, due to those warm hands) is formed, the tennis shoes are made:


It's easiest to roll the equal portions of dough into longish snakes and then use the heel of your palm to coax it into flat submission. And, try to use parchment paper, since it will make your life easier - though I'm fairly certain that it would not have been a necessity at the recipe's birth. The dough certainly has enough butter in it that it would not stick to a sheet pan.

The layer, or puff, part of the Danish Puff comes from a pate a choux type application. Mine didn't raise as much as my Mom remembered it raising, but she thinks perhaps she used a hand mixer to incorporate the eggs. I did not; I just stirred with a wooden spoon in classic pate a choux style. I may try the electric mixer next time and see what happens.


butter and water melted.


flour added.


eggs added.


Spread the "puff" over the dough base, close to the edges.

I will write the recipe as it is on the card. As the radio show pointed out, recipes used to assume that you knew how to cook and bake. But, that said, I know how to cook and bake, and I still asked my Mom how she used to do it. I'm betting that a fair number of vintage recipes are vague because one had someone to ask. Isn't that the best part of baking? Sharing... it's not just for kindergartners.

Danish Puff (Tennis Shoe Pastry)
  • 1 c. flour
  • 1/2 c. butter
  • 2 Tbsp water
  • 1/2 c. butter
  • 1 c. water
  • 1 t. almond (extract)
  • 1 c. flour
  • 3 eggs
"Measure first cup of flour into bowl. Cut in butter. Sprinkle with 2 Tbsp water. Mix with fork. Divide in half. Pat into 12"x3. Place 3" apart on ungreased baking sheet.

Mix second amount of butter and water (in a small to medium pot). Bring to boil. Remove from heat: add almond (extract). Beat in flour, stir quickly to prevent lumping. When smooth, add one egg at a time, beat well after each one. Divide in half, and spread evenly on each half of pastry.

bake 60 min.

Frost with a confectioner's sugar icing and sprinkle with nuts.
8-12 servings "


My icing also had almond extract in it, and next time, I'll probably add a bit more to the puff part. The baking time was exactly one hour. It turns a golden brown, and is puffed up when it's ready. Cool it completely before frosting, and sprinkle it with chopped nuts, in our case walnuts, before slicing into it. It really is a great coffee cake recipe, and after not having it for maybe 20 years, I can say that it is as I remember it: flaky and buttery, the center custardy and not so sweet, and gone by the end of the day.

Well, actually it was gone by the next morning, when just 3 little pieces remained. Somehow, my family adheres to the credo that little bites don't matter. At least, I do, and cut most desserts into smaller and smaller pieces until the "row is straightened" accordingly. This method is most often applied to our fudge making, when those rows just will not be straight, and a sharp knife deftly tries to even it out, scraps going directly to my hips...

Ahhh, the trappings of a dessert-eating family. We do what we can, right? And if we want to cut back on sugar, we just don't make dessert, because if it's there, it needs to be eaten.