baking

Christmas Cookies.

What makes a Christmas cookie a Christmas cookie?  I ask myself this question every year as I prepare to bake.  Since I became a full-time homemaker I usually organize my thoughts and baking pantry in November, beginning with a thorough detailing of my kitchen.  That didn't happen this year - for some reason the time is flying much faster than I can fathom.  But I'm nearly done with my baking for the season, using my method of batch-a-day baking, which I pretty much have always done around Christmastime since setting off on my own.  It might be hard to make 12 kinds of cookies in a single day, but 12 types over a couple of weeks, even when holding down a couple of jobs is surprisingly easy.  Or maybe just surprisingly easy for someone who loves to bake.

cinnamon pinwheels

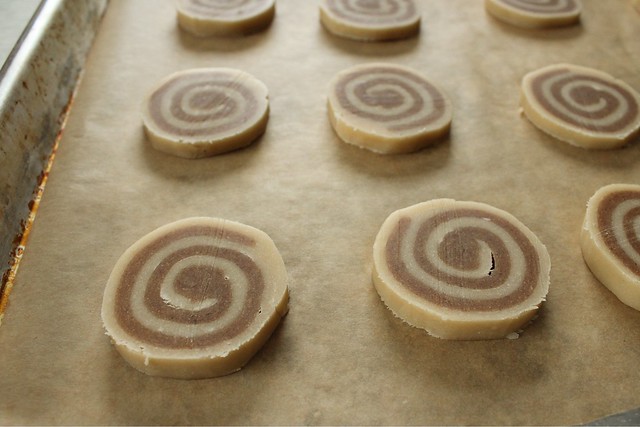
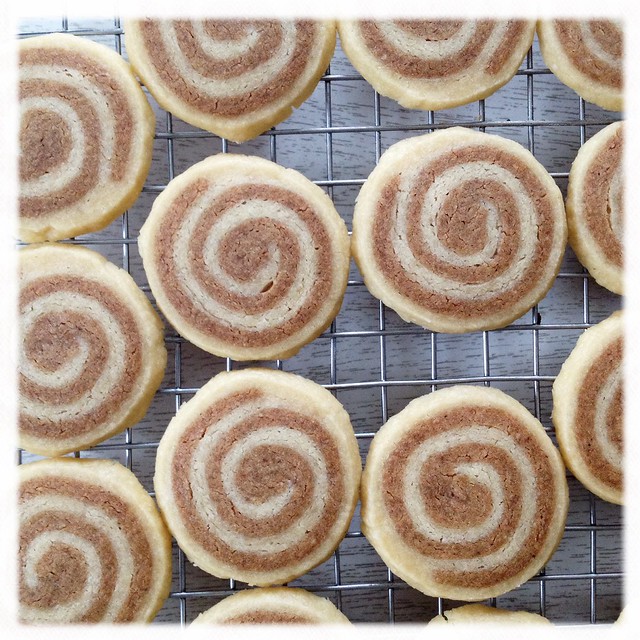
Frequently I end up with more than 12 types of sweets, but 12 is my goal for a nice selection for a cookie plate or tin.  I like to choose naturally long-lasting things to bake first like biscotti, and then move on those that freeze well after baking, leaving any more perishable types for last minute.  But I'm not so much an icebox cookie fan; the slice and bake notion is appealing, but requires some finesse that I can't always muster.  (But, I did make time and patience enough for these Cinnamon Pinwheels from King Arthur Flour.  The dough was a bit tricky and soft, but they paid off.)

cinnamon pinwheels.

I have no rhyme or reason for Christmas cookies, what makes my cookies Christmas cookies is baking them around Christmastime.  It's unfortunate that I never make decorated sugar cut-out shapes.  My Mom makes dozens and dozens of sugar cookies at Christmas.  For the bulk of my youth, visions of wax paper lined countertops with drying cookies decorated by our family signaled that Christmas was almost here.  My Mom would spread the icing and my brothers and I, armed with sprinkles and colored sanding sugar, and red hot candies (not to mention the silver dragees that were not intended to be eaten but always were), would take turns making miniature, edible artworks.  I don't think I'm exaggerating that some years there were upwards of 70 dozen when we finished.  They were stored in big plastic bowls on our old-fashioned, naturally frozen back porch, and given freely to nearly every friend and neighbor.

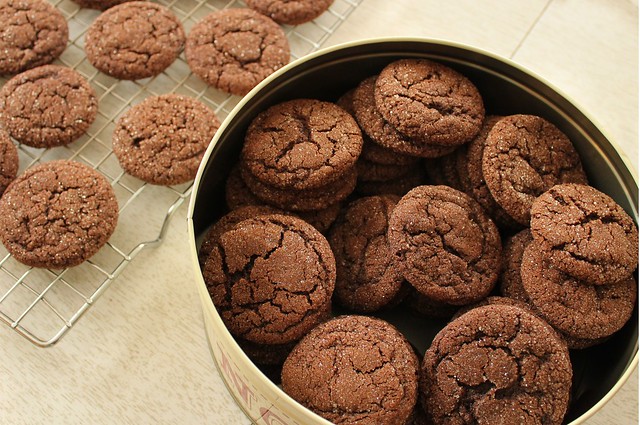
I can't say that I have many traditions of my own like that.  I make different cookies every year, ones that catch my attention here and there, ones that might require slightly more dedication than a non-holiday event cookie.  Some are just plain, however.  One of my favorites happens to be this one from a decade-old Martha Stewart Magazine:  Grammy's Chocolate Cookies.  I do make this cookie nearly every year, so I suppose in a way it has become my tradition.

grammy's chocolate cookies.

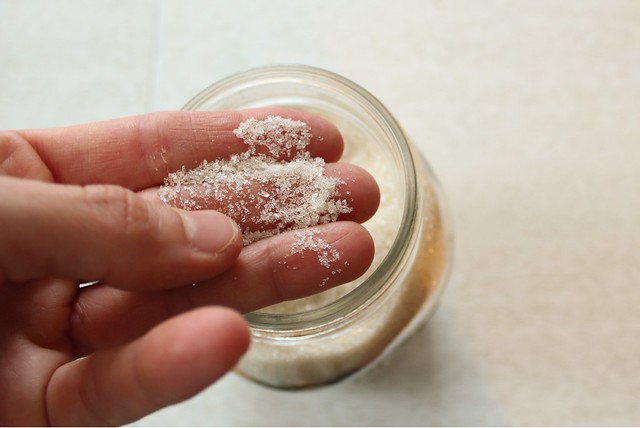
These cookies don't seem remarkable, until you pop one in your mouth.  They are definitely the cookie that you swear you remember sitting at your grandmother's table eating too many of... along with a glass of cold milk of course.  They store well in the freezer and at room temperature, and the recipe makes a lot.  I like to use coarser raw sugar for rolling them in; it makes them sparkle a bit more. 

I always make the dough the day before using it, or at least several hours before if I'm in a hurry.  If you rush it, the butter-heavy dough melts into a big mess when you attempt rolling it into balls.  I know from experience.  I adapted the way I store the dough to allow for less mess.

Grammy's Chocolate Cookies (Martha Stewart Magazine - but this recipe differs from the in print version)
yield about 6 dozen
  • 2 cups + 2 Tablespoons all-purpose flour
  • 3/4 cup Dutch cocoa powder
  • 1 teaspoon baking soda
  • 1/2 teaspoon salt
  • 10 oz. butter (2 1/2 sticks) unsalted, butter room temperature
  • 2 cups granulated sugar (additional granulated or raw sugar for dipping)
  • 2 large eggs
  • 2 teaspoons pure vanilla extract
Sift flour, cocoa powder, baking soda, and salt together in a medium bowl.  Set aside.
In a large bowl (or the bowl of  a stand mixer with the paddle attachment), beat the butter with the sugar and eggs until fluffy, at least 3 minutes.  Add the vanilla, and beat another minute to combine.  (Scrape down the sides of the bowl as needed.)

Reduce mixer speed to low and add the sifted dry ingredients slowly until just mixed.  Spread a sheet of parchment (or cling film will work too) out on the counter, and transfer the dough onto it.  Use a knife to spread it into a flattish rectangle, and top with another sheet of parchment (or cling film).  Put the dough in the refrigerator for at least 2 hours and up to 2 days.  (Make sure the dough is well covered so the air doesn't get at it.)

When ready to bake, preheat the oven to 350, and line sheet pans with parchment paper.  Use a bench scraper to portion the dough into 1 inch squares, and roll each between your palms to make balls.  Drop them into a bowl of raw sugar (or more granulated sugar) to coat, and place them about 2 inches apart on the baking sheets.  (If the dough softens too much at room temperature, pop it back in the fridge as you are waiting on the batches.)

Bake for 10-12 minutes, rotating pans halfway through the baking time.  Let the cookies stand on the pans for 5 minutes after baking before transferring to a wire rack to cool completely.


Amish bulk store raw sugar.


When I was back home visiting for Thanksgiving, I picked up the most gorgeous raw sugar from one of the Amish bulk stores that dot the countryside near my parents house.  I was disappointed that trying to take a picture of it proved so tough.  It was some of the prettiest, sparkly sugar I've ever seen.  Even though it was an off-white color, I used it to coat my frosted cranberries.  The recipe is from Heidi Swanson at 101 Cookbooks, and I've been making them since she first introduced me to them in 2009.  I've found that using half the amount of simple syrup (or twice the amount of cranberries, since they are so addicting) works fine.  I also save the pink syrup to use in other things.


frosted cranberries

I've all but wrapped up my baking for this year.  There is a bowl of jam thumbprint dough chilling that I'll need to attend to, and just this morning I decided to make the world's easiest (and tastiest!) peanut butter fudge.  All that remains is double checking the list I keep on the counter to make sure I don't forget any varieties that are stashed throughout the house, and matching plate or tin sizes to recipients.  I don't plan to give out a ton of cookies, really, but I bake in December for the sheer joy of baking.  Believe it or not, I don't end up eating very many myself (except for those cranberries: I usually have to make a second or third batch of them).  Whatever cookies you made or wish you made for the season, I wish you all a Merry Christmas! 

Sourdough Surprises: English Muffins

This is the second time I've participated in a newly formed baking group Sourdough Surprises.  The monthly bake-along choice for September was English muffins, a baked good particularly close to my heart.  Over a year ago, I worked tirelessly trying to perfect the sourdough English muffin; I made so many English muffins in a week, that I knew I had to hit on something - and I definitely did.  (This final version I thought was the best, but all of my trials were completely edible).

When I read the challenge was going to be English muffins, I knew there could be no better time than now to test-drive another Tartine dough.  I already knew it to be wonderful, since it was one that Chad Robertson had based his famous baguettes on. That same dough was coaxed into a classic, muffiny shape... and it did not disappoint.

sourdough english muffin
Tartine english muffins
Did you notice the bright yellow exteriors on a few of the muffins?  That's because I used my cast iron skillet the day before to fry some vegetables in turmeric.  It stained the pan.

The dough is a hybrid of commercial yeast and sourdough starter.  A poolish, created by letting a small amount of active dry yeast ferment in a flour mixture for several hours, is combined with sourdough starter (in my case, the 100% hydration starter that I keep perpetually on my counter).  I altered the amounts to suit one sheet pan, but otherwise, it is the very same dough that made this thin-crusted, naturally seamed loaf named Fendu.  I loved this bread wholeheartedly, so I knew that the same dough coerced into English muffin form would also delight.

Untitled 

What I loved about this recipe, is that the bulk of the work is done the day before.  When you bake the muffins, you have only to cut them out with a circle cutter, and fry them in some butter - clarified if you follow the Tartine instruction.  I cut some of the leftover spaces into tiny, bite-sized muffins, but I don't think the scraps would rise much if re-rolled.  There was a small lump of dough that was sacrificed. 

cutting 

Since I keep my starter well fed and ready to go, I do not mix Robertson's "leaven" as directed for this particular recipe.  I instead substitute the same amount of starter. and make sure that I feed it just a little bit before building the poolish.  (Since the poolish is mature and ready in about 4 hours, and my starter is most active 4-6 hours after feeding, I mix the poolish about an hour after feeding my starter for the day.)  

Tartine-Method Sourdough English Muffins (adapted for starter and quantity from Chad Robertson)
yield 1 dozen 3-inch muffins, plus a few bite-sized

poolish:
  •  100 g. ap flour
  •  100 g. water
  •  1 1/2 g. active dry yeast
to build dough:
  • 200 g. well fed starter (a teaspoon should float in a glass of water)
  • 250 g. water
  • 200 g. poolish (it should be all of the above)
  • 325 g. ap flour
  • 175 g. bread flour
  • 12 g. salt (but I feel this is too salty.  I actually salt to taste - I add 1 1/2 t. kosher salt, and taste the dough to correct.)
 To make the poolish, mix everything in a small bowl, and let ferment 3-4 hours at room temperature (or overnight in the fridge, but I haven't done that).  

(Both the poolish and the starter should pass the "float test" as described above; a teaspoon should float in a glass of water.)

To mix the dough, pour the water into a large bowl.  Add the poolish and starter and stir to blend well.  Add the ap and bread flours, and use your hands to mix well until no floury bits remain.  Let the dough rest for 30 minutes.  I didn't forget about the salt:  we won't add it just yet.

Transfer the dough to a large, clean, clear container for the bulk fermentation.  Bulk ferment should take about 4 hours, and every 40 minutes, fold the dough.  The salt should be added with the first turn (or 40 minutes after transferring to the clean bowl.

When the bulk fermentation is complete, turn the dough out onto a well-floured towel (use flour that is 1/2 regular ap flour and 1/2 rice flour - it prevents sticking really well) that is spread flat over a sheet pan.  Let it rest for 10 minutes in a mound, then dust the top with rice flour/ap flour mix and ease the dough into a rectangle of even thickness.  Dough should be about 1 inch thick; aim for uniform thickness overall.  Cover with a clean, lint-free towel, and place in the fridge to rise overnight or 8 hours.  (I worried that it would dry out, so I placed some plastic bags loosely over the top of the towel.)

Take the dough out of the fridge 30 minutes before baking them.  Ready a heavy cast iron skillet, and clarify some butter if you like.  Do not cut the muffins until ready to place them in the skillet.

Brush the skillet with butter, cut a 3-inch round of dough and immediately place it in the hot pan.  Pick up each carefully, and hopefully you used enough flour and nothing sticks!  (In a number 8 skillet, I could fit 3 muffins at a time easily.) Cook for 2-3 minutes on the first side, until brownish - or as brownish as sourdough can get.  Carefully flip, and continue cooking 2-3 minutes more until they appear done.  Try to let them cool somewhat before slicing, they continue to cook for a minute or two after removing them from the heat.

(Robertson says they'll keep well in a covered container at room temp for a day or two, but I prefer to freeze what I can't eat in a day.  Let them come to room temperature before splitting them open and toasting them, but that can take up to 2 hours.  An impatient bread fiend can dangerously wiggle a paring knife around enough to split a mostly frozen puck enough to get it into the toaster oven.  But that does involve a stabbing hazard.  You have been warned.)

Tartine english muffin 

I really liked these muffins, but I can't say that I liked them any more than the ones I've made in the past.  I think because I first used this dough as a loaf bread, that flavor of bread lingered in my mind, the craggy holes of English muffin-dom seemed imbued with regular bread flavor.  Because other recipes I've made had a bit of whole wheat flour and a small amount of milk and/or sweetener, the texture of the middles seemed more akin to what I think of as a true English muffin.  But that is all just particulars, since this is a perfectly respectable muffin in all ways. 

And, since they rest overnight - it feels like there is no mess the next day when you go to bake them.

muffin sandwich
Fried egg, cilantro-raisin chutney, and hot sauce on a fresh sourdough English muffin.


Do you love to use sourdough and want to bake along?  You don't need to have a blog, you can find out more on the Sourdough Surprises website.  With the busy Summer behind me, I'm definitely looking forward to the coming months of bakery! 

Oh, and be sure to check out the other participants:

This post has also been Yeastspotted.

More Adventures in Gluten-Free Baking

I somehow feel like it's my personal goal to bake gluten-free treats that taste so good no one has any clue they are gluten-free.  It's not because I have trouble with gluten, and it's not because I'm vying for blog clicks and cashing in on a trend:  it's purely because baking is an adventure and gluten-free baking is the biggest adventure of all.

It's been awhile since I tried my first experiments with GF baking.  It began when I realized that my Vita-Mix could easily turn any whole grain into flour.  Since I run a fairly "whole food" kitchen, I already had tons of  raw material to work with - and the only thing standing in my way were a few minutes of prep time and the mess involved when grinding up lots of miscellaneous grains at once.

I've gotten a little smarter since I've discovered I love baking with GF ingredients, and I made a shelf in my pantry for all of my supplies.  Instead of grinding what I need when I need it, I can usually reach for a quart jar and then only occasionally run into the need to refill it.

GF baking pantry shelf

What exactly is on the shelf?  I keep jars of sorghum flour, brown rice flour, teff flour, tapioca flour (also called starch), potato flour, xanthan gum, a gluten-free AP mix that I make up according to this recipe, and a canister of coconut flour that a friend gave me and I haven't tried it in anything yet.  I personally have not yet found much difference between brown rice flour and white rice flour, so I only keep brown rice - and a nice bonus is that it is available in bulk at my co-op without being prohibitively expensive.  (Purchased rice flour is also much more finely ground than what I can produce in my Vita-Mix.)  Now that I've got a basic GF pantry going, it's easy to keep things in stock - and grind things from my other whole food staples like quinoa, millet, and oats on an as needed basis.

And, can I add that sorghum flour is my most favorite flour ever?  It's absolutely worth the expense, and I adore the texture and flavor it gives baked goods.  In fact, there was a whole cup of it in the blueberry muffins I decided to make yesterday...

GF blueberry muffin

These muffins, admittedly, were best fresh from the oven.  In fact, all of my tasters didn't suspect they were GF at all, and the texture was exactly like that of a regular blueberry muffin.  When I tried one this morning, the texture had changed a little, but was still very good - especially with a cup of coffee.  I should have tossed the frozen berries with a tablespoon or two of the floury mix to keep them from congregating towards the bottom of the muffins... I'll remember next time.

When I want muffins, I usually decide last minute - so waiting on butter to come to that magical room temperature isn't always an option.  I used coconut oil to great effect, it's 10 tablespoons by weight (the weight of butter),  I've given you the gram measurement.

Gluten-Free Blueberry Muffins (adapted from Gluten-Free Girl)
  • 142 g. coconut oil, soft room temperature
  • 1 c. white sugar
  • zest of one orange
  • 2 eggs
  • 1 c. brown rice flour
  • 1 c. sorghum flour
  • 1 c. tapioca flour (also called tapioca starch)
  • 1 1/2 t. baking powder
  • 1/2 t. baking soda
  • 1/2 t. kosher salt
  • 1 c. + 2 T. plain yogurt (I used full-fat)
  • 1 c. blueberries, not defrosted if frozen
Preheat oven to 350.  Ready 18 muffin liners in muffin tins.

Mix the brown rice, sorghum and tapioca flours, the baking powder, baking soda and salt together in a medium sized bowl and set aside.  (Toss the frozen berries with a tablespoon of the flour to keep them from sinking to the bottoms of the muffins.)

In a large bowl, mix the coconut oil, sugar, and orange zest with a hand mixer until just well combined.  Add the eggs, one at a time, mixing well after each.  Add half of the flour mixture, and mix until just combined.  Add 1/2 c. of yogurt and mix until just combined.  Add the rest of the flour mixture, then the rest of the yogurt, mixing after each addition as previously described, taking care not to overmix.

Fold in the blueberries.  Portion into the muffin liners, about 2/3's full, and bake for 20-25 minutes.  They should just be starting to brown around the edges, and a tester should come out clean from the centers.

I considered juicing the orange I used for zest and mixing it with enough powdered sugar to make a glaze.  They didn't need it, but would be pretty and perhaps more dessert worthy if you do it.

GF blueberry muffins.

For a picnic last Sunday, I baked up some GF brownies - and I have to say they were better than any brownies I've ever made before.  They were also adapted from a Gluten-Free Girl recipe taken from Alice Mendrich, so I knew before I even began that they would be amazing.  What I didn't know is that they would age well.  I saved one a full 4 days to test this theory, and they were even better than when fresh.  I didn't bother with a double boiler to melt the butter and chocolate, and I didn't bother with the cold soak to stop cooking either - I just made sure to heat the chocolate over low heat and watched not to over bake.

Gluten-Free Brownies (adapted from Gluten-Free Girl/Alice Mendrich)
  • 8 T. butter (1 stick), cut into 8 pieces
  • 4 oz. dark chocolate (I used Callebaut), chopped
  • 1/2 c. white sugar
  • 1/2 c. raw sugar
  • 2 eggs
  • 1 t. vanilla extract
  • 1/4 t. kosher salt
  • 1/4 c. brown rice flour
  • 1/4 c. tapioca flour
  • large handful of raw walnuts, broken by hand over the batter
Preheat oven to 400.

In a small, heavy saucepan, melt the butter together with the chocolate.  Remove from heat and let cool slightly.

Line an 8x8 square pan with parchment paper (I use 2 pieces that overlap in a criss cross, so that I can lift them out easily).  In a medium sized bowl, blend the sugar and eggs for a full 3 minutes - until the sugar starts to break down a little and the mixture looks thickened.  Add the vanilla and salt and blend in well.

Add the flours, and use a spatula to blend in thoroughly.  Scrape in the melted chocolate and butter mixture, and fold in well until no streaks remain.  Crumble some walnuts over the batter and fold them in too.  Then, spread the mixture into the prepared pan and bake until the pan isn't jiggly when tapped, and fudgy crumbs cling to a tester inserted into the middle of the pan.  I started checking at 20 minutes - and they were perfect within 24 minutes.  Remove pan from oven to a cooling rack, and let cool completely in the pan until room temperature before slicing.

Store any leftovers tightly wrapped (I used foil, since we were picnic-ing).  They will remain very good for several days.

gluten free brownies

Like all alternative kitchen adventures, GF bakery can have the connotation of being healthier.  These two examples of baking are not necessarily healthier for you, but they are proof that GF bakery can taste amazing and fool anyone who may have the predisposition to think that by their very nature, GF bakery tastes rubbery and awful.

In general, I'm baking a lot more thoughtfully these days.  I'm not baking just for the joy of baking as I usually do;  I have successfully stopped eating so many baked goods personally.  So I'm making the most of each opportunity I have at my oven: taking care to ensure that no matter your dietary need, there can be a quality, homemade baked good made to amaze you.  If you happen to have a GF challenge for me, let me know... maybe it will be my next gluten-free kitchen adventure!


The story of Gâteau Basque, time alone, and friends to share it with.

gâteau

This whole week I've spent nearly alone, my kiddo having stayed behind with his Nana and Papa for his first extended Summer sleep-away. I pulled out of the driveway last Monday feeling strangely solitary, and surrounded in my car by overwhelming silence. Until I am separated from my child, I don't realize how much the boy talks. I am told that this is repayment from my own childhood, when I would talk for hours on end. One famous story told by my Gram and retold for years to come by my Mom reminds me that I had gone to stay with her and in a long car ride I was talking non-stop. When sudden silence hit, she turned around to see why I had stopped talking and found I had fallen asleep mid-sentence...

I will admit that the quietness of my house is good for me once in a while. It was only periodically interrupted by long talks with my Husband, which felt good and strangely adult. With no schedule to keep I felt like I was on vacation. Really my home is like a vacation to me; most of the time there is nowhere else I'd rather be.

Amidst the organizing and some deep cleaning, a shift worked at the cafe and gentle, simple dinners, my new boss/friend and I decided that my being childless was a good excuse to have a collaborative dinner. She was bringing some pork that she had butchered in a class and had stashed in her freezer, and I was in charge of bread, dessert, and veggies. Her sister (/co-worker/neighbor) and I all sat together on the patio last night after our delicious dinner trying to pronounce "gâteau", which I thought ended up sounding more like the Spanish "gato".

But, the pronunciation doesn't matter much with this homey, easy dessert. Filled with last years tart cherry jam, I felt relieved that I had gone with a Dorie Greenspan recipe when trying to impress a chef-friend. It bears mentioning that any recipe Dorie Greenspan has ever written will turn out for me on the first try, no questions asked, making her one of my secret weapons when I am trying to make an impression. Gâteau is exactly the thing to make for simple dinner parties. It is lovely and French, it can be filled with whatever preserve on your shelf you need to show off or use up, and it isn't so big that you find yourself with enormous amounts of leftovers to contend with. It could be my new favorite dessert.

gâteau

Truth told, I am insanely insecure about cooking and entertaining for others, even more so when one guest is a professional. I re-washed all my silverware and towel dried the spots off of them, I re-folded all of the mismatched napkins to approximate the same size, I baked the gâteau at the last moment - when it had enough time to cool to room temperature, but not enough time to be called "old". The batter, which is really more of a dough or a cross between a batter and a dough, is rolled out into circles between plastic wrap, and then chilled for at least 3 hours and up to 3 days. Baking time is just over 45 minutes, allowing one to get herself cleaned up and presentable for company. Like I said, the perfect dessert for easy entertaining.

Gâteau Basque (Dorie Greenspan, Around my French Table)
makes one 7 or 8-inch cake, 8 servings
  • 2 c. ap flour
  • 3/4 t. baking powder
  • 1/2 t. salt
  • 10 T. butter, room temperature
  • 1/4 c. light brown sugar, packed
  • 1/4 c. sugar
  • 1 egg, room temperature (I soaked a cold egg in hot water for 10 minutes)
  • 1/2 t. vanilla extract
  • 3/4 c. cherry jam or other thick preserves
  • 1 egg, for eggwash

Whisk together the flour, baking powder, and salt in a small bowl.

In the bowl of a stand mixer fitted with paddle attachment (or in a bowl with a handheld mixer), beat the butter with both sugars for 3 minutes, or until the butter is smooth and the sugar has started to dissolve. Add the egg, and beat for 2 more minutes. Scrape down the sides at least once, and the batter may look curdled, but this is normal. Reduce the speed to low, add the vanilla extract, and then add the dry ingredients in 2 or 3 additions, beating only until they are fully incorporated.

Divide the dough into 2 equal portions (yes, I weighed them), and form each into a circular disk. Working with one at a time, roll the dough out into a circle between two sheets of plastic wrap. Be sure that the circles will fit into your pan. I used my 7 inch springform pan, and used the base as a measure. Still in the plastic wrap, stack the disks on a flat plate and refrigerate at least 3 hours and up to 3 days.

When ready to bake, preheat the oven to 350 degrees and generously butter your baking pan (I used salted butter for this, just because). Remove the disks from the fridge, and let them sit for a few minutes at room temperature before peeling back the plastic wrap. Fit one disk into the prepared pan, and spoon the jam evenly on it, leaving a 1 inch border. Moisten the border with water, and place the other disk on top. Press gently, trying not to let too much jam escape the sides. Some jam will escape anyway - and this is okay.

Make an eggwash by beating an egg with a splash of water and brushing it over the top. (Reserve the beaten egg for tomorrow's breakfast.) Make an even crosshatch pattern with the tines of a fork, and the bake on the center rack of the preheated oven for 45 minutes or so until the top is golden brown.

Transfer the cake to a cooling rack and let it rest for 5 minutes. Run a thin knife between the cake and the pan to loosen it, and then unmold it. Let it cool, right side up, to room temperature, then cut into wedges and serve with vanilla ice cream. (I like this one, because it is Jeni's Splendid.)

(Update: I tried this cold out of the fridge the next day and didn't like the texture nearly as well. It still tasted good, but tasted more like dense pie crust. I left the last bit out overnight, covered well with a glass dome, and then tried it the next morning. It was much tastier, more like a tender pastry. If you want to store it for a couple of days, I'd recommend putting it in the fridge, but then allow enough time for slices to come back to room temperature before eating.)

alsa


What seems like a long time ago, I found packets of French baking powder in an Asian grocery that I bought because I loved the packaging. They were sold in cellophane, maybe 6 packets to the pouch. I couldn't wait to get home and Google to find out about it. What I remember is that it is single-action baking powder, powder that activates immediately when it hits liquid and not again when it hits the oven heat. I recall that it was recommended to be used in gâteau, though I'm not certain how it would fare with a long refrigeration time. I may try it sometime, I still have the pale pink packets in my baking pantry. They still make me happy when I see them in there.

gâteau

So my vacation week is ended, my kiddo is on his way home, and I have just a few hours more of a quiet home. I am looking forward to hearing about all of his adventures away (especially because my Mom told me that he was eating all kinds of new foods this week), and I look forward to having my little family all together once again. I have a few pieces of gâteau left for everyone to taste after dinner tonight, and I will see how long the pretty little cake remains tasty.

Apples: Pressing, Cider, Vinegar, Pectin, Crisp.

cider apples

Last Thursday, my Parents, Kiddo and I went to Weston's Antique Apple Orchard. I have been buying apples from them at the West Allis Farmer's Market for several years; they have been a vendor there for 45 seasons. I never thought of looking to see if they had a website until I learned that I inherited my Gram's apple press, and I needed a good urban source for great apples. I called and spoke with a older man, who informed me good-natured-ly that I'd interrupted his nap, "Since I'm retired!" he'd said. I told him it was our first year with a press, and we just wanted to do a couple of bushels of apples to see about approximate yield and ease of the workload. We negotiated a price for windfalls, and I figured that any price would be worth seeing the land where some of the most exotic apples I've ever tasted have grown for generations.

Even though I'd called back the cell phone number he gave me, I wasn't entirely certain that we would find anyone at this antique orchard when we drove out in my Dad's truck on Thursday. But fortunately we found a sole worker: a middle-aged man in heavily patched pants and a lifting belt who had been debriefed about me and my desire for 2 bushels of apples. A talkative man, he explained that the orchard's brother and sister team worked 7 days a week with just a few helpers like him. He mentioned they were both notoriously difficult to get a hold of, and that we could pay him and then just walk around in the orchard and see which trees had fresh fallen apples. "If you wonder what they taste like, just find one on the tree, shine it up on your shirt, and try one," he reminded us. And we did. Some hard, yellow and tart, leather skinned and bursting with autumnal dryness, others as sweet as honey, plum colored and snowy white inside - the apples the witch likely offered the gullible Snow White.

We spent a hour or so wandering around collecting the bounty of fruits under some trees that seemed perfectly perfect, reminding my Kiddo to show us each apple before tossing it in the bushel basket in case it was buggy or bruised. I had wished the whole while I hadn't already done my applesauce with budget (but perfectly serviceable) apples from the farmer's market. My Mom was more excited that I was, we tried many types and each one distinct and almost unreal. Antique apples are the way to go. If you have a few minutes, just read about some of the unusual varieties that are grown at Weston's Orchard.

<span class=

My Dad had brought baskets for us to use, those mysterious things that never seem to wear out and have appeared from nowhere. My Parents have all sorts of gardening baskets like that, old wired things with history that just seem immortal. The press was really something too. My Gram had an apple tree in her yard that was extremely prolific most years. We never knew which variety it was, but it was on the tart side and made the best sauce. There was always enough fruit for anyone who wanted any. She hadn't had the press for that many years, but my Dad cleaned it up thoroughly and carted it down here just so we could try this experiment that none of us expected to be so life changing.

apples in the truck

In less than an hour, we had pressed our 2 bushels (less the amount my Mom took home for pies, and a couple of pounds that she left me for eating). My Mom washed each apple in the kitchen sink, her nurse's credo preventing her from just hosing them off outdoors like my Dad and I figured would be fine. The press is amazingly efficient, and when we weren't even half done, we had agreed that next year we have to have a family pressing out at the farm. The mess was actually minimal compared to what I thought, we hauled most of the expired, squeeze-dried fruit to my compost bin and I saved one 8 quart bucketful to make pectin with. I am letting it drip now as I write, and will pick up some rubbing alcohol later this morning to see if it gels. To test if the pectin is developed, you mix 1 t. of pectin with 2 t. rubbing alcohol. If it forms a solid mass that can be lifted up with a fork, the pectin has enough gelling power.

I made my pectin according to Linda Ziedrich and several other concurring sources online. For every pound of fruit in a large, covered pot, add two cups of water and bring to a boil. Cover and simmer for 20 minutes, then drain through a jelly bag for at least 4 hours. Return the juice to the pot, and boil it rapidly to reduce by half. It can be stored in the freezer, or water bath processed for 10 minutes for shelf stability.

cider pressapple grinder

pressed apple pulp
pulp, for pectin.

ground apples
ready to press.

I also threw together an apple crisp this morning. I seem to never follow the same method twice when making fruit crisps this year. I didn't skin my beautiful apples, I added perhaps too much ground ginger, a tablespoon each of flour and brown sugar, and topped it off with a crisp topping which I had leftover in the freezer. I like a lot of different crumble toppings, but this one was fairly exceptional. It could be because it has a fair amount of butter in it, but I mix it up in a snap, adding everything including the yogurt to the food processor. Unlike Heidi, I don't even melt the butter, I just pulse it with the flour a few times before adding the oats. I also like to add about 1/2 c. of nuts - walnuts are a favorite of mine with apples. I usually mix up a double batch, and eyeball how much I want to include on top of a makeshift crisp. It does also freeze well.

unpeeled apple crisp

Crisp Topping (adapted from 101 Cookbooks)
  • 3/4 cup white whole wheat flour, AP flour, or whole wheat flour
  • 1/3 c. butter, cut into tablespoons
  • 3/4 c. rolled oats
  • up to 1/2 c. brown sugar or cane sugar
  • 1/2 c. walnuts, pecans, hazelnuts, or other (optional)
  • 1/2 t. or more cinnamon
  • pinch of salt
  • 1/3 c. plain yogurt
In the bowl of a food processor, combine flour and butter. Pulse several times until the butter is the size of tiny peas. Add the rest of the ingredients except the yogurt and pulse to combine into a uniform texture. Add yogurt, pulse once or twice to incorporate. Use right away, store in the fridge for a day, or freeze for impulse baking.

fresh, unfiltered apple cider

As soon as the amber colored cider made it's way down to the waiting bucket, we all stood mesmerized, as if we had no idea that apples under pressure would indeed give up their juice. It's silly really, all of us so excited that we took little cups and stood in the crisp air drinking the best cider we've ever tasted - probably the best since we went through so much work to get it. It was so sweet, thick, tart and refreshing. We got about 4 precious gallons of cider all accounting, and we split it up pretty evenly. We let it sit to rest for several hours, and then I ladled it into jugs and canning jars - setting some aside a little more than a half gallon right away to try and open ferment for eventual vinegar. We didn't filter it into oblivion like we had seen recommended - all of us agreed that having a little sediment was perfectly fine with us.

bottling cider

I have had my issues with vinegar. Making "mock" flavored vinegars (out of Bragg's cider vinegar) this summer made me feel a little better, but like I've said before I felt like I was cheating. This easiest thing seems to be a great challenge for me, and I suspected that I could easily waste my good-as-gold cider trying to ferment and then vinegarize it. Fortunately, yesterday morning, I saw the bubbles of fermentation first appear. This morning, the foam is about a half inch thick, and I suspect in a couple of days I'll be able to strain it into clean jars and inoculate it with mother. Meanwhile, my other quarts of cider are in the fridge waiting to see if their fate will also be vinegar. It is my sincere hope that I can get at least a gallon of homemade cider vinegar, and I don't want to jinx myself, but it looks as if I may be on my way toward that goal.

fermenting cider

Every time we visit, I remember how insanely lucky I am to have such amazing Parents. They get every bit as excited as I do for good food and hard work, experimenting and being together with family. As I helped my Dad hoist that press back up onto his truck (and I didn't think that I'd be able to lift it, maybe I need to start a weigh lifting regimen...), I knew exactly where I get all my quirky obsessions and experiments from. The press traveled 500 miles to my house and another 180 back to the Farm, where it will over-winter in their ample garage or outbuilding until next apple season when we will meet there and be as excited again to see such an amazingly simple thing as cider drip casually from an iron and wooden press directly into our waiting cups. In those moments of simple pleasures, I feel so full up with appreciation for life and the sweet tart of it that I can not really express it. What an amazing way to enter the Thanksgiving season.