Reflections of Preserving Season

I keep saying I'm done, that I will not can any more this year.  I went so far as to send home all extra paper grocery sacks of clean pints and quart jars with my Mom when she last visited, an attempt at organizing my basement.  But maybe now I know I'm a true preservationist when the work is never fully done, maybe the nature of doing for yourself is a drug of sorts that I just can't kick.

seckel pears

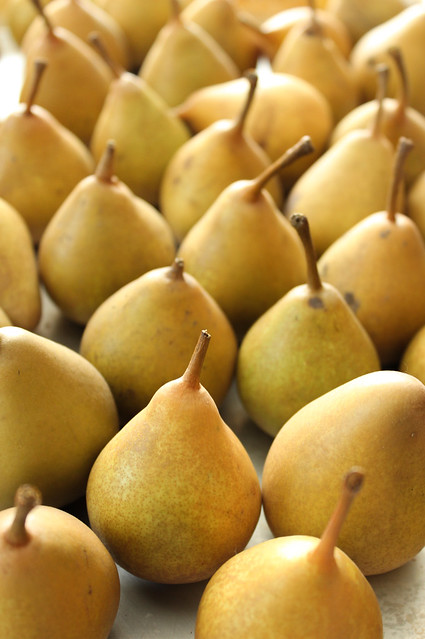
Last week, a neighbor gave me some gorgeous seckel pears from a tree discovered in her parents yard.  I said I'd take some just for eating, but they were so good and they had so many that I ended up getting a few pounds to preserve.  Seckels seem to ripen faster than less petite pear varieties, and I set them up on a sheet pan for a few days to monitor their process.  I decided to try pickling some using Marisa's method over on Serious Eats, a pretty quick endeavor since the pears keep their stems and skins.  I used some raw sugar because I was out of granulated, but then made a series of errands to pick some up along with another flat of pint jars and some fresh pink peppercorns, star anise, and vanilla beans from the Spice House to do up a batch of Mrs. Wheelbarrow's spiced syrup version in the New York Times.

canned seckels
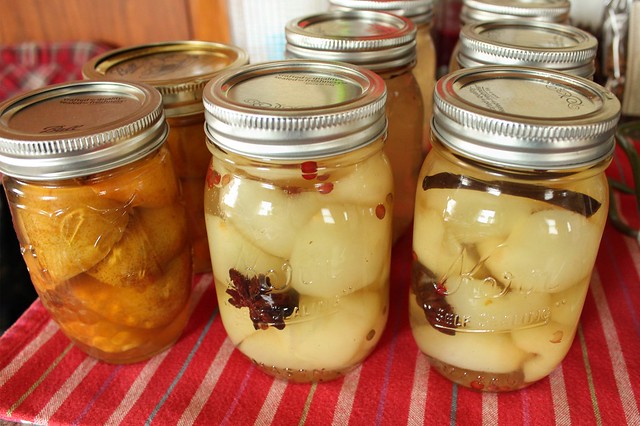
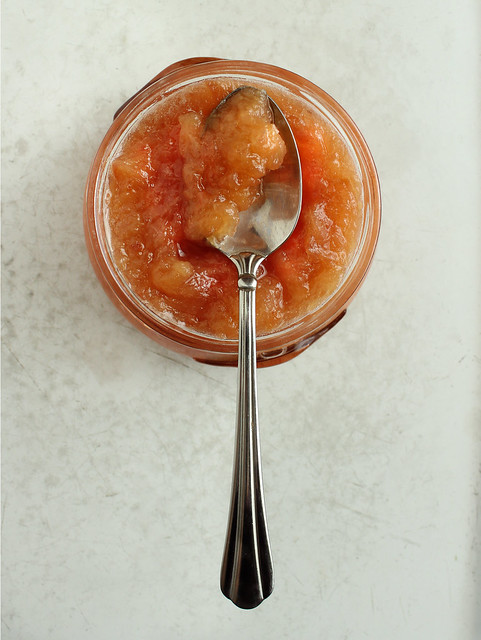
Marisa's pickled pears on the left, Mrs. Wheelbarrow's syrupy ones on the right.

The pears in syrup took awhile, especially with interruptions from the baby who would not succumb to sleeping.  More lessons in patience from the peeling of diminutive pears, trying to daintily finagle a 1/4 teaspoon to hollow out their seeded bellies - but worth it when I tasted the spiced syrup - which actually tastes exactly like a visit to the Spice House.  I didn't even mind that my 24 seckel pears only filled 3 pint jars and I had 3 pints of syrup that I canned up assuming that my pal Alanna would have a good idea for me on how to properly enjoy drinking it.

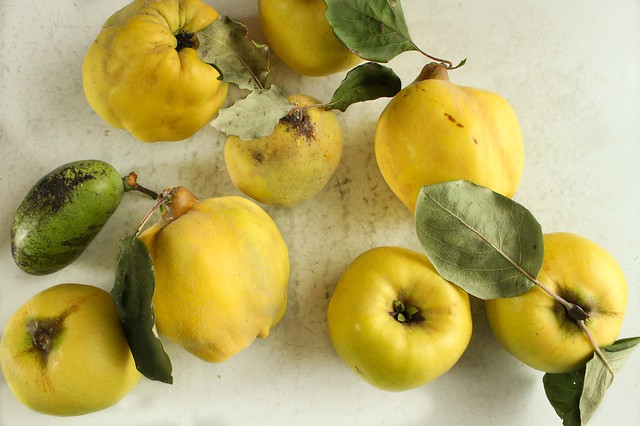
Prior to pear preservation, I made myself contend with the last 4 quinces that I was still debating what to do with.  This was the first year I've tasted quince, and I am completely hooked.  For some reason, I could hardly bring myself to do anything with the few of them I had, I so much enjoyed looking at them and smelling them, and really just living with them on my hutch counter for a few weeks...

quinces.
(On the left there is a pawpaw!  The first one I've ever tasted... more here.)

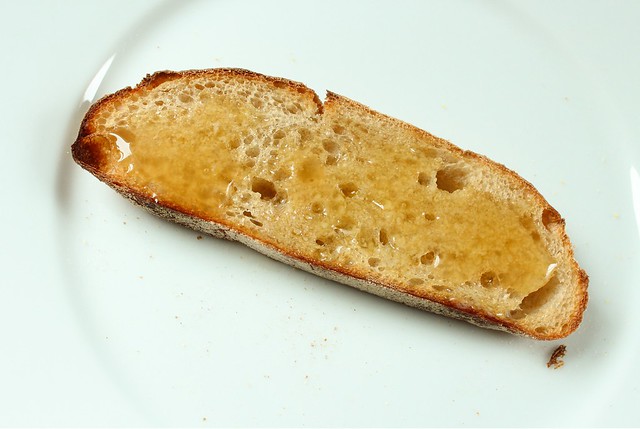
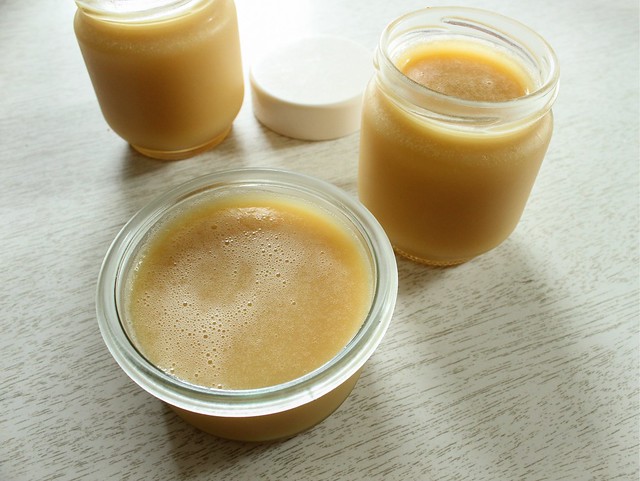
Instead of deciding on any proper preserving of them, I ended up doing two batches of them the same way:  roasting them in a 320 degree oven for a couple of hours until the skin blistered, cooling them to the touch, then peeling, coring them, and carefully slicing them into fat pieces.  I made two piles on my counter, one of the sliced pieces that maintained their shape, and another of those that were too mushy to look attractive.  Then I made a syrup of equal parts sugar and water (600 g. of each, which was plenty).  The nice slices simmered away in the syrup for 30 or 40 minutes until they turned a more uniform color (the roasting left them unevenly colored) and were infused with sugar syrup.  The mushy pieces I put into a smaller sauce pan and simmered with ladles of the ample sugar syrup.  I mashed casually every so often with a potato masher, and added syrup as it was needed, all the while sneaking spoonfuls of hot quince for myself which felt as autumnal and comforting as adding another down blanked to the bed.  (I found the idea here.)

quince preserves.
quince preserves.

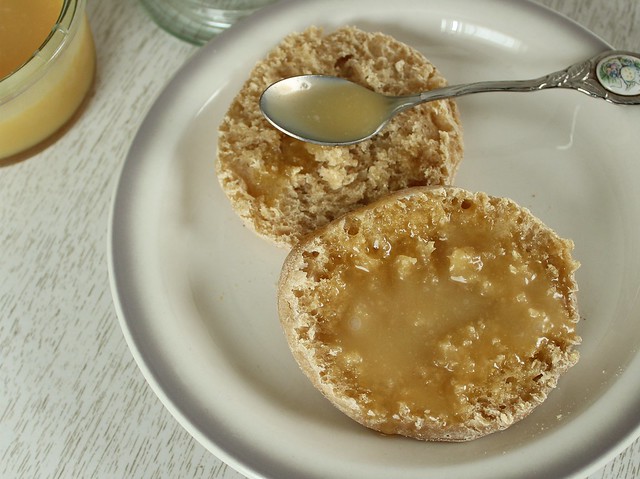
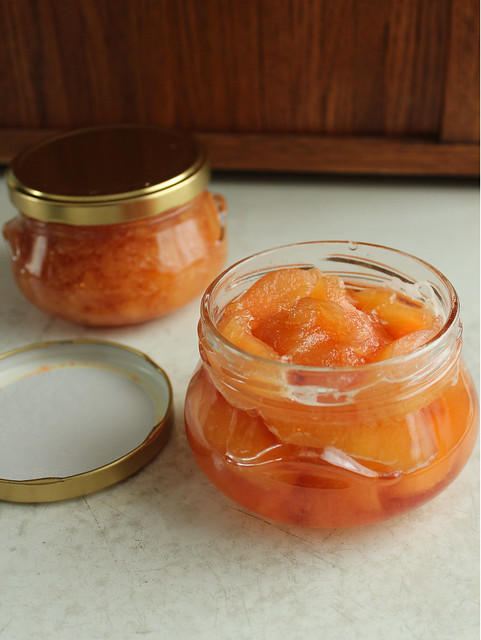
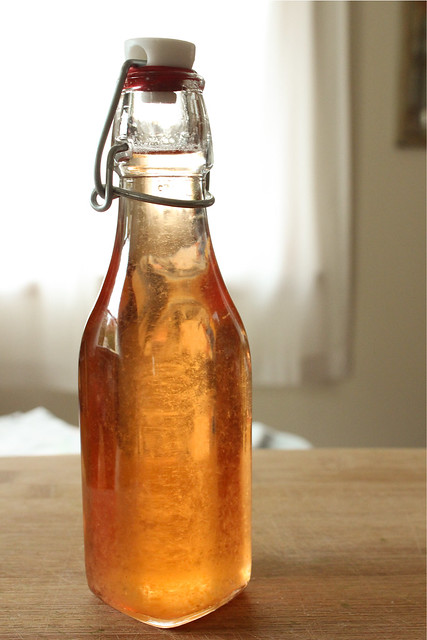
While I didn't bother canning this proper, I'd imagine 10 minutes in a hot water bath would do the trick.  So far, I'm having some really good morning snacks of toast, a pretty amazing grilled cheese with havarti and quince slices, and last week I made David Leibovitz's whole wheat croissants - which I'm pretty sure these quince preserves were born to marry.  I was also left with a bottle of quince syrup when I strained out my slices.  I'm not sure what to enjoy it with first... maybe rice pudding or some vanilla bean ice cream?  The quince was so delicious that I couldn't bring myself to add any aromatics at all to the simmering pots; these are all made just simply of quince, sugar, and water.  Similarly, I think I could almost just enjoy this by the shot glassful.

quince syrup

Monitoring the simmering quince left me plenty of time to think about all of the free fruits and berries I found close to home this year, not to mention the beginning of a relationship with a wonderful, old-fashioned orchard (Klee's Out on a Limb).  There were sour cherries from a friend of a friend, and more from neighbors who dropped them off when the baby was just weeks old.  Pints of mulberries from trees walking distance from my house, and the happy discovery late in the season of a white mulberry tree that I'll keep my eye on for next year.  Tart crabapples found on a walk just a week or so ago that made their way into applesauce and the more than one neighbor who offered me pears.  When farm markets were more difficult for me to visit at the peak of the season this year, there were also neighbors with ample vegetables to share.  (An amazing end-of-season green tomato sauce courtesy of plentiful green tomatoes from across the street.  Click here and read the comments to find a simple but delicious recipe.)  All in all, so many delicious things gracing my shelves to be thankful for as we head into the most thankful part of the year!

Fall is for bread baking.

I'm only speaking from a amateur perspective, but it does seem that all the best breads are baked in the fall.  In the past few years that I've been mothering the sourdough culture, autumnal air seems to be my most trusted ally in getting the most impressive results.  I like to think it has to do with less ambient moisture, and maybe a more seasonal reason for firing the oven (even though the heat of summer does nothing to stop me), but it's quite possible it's just luck.  Just in case, I had to detail the loaves that came from my kitchen last week, the ones still under the glass dome on my counter aging gracefully, the ones that still surprise me and make me feel like a bona fide baker.

72% hydration sourdough (2)

I lowered the water content intentionally and increased the whole wheat content in the Ken Forkish method bread I've most favored for about the past 6 months.  I got out my calculator, and figured it at 72% hydration.  An approximate amount since my bread begins with 100% hydration starter that is well fed and converted some 6 hours before into a near 80% hydration starter.  I'm not math savvy enough to figure the degrees of difference.  72% is close enough for me, and dense enough to stand up to some artful slashing, which was my hope.  This bread was pure perfection; I have to say, I was so proud.

The baking notes:

6-8 hours before mixing the dough, build the 80% levain:
  • 25 g. (100% hydration) starter
  • 25 g. whole wheat flour
  • 100 g. ap flour
  • 100 g. water at 90 degrees.  
Mix well, cover and and let ferment.
Then to build bulk dough:
  • 100 g. whole wheat flour
  • 300 g. ap flour
  • 280 g. water (90-95 degrees)
Autolyse for 30 minutes.  Then add:
  • 2 t. kosher salt
  • 1/4 t. instant yeast
  • 210 g. of the levain (almost all of the levain from above)
Bulk ferment time is 5 hours - with folds every 30 minutes for the first 2 hours (4 folds total).  Form loaf, retard in the fridge overnight, 8-12 hours.  Bake at 475 in preheated, covered cast iron dutch oven for 30 minutes, remove the lid, and bake until deep brown, another 10-15 minutes.

72% hydration sourdough

This success was early on last week, before my Mom visited.  I like to plan on baking just before she leaves so she can take a fresh loaf home with her.  I was slightly frazzled when it came time to do my mixing, and I had a complete accident that worked out unbelievably to my advantage.  I had pre-measured my flours before she arrived, thinking I'd save myself a few minutes when it came time to build the bread.  But... when I went to add my carefully measured amount, I mistakenly grabbed the container of whole wheat flour next to the measured flours, and emptied the whole of it into my mixing bowl.  As I mixed in the water it felt stiff and different, and it took me a few minutes to realize what I did.  My Mom thought I should just go ahead and try building with it since I'd be wasting ingredients anyway if I didn't try... and it turned out to be one of the best mistakes ever.  Two loaves of nearly 100% whole wheat sourdough that didn't feel leaden or too dense, just wonderfully wheaty tasting.

close to 100% whole wheat sourdough

I had already mixed up the 80% levain I mentioned above, and I added it to the autolysed dough of a mystery amount of whole wheat flour and base water amount of 280g.  I knew it would need more water, and added it by feel after the autolyse, working it by hand perhaps a bit more than with properly ratio-ed doughs.  I let it bulk rise for about 5 1/2 hours, folding every 30 minutes for the first 2 hours like I do with regular breads. I could tell it was rising, and held hope the whole while that I would be as lucky when the dough met the heat.

Whole wheat breads never spring back and have the loft of their whiter counterparts, but these rose nicely.  Whole wheat breads age better too in my opinion - their flavors develop and take on more nuance as the days grow on them, and I wish all the more I would have some idea how much flour was actually in the bin I dumped into the bowl to begin with.

close to 100 % whole wheat sourdough

This unintentional success reminds me of my breadmaking goals in the first place: to be able to readily adapt myself to environmental factors, and to somehow cultivate the intuition needed to make consistently good bread.  While it could be a one-off, it certainly gives me bakery confidence, the self-assurance I sometimes need as a home baker.  And just maybe, I've got more intuition that I think I do - unless the fall has something to do with it.

As if honey isn't good enough...

The other day, I fed up my sourdough starter so much that it expanded out of the glass container it was housed in and spilled down the sides and onto the counter.  For some reason, that generous morning surprise cued my need to make English muffins.  The recipe I most like for English muffins comes from Northwest Sourdough, and uses a whopping 453 g. of well fed starter.  I've made it a number of times, and it is reliably good.  What I haven't done before is form it into a loaf and bake it:

sourdough english muffin bread

I did that with the scraps after I cut a dozen traditional muffins, and it was a marvelously good idea.  I thought I might have added too much additional flour as I struggled to get it to form a round of dough that was dry enough to handle.  I didn't proof in the fridge, just let it stand for a few hours at room temperature until it seemed to pass the finger-dent test.  (The dough should slowly spring back and fill in, telling you that the yeast has slowed its action enough and is fully proofed.  If it springs back quickly, the yeast still has some work to do.)  Then, I took a chance on scoring it and baking it in a cast iron pot at 475 degrees.  It was done in a mere 25 minutes, about 18 with the lid on, the remainder with it removed.

The scraps of muffins are always a challenge to re-roll, so I was glad this worked as well as it did.  I froze most of the muffins, and went to town making the best toast ever: pleasantly sour and with perfect, even texture.

toast.

Then yesterday morning, I was talking with my friend E on the phone - which by the way seems like such a refreshing thing to do as most communication is done via text or email lately.  How nice to hear a phone ring and a "good morning" in true human tones!  Anyway, we were talking about quince, which I will be getting my hands on tomorrow.  She said she found some this year in a neighborhood tree, that they are delicious poached, and she ate them all that way pretty much.  Poached and with cream, because everything is better with cream.  I had to agree.  And the English muffin bread made me think of the cream I had to use up and this recipe for "ambrosia" I had seen a few weeks ago.

Now there are things that you avoid making because you know that they are dangerous. Things that don't stand a chance due to the deliciousness of their combined components.  That is what this recipe made me think of.  Originally, it called for an amount of sugar; but why add sugar to honey?  Honey is honey and worthy of no adornment.  But if you are going to adorn it, why not with butter and cream?  Everything is better with cream.

honey butter cream

Honey Butter Cream (adapted from One Good Thing)
  • 1 c. honey
  • 1/2 c. heavy cream
  • 6 oz. room temperature, unsalted butter
  • pinch of kosher salt
  • 1 t. vanilla
Place the butter in a large bowl and have an electric mixer ready.  Bring the honey and heavy cream to a boil in a heavy saucepan (make sure it is large enough to account for some boiling expansion), and boil for 1 minute.   Remove it from the heat and let it stand for a minute, then pour it over the butter.  Mix until all the butter is melted.  Add salt to taste and the vanilla and beat for another minute.  Decant into glass jars and transfer to the fridge while trying to be patient enough for it to cool.  This recipe would be easily doubled, but do that at your own dietary discretion.

honey butter cream

When tasting a spoonful of honey and butter and cream, your mind races to find suitable accommodations for it.  Granted, you could eat the whole jar(s) by the spoonful and no one would judge.  But putting it on ice cream or plain yogurt, spooning it into the black coffee I generally don't mess with (remember the buttered coffee trend?  This one-ups that for sure.), or topping a perfectly ripe pear or apple slice is so much better.  It's a good thing too, since I think the heavy cream gives this a shelf life of about a week - a week that won't be a problem with so many sweet options...

honey butter cream

Bird Bars.

This recipe is for my Mother.  If there is one other person in the world who really "gets" my occasional food obsessions, it's her.  We have so much in common this way; we happily will trade ideas and variations on themes, morphing ideas of what we should be eating with attempts at reducing our collective sweet tooth. 

bird bar.

When she was in town briefly last week, we stopped at my food co-op and she excitedly grabbed a couple of their house made Birdy Bars.  I had never tried them, already being a devotee of their Little Oaties (more than one pregnant trip was made especially to pick up a soft oatmeal cookie sandwich to devour in the car... true story), which is dangerous enough.  But my Mom lives 3 1/2 hours away, so she said before she left, "You have to figure out how to make those, okay?"

So here you go, Mom:  this is my version of the Birdy Bar.  I was surprised that I got it in one try, but having already mastered a number of vegan truffles/energy bars based on nuts, seeds, and the like I had a pretty good working knowledge of what it takes to make a seedy bar stick together.  And, I had saved the ingredient label from the original.  Hopefully, Outpost will forgive my treasonous homemade version - especially since I purchased all my bulk ingredients from them!

bird bar.

The only thing I didn't do this time and would do next time is completely melt the peanut butter and honey and bring it to a just simmer in a small pot.  I had a few dry pockets of seeds, and I think this would make for a more homogenized bar.  That being said, I certainly don't mind the little messy bits:  it gives me the excuse I need to eat the errant snippets on plain yogurt or vanilla ice cream, or even gingery butternut squash soup as seen below...  Substitute almond butter for the peanut butter to make it paleo, and agave for the honey for a vegan option.

Bird Bars (Inspired by Outpost Food Co-op)
yields 9 smaller bars, or 4 "Outpost-sized" bars
  • 1 c. raw sesame seeds
  • 1/2 c. raw sunflower seeds
  • 1/4 c. raw pumpkin seeds
  • 1/2 c. unsweetened coconut
  • 1/2 c. sultanas (golden raisins)
  • heavy pinch of salt
  • 1/2 c. smooth peanut butter (natural, just peanuts and salt)
  • 1/4 c. honey
Preheat the oven to 325.  Line a 8x8 square pan with parchment paper.

Basically, just mix all of the ingredients in a large bowl until well blended.  As I mentioned in the note above, you could melt the peanut butter and honey together in a small saucepan and then pour over the seedy ingredients to ensure a better mixture.

Press the whole lot into the prepared pan, and bake for about 25 minutes until the seeds around the edges are just starting to look a little golden.  Cool completely in the pan before removing to a cutting board and portioning into bars.  Wrap them individually, and hide half so you don't grab them all right away.

bird bar.
butternut squash soup.

The original version has almonds and dried cranberries, and I'd imagine you could doctor these with just about anything, so long as you don't stray too much from the ratio.  Upping the "wet" ingredients just a little bit might allow for a completely raw bar too - if you're into that sort of thing, but I like the soft set texture of the baked version.

Sesame seeds are actually a good source of calcium, but the unhulled seeds contain far more (like 90-95% more) than the hulled counterparts.  That's something to consider as you add them to your diet for that reason.  I like trying to include more of them in my food because they have anti-inflammatory properties and help with regulating cholesterol, not to mention they are just downright tasty in large quantities.  Recently I made myself a batch of simple granola that was surprisingly great.  You wouldn't think so few ingredients would be so delicious, and really highlight the unique flavor of sesame!


bird bar.

And while I'm talking about granolas, the one on the left in the picture above is what is left from a truly amazing Gingersnap Granola I snagged from the Bojon Gourmet last Friday.  That is another recipe I know my Mom will absolutely love... and I was trying hard to not mention it because I know if I surprised her with a jar of it on our next visit she would be as crazy for it as I am!

It does seem like I have a lot of bird food going on over here as I finally sit to think about what I've made in the past week or so.  I suppose I have enough real food to fill in the gaps, but just what is it about snack foods that are so appealing?

Compound Butters, Pie Dinners, and Self-Promotion.

Of all the things I think I'm pretty proficient at, self-promotion is not really one of them.  I am of the battery of home cooks that truly believe that anyone can cook, that recipes are merely suggestions for inspiration (with the exception of most bakery goods which can be modified within ratio-appropriate reason), and that the more time people would spend in their kitchens, the better off we'd all be.  I also believe in that saying "nothing new under the sun", which in and of itself pretty much prevents me from wanting to take credit for anything.

I would be no cook at all without the hundreds of food writers and photographers who continually pique my interest,  but the time has come for me to cross my line in the sand and try to promote myself more.  I love my life at home, mostly in my kitchen, as a mother and homekeeper, but yet I definitely do not consider myself a "mommy-blogger".  I plan my weeks around line-dried clothes, when the floors need washing, when a boy needs a visit to his Grandmother's house or to read a book to me; it's a busy life with real, from scratch food at the heart of it all.  I don't spend much time trying to gain followers or friends in an online Internetty sense... and I think maybe I need to improve on that.

I genuinely use social media in a more personal way:  I get excited to talk with people I've never met about the things we choose to put in our bellies, and more than once the bridge has been crossed when an online acquaintance became a real life friend to me.  If you click the Facebook like button, I assume that you really want to be part of my wider circle of friends, and I hope to be inspired by you too.

basil-chive compound butter

Even with a new baby I am still at full force in the kitchen, but I find myself with a little less time to dedicate to in-depth musings on the subject.  I'll use this time to invite you to Flickr.  I love Flickr, and have for years.  I frequently record recipes and things there that don't make it over to Facebook or my blog.  If you click the above Basil-Chive Compound Butter, for instance, you'll find the recipe.  Not every food picture I put on Flickr has a recipe, but if you comment and ask me about it, I will find the time to record it there.  While I'm still kind of getting used to the new Flickr format, it's probably a good thing for new users since everyone gets tons of free storage and it's free to join.  Make me one of your "contacts", and you'll usually be privy to the pictures for a blog post before I have the time to write about it too.  I'm usually good at linking back my photos to the corresponding CakeWalk post, and I use this resource myself when I'm trying to remember something I've made.

another pie dinner

beet green tart w/ sesame crust.

I also will sometimes cross-post pictures from the CakeWalk facebook page to Flickr with more in depth information too.  I think this is easier for me (or just faster, anyway), because I can do it from my phone.  Case in point: during the past month I've been obsessed with an olive oil and sesame tart crust (click the second photo for the recipe) that caught my eye when leafing through a Martha Stewart magazine at the library.  I have made one every week, throwing in different types of greens and whatever cheese or vegetables I need to use up.  I eat a slice or two for my lunch nearly every day, the one meal in the day where I don't have to satisfy anyone but myself.

I could probably be better at joining groups and posting comments on Flickr, I'll try to work on that too.


beets, their greens.
Beet greens: I cut the stalks up very fine and use every last bit of the beet plant.

October 29th, I'll be giving a presentation during the Learning Never Ends program through the Wauwatosa Recreation Department.  (Click the link to find the sign-up information.)  My class is titled The Ancient Art of Fermentation and will focus on lacto-fermentation.  It's going to be a small class, so come with questions and ideas to share and we'll also start a cabbage slaw of some sort (I haven't decided what type yet), and taste samples.  I'll also have copies of my book for sale at the event.

So, there you have it.  A short and sweet post on my attempts to self-promote.  And I can't forget about my book!  The copies are starting to ship, and even Outpost, my food co-op, is going to be selling copies soon!  I'm still trying to work out how I will sell it here on my blog, but meanwhile if you'd like to buy a copy directly from me, send me an email and I'll make it happen.

my cookbook.