How not to can ground cherries.

ground cherries.

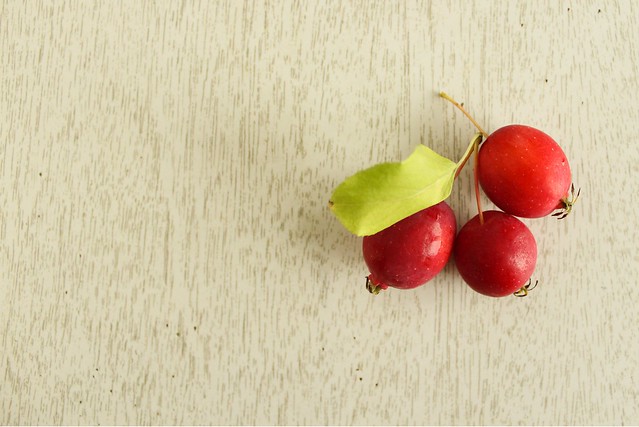
Sometimes, my mouth speaks before my head registers what is being said.  I'm also guilty of not being thankful on occasion, particularly when I'm hungry or tired.  A combination of these things were at play when my Mom informed me about a week ago that she was bringing me a peck of ground cherries.  "WHAT?" I had said, maybe too loud.  "I thought you liked them!" she said back.  And I do.  But a bit of sleep deprivation had maybe left me lackluster in wanting to experiment.  "What am I going to do with a peck of ground cherries?"

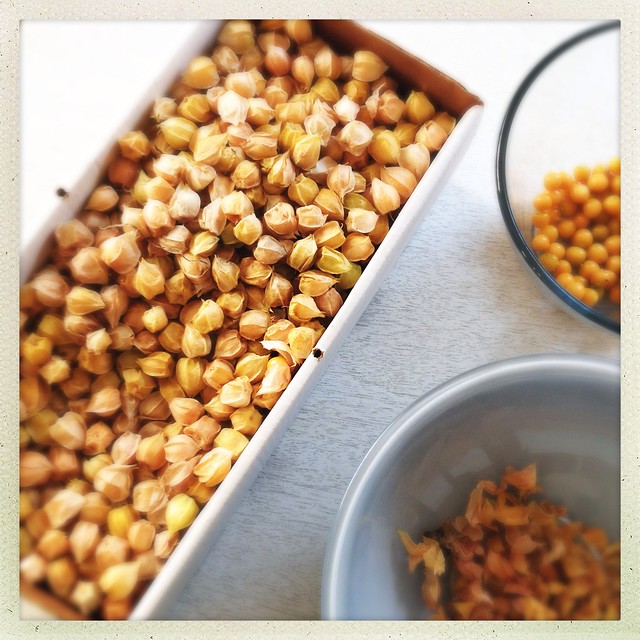
The first thing I needed to do was husk them.  My Husband was going to help, but I took advantage of too hot, mid-90's temps to hole up in my air-conditioned kitchen a few days ago when he was at work and husked them all myself.  I wasn't working super fast, and fortunately the babe was fast asleep for most of the time; I'm not lying that it took a few hours.  Just how many pounds is a peck of ground cherries, you ask?  Almost 5 1/2.

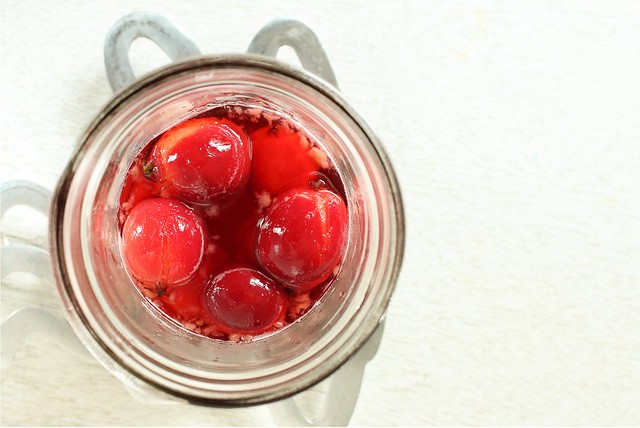
Now if there were some information out there about canning ground cherries, that would be helpful.  I called our extension office, and was then referred to a Madison food safety specialist who couldn't tell me how to can them whole, which is what my Mom suggested that I do with them.  I thought that Google would be a help, but after quite a bit of searching, I didn't find much.  I did find that the ground cherry is a pretty healthful thing to consume, its naturally high levels of pectin are good at keeping cholesterol in check, and it is an excellent source of vitamin A.  My logic told me that if they were preserved in an extra light sugar syrup, they should be shelf stable... but please don't take my word on it, as I was not able to confirm it anywhere.  (For the record, I processed the pint jars in a hot water bath for 15 minutes.)

how not to can ground cherries.

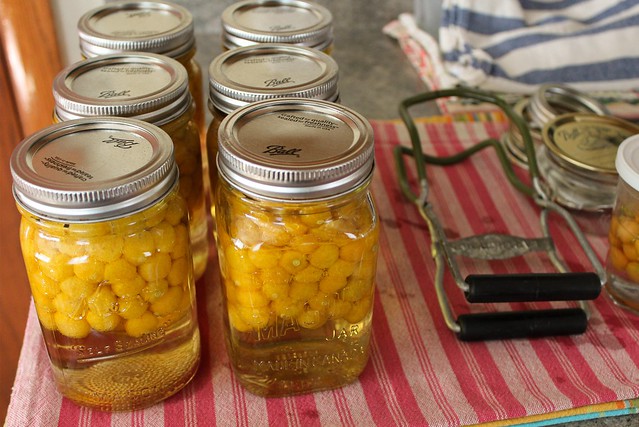
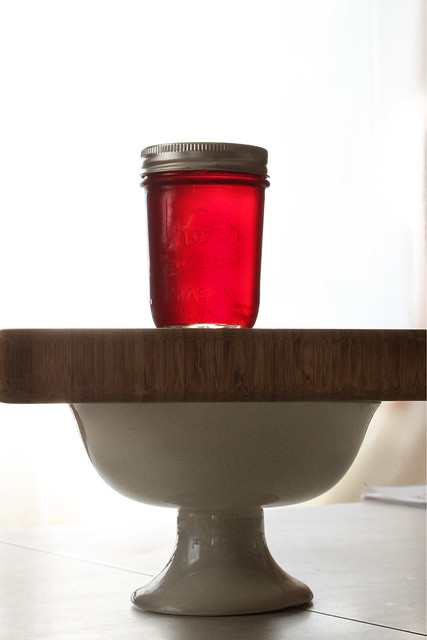
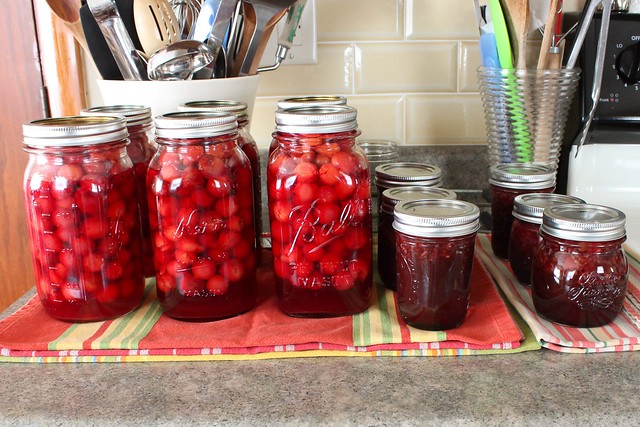
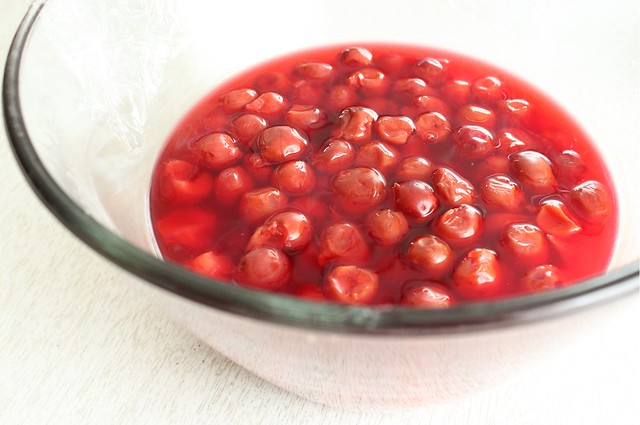
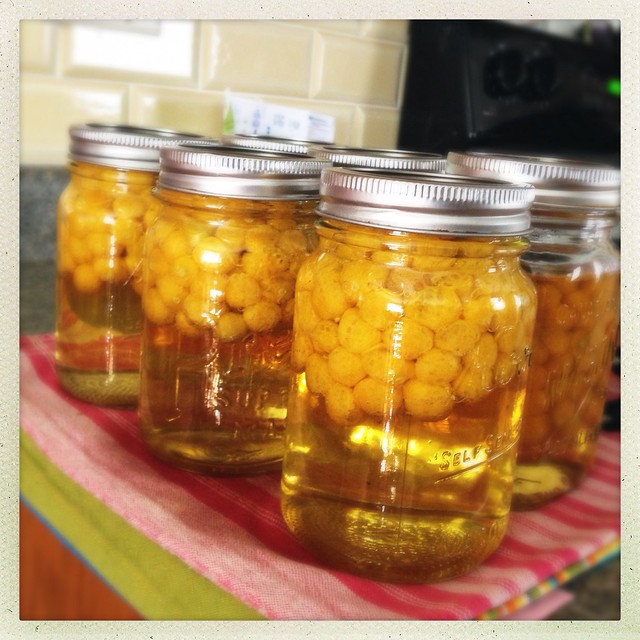
I decided to raw pack the ground cherries, not remembering to take into account the likelihood of fruit float.  The combination of raw packing and using an extra light syrup increased the chances, and my 6 pints (which held all but about 1 1/2 lbs. of the ground cherries) all appear half full.  In the future, I will try to pack them hot, letting the fruit simmer for 5 minutes or so to release some of the liquid.  I might also do a heavy syrup despite all my attempts at lowering my sugar consumption.  I'm not considering this a total fail however, because the syrup turned a bright golden yellow, and I'm looking forward to the surprise of a delicious syrup when I open my first jar.

Untitled

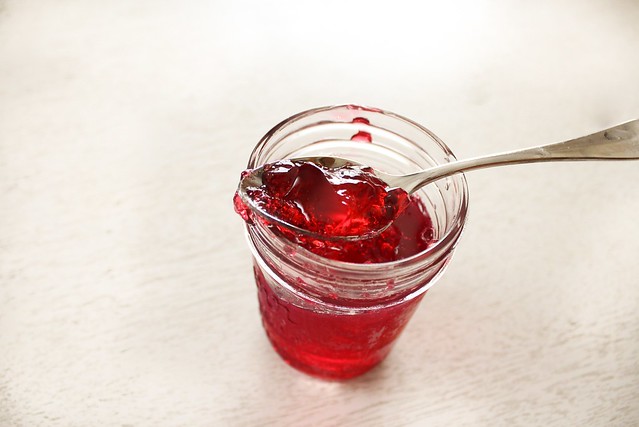
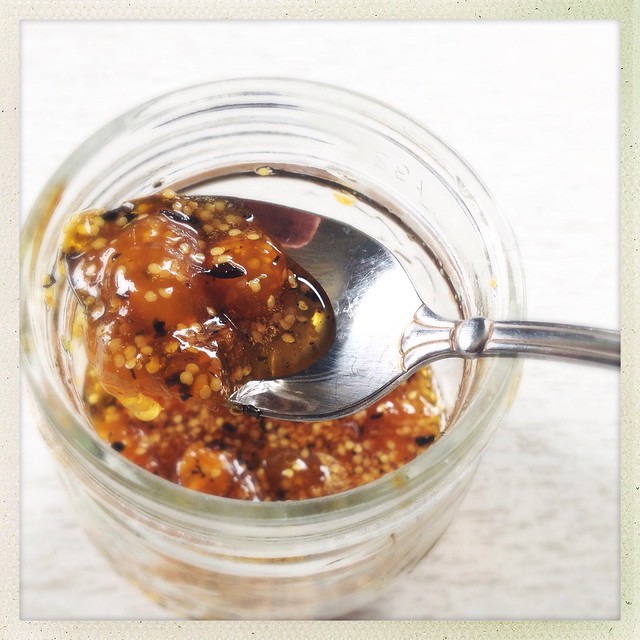
Before experimenting with canning whole ground cherries, I did do up a little batch of the Chai Flavored Ground Cherry Preserves I made last year.  I forgot how great it was - and I think this batch was even better because I used a premium loose chai tea.  On buttered sourdough toast, I can't think of a better way to welcome fall.

chai flavored ground cherry preserves.

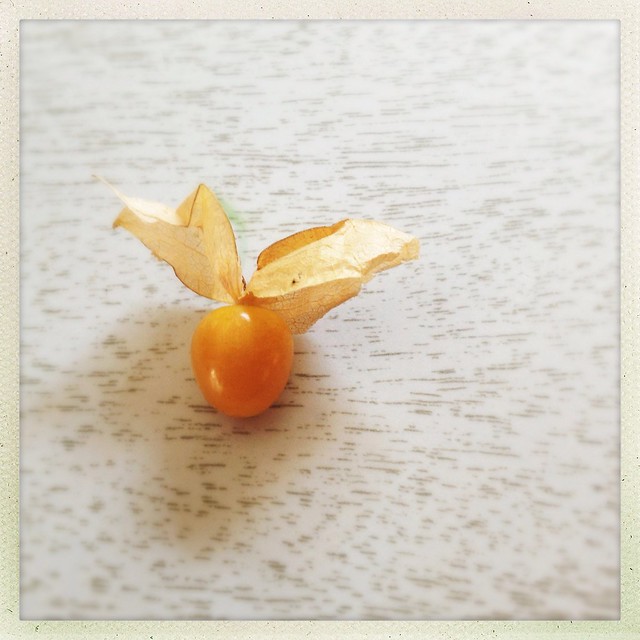
So my week-long project of processing ground cherry is complete, and in retrospect, I feel kind of bad for wondering aloud why my Mom would grace me with so much of this beguiling little fruit.  As I sat peeling back their little parchments I had plenty of time to think - and plenty of time to appreciate my parents and how thoughtful they both are, even when I am tired and sometimes say the wrong thing.  The golden jars of ground cherries neatly tucked on the shelves will remind me to be thankful for so many things, the change in seasons, the quiet wholesomeness of working with my hands, the prosperity of Wisconsin's land in late summer.   Little fruits that grow in their own wrappers, appearing to take flight.

on wings.

Of Yellow Transparents and Dolgo Crabapples...

The other day my friend Deena told me (that one of her friends told her) that with kids you could do all of the same things as you could do without kids β€” it just now takes twice as long, and is half as fun.  I'm not sure about the half as fun part, but boy does the twice as long ring true.  

Last Saturday, I bartered a pan of cinnamon rolls for some overripe (but still sauce worthy) Yellow Transparent apples from Klee's Out on a Limb Acres.  Standing out in the orchard, the baby resting in the shadow of an apple tree, chatting with Omer about things was just about the best way to spend a Saturday morning, and as I had suspected even before leaving home, I was inspired by the ripening orchard and came home with more than I figured on.  All in all I've been pretty good this year about not over-preserving especially the sweet spectrum of things.  But when my new orchardist friend was telling me about Dolgo crabapples, how beautiful the jelly is that they make, how he used to help his grandmother pick them for preserving and ate so many in their un-sugared tart state:  I just had to get some to play around with.  One smell of them sealed the deal.


dolgo crabapple

Then I ate one fresh from the tree.  Though super tart, once my mouth was accustomed to it I could really taste how they could be transformed into something amazing, if not just eaten plain as Omer did as a child.  They were beautiful looking as well, like near red balloons when freshly picked.  As they sat around my house for a few days, they seemed to deepen in color.  They infused the lot of my preserving this week with their cheerful bright pink.  

After getting home Saturday afternoon, I steamed down 4 pounds of them right away and let the juice strain for jelly.  I'm quite sure I've never worked with a fruit with such a good amount of natural pectin, the juice was silky and thick, bracing to taste on its own, but really not unpleasantly sour.  I got to making the jelly yesterday and got almost 4 half pints... I may have over cooked it just a little, but I'm not worried about it since the flavor is so good.


crabapple jelly
crabapple jelly.

I still had quite a few crabapples left over, and I remembered my Dad saying how much he liked whole spiced crabapples that his grandmother used to can.  Never having tried one, I tried not to remember the awful, fake red spiced apple slices that I'm sure I've eaten on more than one occasion at a Friday night fish fry with endless salad bar.  I looked in my Ball book to see about that, and settled on a recipe that looked pretty straightforward and old-fashioned.  I added ginger and used powdered allspice after there were no allspice berries to be seen at my co-op this morning.  The result was amazing, just like I knew it would be... and not at all like those garish nibbles on the side of a Friday night salad plate.

spiced whole crabapples

Whole Spiced Dolgo Crabapples (adapted from Ball's Complete Book of Home Preserving)
yields 5-6 pints
  • 8 cups stemmed Dolgo crabapples, pricked with a fork (about 4 lbs.)
  • 1 cinnamon stick
  • 1 T. whole cloves (place them in a tea ball, or tie in cheesecloth)
  • 1 t. powdered allspice
  • 2 fat coins of ginger, each about 1/4 inch thick
  • 4 1/2 c. granulated sugar
  • 3 c. water
  • 2 1/2 c. white vinegar
In a large preserving pot, combine spices, ginger, sugar, water and vinegar.  Heat over medium high heat, stirring occasionally to dissolve sugar.  Reduce heat, cover, and simmer the syrup for 10 minutes.  Add crabapples and return the syrup to a boil, stirring very gently once in a while.  Reduce the heat and just simmer the crabapples until nearly tender, about 10-20 minutes.  (They might try to burst along the seam where you pricked them with a fork if the heat is too hot.  I aimed for "al dente" apples...)

Meanwhile, ready a hot water bath and heat freshly washed pint jars.  (I like to hold them in a 250 degree oven, and pull them out just prior to filling.)

When crabapples are tender, use a slotted spoon to pack them into hot jars, leaving a 1/2 inch headspace.  Ladle hot syrup into the jars to cover the apples, leaving 1/2 inch of headspace.  Release any air bubbles and adjust syrup level accordingly. 

Apply lids and rings, and process in a hot water bath for 20 minutes.  Remove the canner from the heat and let the jars stand in the hot water for 5 minutes before removing to a towel lined counter to cool completely.


spiced whole crabapples

Before I had even tackled the crabapples, I made my year's supply of applesauce.  Before a couple of weeks ago, I had never heard of a Yellow Transparent apple:  so named for the pale yellow skin that looks nearly invisible.  I found a website, Orange Pippin, that lists apple varieties, tasting notes, and other attributes, and found that the Yellow Transparents are a good bet for sauce.  When I finally saw the apples in person, Omer explained that they are notoriously short lived, and when overripe, they can pop almost like a kernel of corn.  First, he had me taste an overripe apple, which was mealy and lightweight for its size.  Despite the negative marks against it, it did have good flavor, and when I then tried a perfectly ripe apple, I could see why people seek out this gem of a fruit.  

yellow transparent apples
Overripe on the left, perfect specimen on the right.

Fortunately, even the overripes were excellent for sauce. I added several crabapples to the pot as I started cooking them down to infuse the sauce with a little pink color; the extra pectin in the crabapples was just a bonus, and the finished sauce was sweet-tart and silky.  I added no sugar.


Untitled

All told, I got 17 pints of applesauce, which I was very thankful for after not making any at all last year.  Not bad for a pan of cinnamon rolls!  I had my older son help me turn the crank on my Gram's old Victorio strainer, and after all of the sauce was finished and resting we helped ourselves to big bowls full of still warm fresh pink sauce.

So it's true it took me 4 days to work through what normally would have taken me about 32 hours or less, but it was still pretty fun.  Estimating the newest boy's sleeping pattern sometimes worked and sometimes didn't, and having an extra pair of hands to hopefully learn a bit about preserving and to help in the kitchen was nice too.  I sure hope both of my boys will grow up and be as excited as I am to see things growing and have the pleasure of preserving it!

Daring Bakers August 2013: Indian Desserts.

Aparna of My Diverse Kitchen was our August 2013 Daring Bakers’ hostess and she challenged us to make some amazing regional Indian desserts. The Mawa Cake, the Bolinhas de Coco cookies and the Masala cookies – beautifully spiced and delicious!

Bolinhas de Coco
Bolinhas de Coco

Where I found the time to do the Daring Baker Challenge this month, I'm not sure.  It could be that when I decided to check out what it was last week, I saw a vaguely Portuguese name for a coconut cookie... and of course I was sold. The sweets we were challenged to make were actually Indian in nature, and in the interest of time (and a bit of sleep deprivation on my part) I'll leave you to read what our host had to say about the history of the Bolinhas de Coco cookie.

As for my notes on the matter:  these cookies were really just okay for me.  I like cardamom, which were the main flavor component (other than the coconut), but these felt a little lacking.  They were at their tastiest just out of the oven; storing them even one day caused them to lose their macaroon-like crispy exterior/soft interior.  I thought the method of making them was unique and might be worth exploring more... but to tell the truth, I'm probably not going to get to that for a while!

Bolinhas de Coco

Read more about the challenge this month, get the recipes, and check out the blogroll for other participating bakers.  Maybe next month, I'll have a bit more time to dedicate to the Daring Baker Challenge.

Bolinhas de Coco

Sourdough Surprises August 2013: Crackers

I was kind of glad that the Sourdough Surprises item-of-the-month was crackers.  I think I've consistently made sourdough crackers ever since I started my sourdough starter, in September of 2010.  In those early days of sourdough experimentation, I was obsessed with finding ways to use up my discard starter - probably because I had so much of it in the beginning.  It took me some time to be more efficient with my feedings and management of my fledgling starter, and pancakes and crackers became a staple part of my kitchen life.

sourdough crackers.

The recipe I first found for sourdough crackers is still the one I use most frequently.  I've gotten so good at making them that I rarely even measure, I just mix them up according to feel - and they always turn out good.  I always let the dough rest for at least 7 hours (making them a fully cultured snack with reduced phytic acid in the grain), but usually it ends up being a whole 24 hours.  On occasion, I've let the dough sit in the fridge for a couple of days before getting around to rolling them out, and that works too, though remember that you need to allow an hour or so for the dough to come back to room temperature before rolling it out.  The longer resting times make for crackers with a little more tang, but that is fine with me.

sourdough crackers.

My best advice making these is to invest in a silicone baking mat.  I found mine for a well-spent $11 at a restaurant supply store, and I can roll the dough out directly on it without bothering with wrinkling parchment.  I use this pastry roller, which was another rummaged gift of that bread genius, ex-boyfriend's mother.  She really was an inspiration to me in the baking department, and I like having little remembrances of her in this tool I use so often.

I've made these crackers with all sorts of flours, but prefer them best with plain old whole wheat.  I've also made them with both butter and coconut oil (and olive oil too, if memory serves), but I like coconut oil the best.  When I have quite a lot of discard starter I'll make a double batch; I've found that for a single batch I can fit exactly half of the dough on the silicone baking mat, so double batches take me much longer to bake.  I really need to invest in another baking mat to bake more efficiently.  Meanwhile, I try to schedule my cracker baking when I have something else to go into the oven as well.

sourdough crackers.

  • 1 c. discard sourdough starter (any hydration seems to work fine)
  • 1/4 c. melted coconut oil (or butter, olive oil) (if the coconut oil is spreadable consistency, I sometimes don't even melt it)
  • 1/2 t. kosher salt, plus more for top
  • 1/2 - 1 c. whole wheat flour
  • olive oil for brushing the tops
Combine starter with coconut oil and salt and stir well to combine.  Begin to add whole wheat flour, starting with 1/2 c., and stir or use your hands to start kneading it in.  Continue adding enough flour to create a sturdy dough that is smooth and not sticky, but don't add so much as to make it dry.  Form the dough into a ball, place in a clean bowl, and cover well with cling wrap.  Let stand at room temperature for at least 7 hours before rolling out into crackers, or storing in the fridge for up to 2 days.

Preheat oven to 350.   Divide the dough in 2 pieces.  Working with the first piece, roll the dough as thin as you like, I like to make the amount of dough fit the entire sheet pan - which makes them very thin (1/16").  I like to roll on a silicone baking mat as I described above, but you can roll between two sheets of parchment paper.  Use a pizza cutter to slice the crackers into squares or rectangles, and transfer the sheet to a baking pan.  Using a pastry brush, brush the top of the cut crackers with olive oil and sprinkle with additional kosher salt.  Bake for 20-30 minutes depending on the thickness of your crackers.

sourdough crackers.

 I have also tried adding a few spices to this dough, or just to the tops prior to baking... but really none of those experiments stand out.  I just like these as plain crackers, to munch on their own or with thin slices of cheese.  They also keep an amazingly long time - if they don't disappear first.  I store them tightly sealed in quart size canning jars.

round sourdough crackers
 I have cut fancy shapes from them, but it takes a bit longer than just cutting squares or rectangles...

sourdough cracker ends
...but then I just baked the ends right next to the rounds so I didn't waste any dough (and didn't take too long transferring them to another pan to bake).

I'm really looking forward to seeing what other group bakers used for recipes!  While I do truly love this recipe, I could stand to break out of my mold.  But if I could ever recommend a single quick and reliable recipe to use up a cup of starter (and that is fully cultured to boot) this is definitely the one.

Tart Cherries, My Cookbook.

tart cherries

During the last month of my pregnancy, I was obsessed with the idea of tart cherries.  As I mentioned before, last year was a wash for finding any and I was hungrier than ever to find some.  Just after my new addition, I got several pounds of fruit from neighbors, and just last week I had the opportunity to buy a bulk quantity of Door County tart cherries as I did two years ago from Cherryland's Best.  Perhaps the best thing about buying a pail of tart cherries from them is that they are already pitted, and swimming in their own juice.  I appreciated that extra bit of work was already done, especially since it seems that whenever I try to tackle something that could require some attention, one very small, fairly new human being seems to need my undivided attention.  And I am the mama who will stop everything to oblige.

Fortunately, the day of the cherry drop off I was blessed with a sleepy boy who napped away the afternoon as I worked my way through the 27 lb. pail.  I broke 2 quarts in my haste of getting the quarts of whole cherries into the hot water bath (but to my defense, those cherries were chilly!), but somehow I was also blessed with both the patience to clean up my mess of epic proportions and the perseverance to continue on to the bottom of the pail.

That day yielded 6 quarts canned in extra light syrup, and one small and very sweet batch of a Black Forest sauce I found in the Ball Preserving book and added some almond extract to.  It is going to be very good on some chocolate cake or vanilla ice cream.  It didn't really gel up like I expected, but it is great as a medium thick sauce with chocolate and unsweetened coconut, and some of the cherry brandy that I made last month with neighborhood cherries.

I started to turn 2 lbs. into drinking vinegar, which when mixed with selzer water is my favorite cocktail these days.  It is sweetened with the same sugar I'm trying to reduce my consumption of, but I make concessions for it because I'm not drinking kombucha right now - and the vinegar fools me well enough.  Vinegar is also a detoxifying agent, but I suspect not in the same way as kombucha (let me know if you know otherwise)...  It appears I do crave some fizzy drink with tart/sour kick almost every afternoon.  At least it is something I've made myself.

tart cherries, vinegar.

soaking in vinegar.

To make tart cherry drinking vinegar (or any fruit flavored vinegar), I combine the ratio of 1 lb. fruit to 1 cup raw cider vinegar (Bragg's).  Let it steep for 5-7 days, strain it, then measure the liquid.  For every cup of strained vinegar, add 3/4 to 1 cup of sugar depending on taste.  I heat it very gently so the sugar dissolves, but well below the temperature of pasteurizing the raw vinegar, then cool and store in re-purposed glass bottles.

I cheated somewhat and froze the remaining cherries in 1 1/2 lb. bags with some of their juice.  I then tucked the remaining near-quart of cherry juice in the fridge - with the consideration of making cherry jelly, but then noble declination when I'd realized I'd already exceeded the number of jars of sweet preserves I want on my shelf this year.  I'll just drink it, or maybe freeze it in ice cube trays to keep other drinks cold and pink.

 Untitled

I spent the weekend out at my Parents farm, both boys and husband in tow.  Just before I left the city, the day of the cherry drop off in fact, I got the first copy of my cookbook in the mail.  It hit me as being real - that I wrote and photographed a book that was actually going to be for sale.  And even better was the feeling that came when we found my name on Amazon, and I found out my husband was checking it twice a day every day since, checking up on my "rating" which is in the hundreds of thousands, but it doesn't matter because him being so proud of me is the best feeling ever.

the cover.

The book is a small thing, almost pocket sized, but very readable with some of my most favorite concoctions in it.  Some are recipes that have appeared on my blog, but some are new things I developed especially for the book.  I was happy to also include several lacto-fermented recipes, like this Cilantro-Raisin Chutney which could be my favorite thing ever.  Or one of my favorites, anyway.


It will likely be available in September, but is already available for preorder on Amazon.  I will also have copies for sale on my site, or you can order directly from the publisher, Peter Pauper Press. I will update this site and the CakeWalk Facebook page when I know more!

As I hold that little book in my hands, I keep thinking that if I never had kids I wouldn't be looking at it.  I may still be working 60 hours a week somewhere, having never discovered the mysteries of sourdough, bubbly ferments, long cooking slow food.  I might never have owned the preservationist title, and instead rested on the laurels of my Mom and Gram rather than embracing the lifestyle I now have:  one of hard work at home that was definitely inspired by them and their love of taking care of family.  

Those little boys that entered my world, they made so many things crystal clear for me, but there is more to come that is still hazy.  Where I'm heading next with an infant in tow, I do not know.  It's a good feeling to provide for them in tangible ways, and what an amazing feeling to write things into existence that I hope people use and are inspired by!