Sourdough without a recipe.

The sourdough has become so much a part of my life that now it's hard to remember a time without it.  But if I do think back, I remember the sinking feeling that I would never master it, that I would continually have too much waste (or rather discard), and never really have something that I would be proud to share.  Working with things continually is the best education, and my daily walk with sourdough has taught me so many things.  Deep things like patience, scientific things like the power of leaven, and superficial things like the cosmetics of slashing.  There are probably one hundred other things - it's been a very well-rounded education to be sure.

Just when I think that I should delve into new technique or hydration, branch out into other grains or even tackle something gluten-free just for the sake of learning, sourdough has other more basic things to teach me.  My confidence in my own intuition is sometimes lacking, and these past few weeks that leaven has showed me that I know more than I think I do.  It has given me baking confidence.

sourdough cracker

In efforts to entice my husband to healthier snacking, I've taken to more scheduled cracker making.  I've made them pretty much the same way for a very long time, more or less using this recipe.  I don't know when I stopped looking at the actual recipe, and just starting winging it, casually spooning in room temperature coconut oil and usually forgetting the salt by accident, adding whatever flour is handy.

Sometime after my Tartine #3 book came, I oogled Chad's gorgeous windowpane-thin "crackerbreads", but wasn't so enthusiastic with the way his recipes were written.  And meanwhile, I had made crackers with the 80% hydration starter that I base my bread on.  It seems less water in the cracker dough to begin with helps in the rolling out, and I was finally able to run the dough through my pasta machine without wondering why I bothered with the big mess.

Just a couple of weeks ago, I stumbled onto my new preferred method, a foolproof way of easier crackers, without any waste or as much mess.  To whatever measure of 80% starter I have to use, I mix in a few spoonfuls of room temperature coconut oil and mash it with the back of a spoon as best I can.  Then, I mix in flour until a nice dough forms, and try to remember to put in a heavy pinch of salt too.  I knead this by hand on a bare countertop for several minutes, rolling the dough strongly with my palms to melt any little bits of coconut oil that is still solid.  I might notice it needs more flour, but I try not to add too much - figuring that like pasta and tortillas, a cracker is most tender and delicate with less flour instead of more.  Then I let it rest for 8-24 hours before running through the pasta machine.

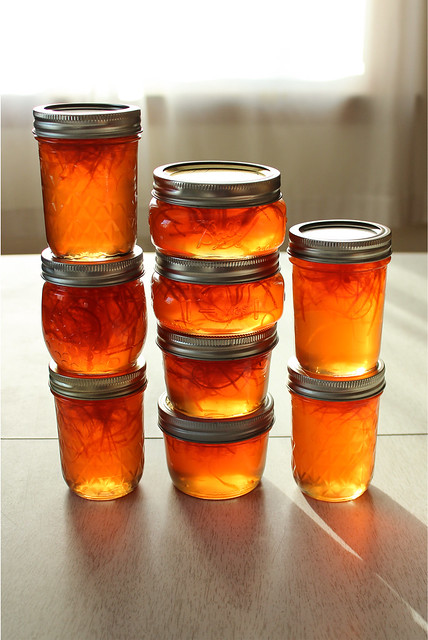
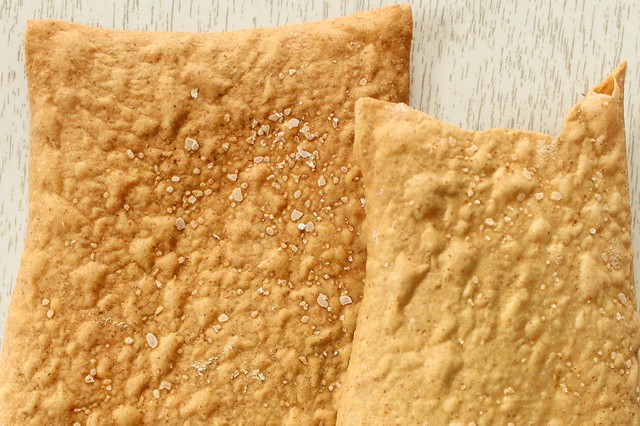
Instead of cutting the crackers into little diamonds, I started baking them in whole sheets and instead of brushing them with olive oil and sprinkling with salt, I sprinkle them first with (kosher) salt and then spritz them water to help the salt to stick.  I bake them at 350 until golden or dark golden brown depending on what other things are going on around me.  After cooling thoroughly, I break them into rough shards and store them in glass jars.

(To make my 80% hydration starter, I follow Ken Forkish's ratio in Flour Water Salt Yeast.  For 2 loaves of bread I've scaled it down to this:  50 g. 100% starter, 50 g. whole wheat flour, 200 g. ap flour, and 200 g. 95 degree water.  I mix it about 6-8 hours before building bread or cracker dough.)

sourdough "cracker"
They bake into brittle thin sheets, and depending on how long I've let the dough rest they can have a nice sour tang to them.

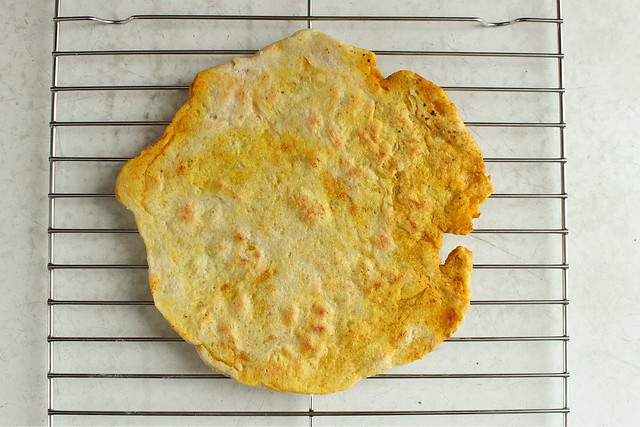
Yesterday, I mixed up enough 80% starter for 3 loaves although I was only going to make two.  When I set to working the bread, I also mixed up some cracker dough.  By this morning, the dough had risen out of the container signaling both the well-fed nature of the culture and the how-can-it-finally-be-spring feeling of warmer outdoor temperatures.  I knocked it down a couple of times, and it kept growing back - and then I had the idea of making it into flatbreads for lunchtime.

I mixed up some mid-eastern inspired spice mix based on the msemmen from Artisan Bread in 5 Minutes a Day, and pinched off a few ping pong ball sized pieces of cracker dough.  I rolled them the same way I did the msemmen, and baked them several minutes per side in a cast iron skillet.

sourdough flatbread

They were crunchy in some places and soft in others and perfectly spicy.  I realized that I'd forgotten the salt in the cracker dough, so I sprinkled more on top and pressed it in.  I don't know why it's so hard for me to remember that lately; I have stopped the practice of nibbling a small bit of raw dough, and I think I need to take that back up.

I'm not sure how well these would keep - but given how simple they are to make on demand you wouldn't have to worry about that I suppose.  Instead of letting the dough rise at room temperature after mixing it, it might be a good idea to refrigerate it right away.  I'm assuming that instant flatbreads could be yours for the next 48 hours before the yeast tires.  If you were to bake the breads more thoroughly, say on a pizza stone, and let them crisp up fully, their keeping power would increase.  But I say make and eat liberally on demand.  There aren't nearly enough breads eaten directly from pans, moments after baking transforms the raw dough...


sourdough flatbread
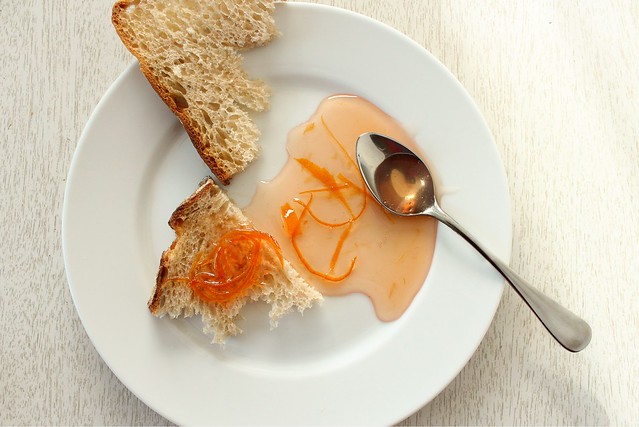
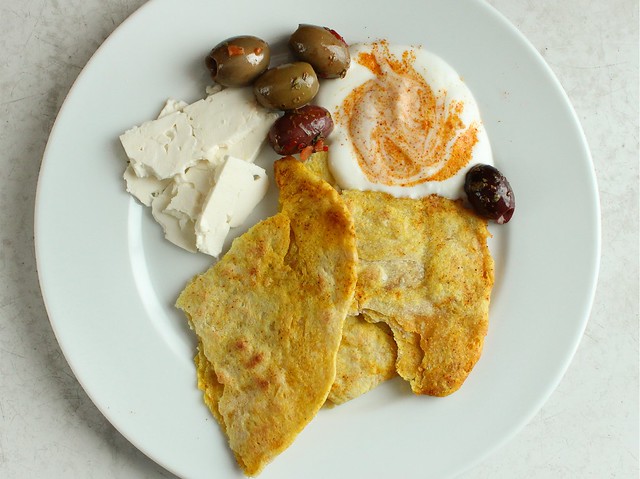
Perfect eaten with feta, chile olives, and some delicious homemade yogurt my friend Mary gave me: I added a little of the msemmen spice mixture to it.

The sourdough is a teacher, always providing me lessons in life and good eating.  When I work with it, I often think back to a conversation more than 20 years old that I can't quite remember.  My Gram was the first to tell me about capturing wild yeasts, though I'm not sure she ever used it to bake wild yeast bread.  That day she told me about trying to find a favorable culture by leaving a piece of bread out in the woods is like a dream at this point, I remember where I was in her house when she told me, and I remember conjuring exactly where in the woods she was placing that slice of bread, just past the edges of her sprawling garden.  Like a dream, I can't quite put a finger on any more detail than that and I wonder about it all the time.  Is it in my blood to be so curious about natural cultures?  Did the wild yeast also have lessons for my Gram long before I ever would have suspected it had lessons for me?  Either way, it has turned from a unknowing teacher to a carefully chosen mentor, one I respect deeply, and one I hope to continue learning from for the rest of my life.

Salad Dressing Cake.

I guess it all started when I wanted a tuna sandwich for lunch one day last week.  I love tuna sandwiches, but I hate hate hate the conundrum of purchasing mayonnaise.  I like lacto-fermenting my own, but haven't done that so much since I made the commitment to higher quality olive oils.  I don't have any "neutral flavored oils" in my kitchen arsenal at all anymore; if it can't be made with butter, olive oil, coconut oil or bacon grease, I probably will opt out.  But that tuna sandwich was nagging me, and I recalled this recipe for super quick mayonnaise made with a whole egg and an immersion blender.  Armed with a new bottle of olive oil, I figured I'd give it a go.  I didn't have any purchased mayo on hand, so it was my only option if that tuna sandwich was going to become a reality for me...

salad dressing cake

To the basic mayo recipe, I added a spoonful of dijon mustard and extra lemon juice; the recipe did work (although the texture wasn't quite as lovely as the yolks-only, lovingly hand whisked versions).  My only complaint was that the quality extra virgin olive oil I used made the mayo seem a bit too rich and mineral-y.  It was edible, but I didn't want to go through the trouble of lacto-fermenting it, and I didn't have a good excuse to go all out on a mayo binge to use up the cup or so I had leftover.  I also didn't think I could pass it off on the rest of the family - I have one kid who can't even eat condiments yet, another who won't eat them out of choice, and finally a husband who is a harder sell than I am.

Fortunately I remembered about salad dressing cake.  Salad dressing cake could very well be the first cake I ever made myself, mixing the simple, pantry-staple ingredients with a whole cup of mayonnaise, Miracle Whip actually, which was what we called mayo at my house growing up.  It was proof that miracles do indeed exist.  How on earth could you make a chocolate cake with a cup of sickly sweet and thick Miracle Whip that left no trace on the tongue of mayo?  How could you make a cake that was so perfectly full of moisture, a good keeper at room temperature or in the fridge, and barely messed up the kitchen?  It's magic.  And I'm glad I remembered it now. 

salad dressing cake

You can frost this cake however you see fit, but I can't properly enjoy an everyday chocolate cake at my house without a simple butter infused, powdered sugar based buttercream spiked with almond extract.  I don't ever measure, I just try not to make too much, and if I do, I store the leftover in a glass jar until I need to make another cake - which will then usually happen sooner than later because I have extra frosting.  It's a vicious cycle.

I also encourage you to make immersion blender mayo with 100% olive oil for this recipe.  You get a nuance of olive in the background for those that are interested in tasting it, yet it's subtle enough that the rest of your family won't go noticing it.  They'll just think you made the best chocolate cake ever.

Salad Dressing Cake
makes 1 8x8 inch cake
  • 2 c. ap flour
  • 1 c. granulated sugar
  • 1/2 c. cocoa powder
  • 1/4 t. kosher salt
  • 2 t. baking soda
Preheat the oven to 350 degrees.  Butter a glass 8x8 inch baking dish.

In a 4 cup measure (or medium sized bowl), combine the mayo, cold water, vanilla, and espresso powder if using and stir well to combine.  (I still had a dirty immersion blender from making the mayo, so I used it to blend the wet ingredients.)

In a large mixing bowl, sift or mix well the dry ingredients.  Pour the wet ingredients over the dry and stir until just mixed thoroughly and no dry spots remain.  Use a spatula to ease it into the prepared baking dish, and smooth the top out towards the corners to counteract some of the doming action in the center as the cake bakes.  Bake in the preheated oven for 35-45 minutes, until a tester comes out clean.  Cool completely before frosting.

salad dressing cake


Sourdough Surprises: Monkey Bread

Monkey bread.  A pretty straightforward breakfast sweet, whose charm lies in the communal, pull-apart nature of the finished loaf.  I've never made monkey bread, but I have made many pans of cinnamon rolls, and thanks to Sourdough Surprises I had also made babka.  I married the two for this challenge, basing the monkey bread on Nancy Silverton's brioche recipe and hastily mixing up some sugared cinnamon to roll the portions in before letting them rise in a bundt pan.

sourdough monkey bread

I forgot how much I loved Silverton's brioche recipe.  I halved the recipe and ended up with about 2 lbs. of dough, suspiciously perfect for one 12-cup bundt pan.  I planned it out 3 days before Valentine's day, so I could bake it for a somewhat special morning.  This bread is not unlike a soufflé in that it tastes best moments after leaving the comfort of the oven.  When pulled apart barely cooled, the little puffs of dough taste feather light, a quality that leaves soon after the heat is gone.  I wouldn't say it's any less delicious when cooled, just different.  But that said, I'd probably recommend planning ahead to appropriately devote the morning to enjoying it.

sourdough monkey bread
monkey bread

Since I recounted the recipe for brioche on the babka post, I'll not post it here.  I used half measurements, by conventional weight, and my yield on the dough was almost an even 2 lbs.  I portioned the dough into 1 oz. bits, then rolled each into a taut ball.  Meanwhile, I had melted about 4 tablespoons of unsalted butter in a pot on the stove.  I also had mixed a dish of approximately 1/2 c. brown sugar, 1/4 c. granulated sugar, a few generous shakes of the cinnamon jar, a pinch of cloves and a pinch of salt.  When all the balls were ready, I rolled them first in butter and then in the cinnamon sugar and then positioned them concentrically in a well buttered 12-cup bundt pan working from the center out.  I sprinkled any leftover sugar mixture evenly over the top, taking care to let some fall down into the crevices. When the dough appeared about half risen, I preheated the oven to 350.

unbaked monkey bread
monkey bread

I baked the bread for about 35 minutes if I remember correctly.  I checked the internal temperature when the top looked nicely browned, and it was around 200 degrees, so I figured (correctly) that it was done.  I let the bread cool in the pan for 5 minutes before inverting it onto a plate - during which time I could see the bread settle down into the pan and shrink back a little bit.  After inversion I was surprised at how beautifully glossy the top became; this was short lived, since I didn't go overboard with the sugar and it absorbed into the tops of the puffs as they cooled more completely.

I was also surprised how much the dough rose. I know I shouldn't have been, but I guess 3 days of preparation and waiting, and then the beating the little portions into submission... I thought I had worked all the life from the bread.  Sourdough continually surprises, it has a deep life that is hard to beat back.

This bread is really not all that sweet.  I mean, it is sweet, but it's not tooth-achingly sweet.  It's a polite sweet that tricks you into eating far too much.  I had 32 light little puffs of portioned dough and they didn't last long...  I didn't eat them all myself if that's what you're thinking, but I certainly could have.

sourdough monkey bread

I'm excited to look around at the other ideas this month.  I know I could have taken monkey bread to a savory place, but I just couldn't bring myself to do it.  I'm curious how many were brave enough to tackle that!


Mixed Citrus Marmalade.

I think I may have found the secret for bringing the sun back to our winter, and it's making marmalade.  I'm not talking about the sunny feel of the citrus or the sunny completion the finished preserves take on, I'm talking about the actual sun.  It's as if making a batch of this stuff actually worked as some variation on a rain dance, coaxing the sun from wherever it has mysteriously disappeared to the past several weeks.  I made this yesterday morning, and I've seen more sun streaming through my windows in the past 24 hours than in the past month.

marm jars

I've been patiently waiting to see organic blood oranges for about a month, and I just found them in my co-op last week.  I like to make at least one bright, citrussy thing in the winter, because it seems like there is all this time to fill - and there is no disputing that winter citrus is king of the fruit world.  Every November, like clockwork, I begin trying to squelch the absolute need I get for a good grapefruit, and by January they are hitting their stride.  Oranges seem to be reliably good from December on and I eat at least one a day, usually in my morning smoothie with plenty of ginger and sometimes some blueberry.  Cara Cara oranges pop up around January with their cross-flavor of sweet and tart; they're meaty and deep colored, but not as red as the blood orange.  Blood oranges appear last in my northern neck of the woods, and as Linda Ziedrich aptly said, they have kind of a berrylike essence.  I like that they aren't so sweet.  

blood oranges. 

And I like that I had my eye on a mixed citrus marmalade recipe in Diana Henry's new book Salt Sugar Smoke which focused on all my favorite types of citrus.  Her recipe called for Seville oranges, which I can't say I've ever seen here in Wisconsin.  I used navel oranges instead - and changed up her recipe a little in other ways too.  She used a method for making marmalade that I'd not used before: letting the peel soak in the citrus juices and water overnight before cooking down.  I like starting things the day before, so this was a favorable way to do things.  I'm not sure if it had much flavor contribution, but this turned out so well I'll likely do it the same way in the future.

She calls it "Nick's Good Morning Breakfast Marmalade", so named for Nick Selby who is a master jam maker and the English grocery and kitchen Melrose and Morgan, who gave her the recipe.  One taste makes me want to hop right over the pond to visit them in person, I'll tell you that.  My version strays slightly from the British originals, but it is still lovely.  Silky, barely set, and perfectly sunny in the deepest part of this never-ending winter.


citrus zest

Begin the day before, since the peel needs to soak for 8-12 hours.  I always weigh sugar in metric weights, so I can mix types and not worry about keeping track.  This one calls for 10 cups of sugar, which is ridiculous for my continuing quest at sugar consumption reduction, but it's absolutely worth it.  Use a raw sugar to feel a tinge less guilt.  Sharpen your chef knife to get the thinnest shreds of peel possible, and remember that organic citrus is best since you are eating the peels. 

Mixed Citrus Marmalade (adapted from Diana Henry & Nick Selby)
yields about 10 half pints
  • 1 pink grapefruit
  • 4 blood oranges
  • 3 navel oranges
  • 4-5 lemons total, divided (to equal 2/3 c. lemon juice and some zest)
  • 10 c. granulated or raw sugar (1916 g.)
Wash all citrus well.  Using a peeler, carefully peel grapefruit, oranges and 1 or 2 lemons (your choice), leaving as much of the white pith behind as possible.  Stack the peels and slice into thin shreds.  Put them into a large preserving pot (5 quart).

Next, juice all the citrus except the lemons into a large measuring cup.  Save the pulp and any seeds and tie them up into a square of cheesecloth.  After you have all the citrus juiced, add enough water to equal 10 cups and pour over the peel in the preserving pot.  Add the cheesecloth bag of pulp and seeds to the pot, stir well, and put a lid on it.  Let it stand 8-16 hours before continuing.

When ready to continue, prepare a hot water bath canner (and jars) and juice lemons to equal 2/3 c. lemon juice.  Measure out the sugar and have it standing by in a bowl.  Bring the preserving pot to a boil over medium high heat, then reduce heat and simmer, letting the peel cook until it is tender and the liquid has reduced by half (to 5 cups).  The peel will likely be soft sooner than the liquid reduces, so keep an eye on it and remove the peel with a slotted spoon or spider when it's done.  The whole process should take about 90 minutes.

After the liquid is reduced and the peel is soft, remove the cheesecloth bag and discard.  Stir in the lemon juice and sugar and stir to completely dissolve.  Bring back up to a simmer over medium high heat and skim any foam that forms.  After skimming is complete, add back the peels.  Stir frequently, and simmer until the marmalade gets to the set or gel stage (220 degrees, I let it go to about 223 degrees, it's not a heavily set preserve however.) Once it hits the gel stage, remove from the heat and let stand for about 10 minutes as you ready your sterilized jars.

Fill jars leaving 1/4 inch headspace and process in hot water bath canner for 10 minutes.  Remove to a towel lined counter and cool completely.

zests.

I left one jar uncanned to enjoy now, but the yield was right on.  I always have trouble distributing the peels evenly among the jars, but I suppose that's OK.  The peel of the grapefruit in particular adds a lingering bitterness that some might not love as much as I do.  When I consider giving away a few jars, I'll keep that in mind and hold back the ones for myself with the most peels!  Diana Henry said she reserves this marmalade specifically for morning toast, but I think the color and texture would be perfect to top a plain cheesecake or small tart.  I also think the thick syrup would be good mixed with seltzer water.  But I'll probably take her lead and hoard the jars for morning toast or other morning confections.  It's making me want to make a fresh batch of croissants or maybe some sourdough biscuits...

marm spoon

About CakeWalk

The CakeWalk name originated in my head one day as I was walking.  I do like walking, and food can be easy if you enjoy it tremendously, kind of like a cakewalk.  And, I do adore cake.   Then I discovered that in addition to being an easy dance or a task easily accomplished, it was also a company on the east coast that develops music production software.  If you are looking for electronica, let me tell you, you are in the wrong place. While I have a great fondness of music of almost any type (but with a special nod to jazz), I also love to cook and bake, and this is the CakeWalk I have become.

When I began CakeWalk in April of 2009,  I was basically looking for a good outlet to obsess at length about all of the foodstuffs that I was nonchalantly emailing my friends.  I didn't realize that what I was sending every few weeks to that select few was the beginning of my online life.  In the duration of my first year as rcakewalk, I found even more than I bargained for:  new friends from all over the place and hundreds of bookmarked recipes from blogs around the planet.  My second year found me diving deeper into whole nutrition, making even more from scratch and changing my once negative views about heavy cream, butter, and coconut oil.

Year three began with commitments to only homemade ice creams in the freezer and purchasing mostly local and sustainable eats.  I had an itchiness to figure out home cheesemaking, deepen my understanding of wild yeast breadmaking, and possibly to build a still in my basement.  As years four and five dawned, the still hadn't been built, but then I found out that it would have been illegal anyway.  Cheesemaking was still on the list, but I had plenty on my plate - and then my second little son was born last summer, 7 years to the day after my first.

I've now hit my stride both online and in the kitchen.  Most everything eaten in our home is from scratch, and I continue to read voraciously on diet and whole health as it pertains to our food system.  I attracted the eye of a publisher, and wrote a canning and preserving cookbook which was released last fall!

Continue to follow my day-to-day operations as I make most of it from scratch. I am thankful for the little and the lot as I continue to learn and make, obsess a bit over whole health and true whole foods, and try to articulate just why it is I love to be in the kitchen so very much.